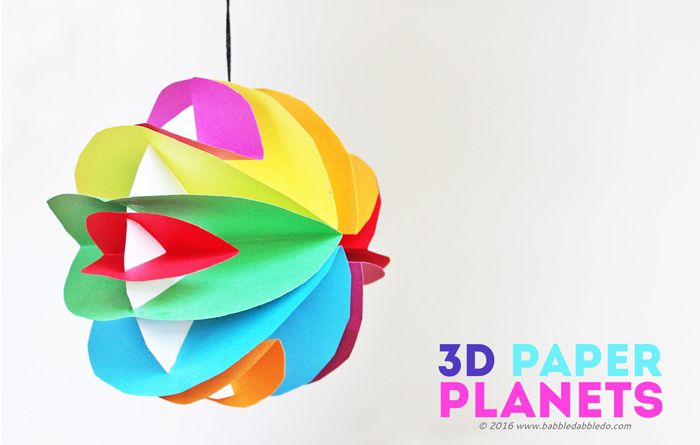
Want to turn a simple sheet of paper into some 3 dimensional magic? If you have little astronomers in the making, this easy planet craft for kids, Paper Planets, is a great exercise in paper crafting AND looks pretty cool as a hanging decoration in any future astronaut’s bedroom!
Note: This post contains affiliate links.
I first stumbled across this idea in one of my favorite books The Best of Making Things: A Hand Book of Creative Discovery as part of their the 3D paper objects section. I thought these looked wonderfully “cosmic” and had the double bonus of being an excellent fine motor skills craft.
Planet Craft: Paper Planets
Materials
- Colored Paper
- Scissors
- Pencil
- Circular objects Used to trace circle shapes
- String
- Glue
- Hole Punch
Optional to make it glow:
- Glow-in-the-Dark Paint
- Q-tips or paintbrushes
Instructions

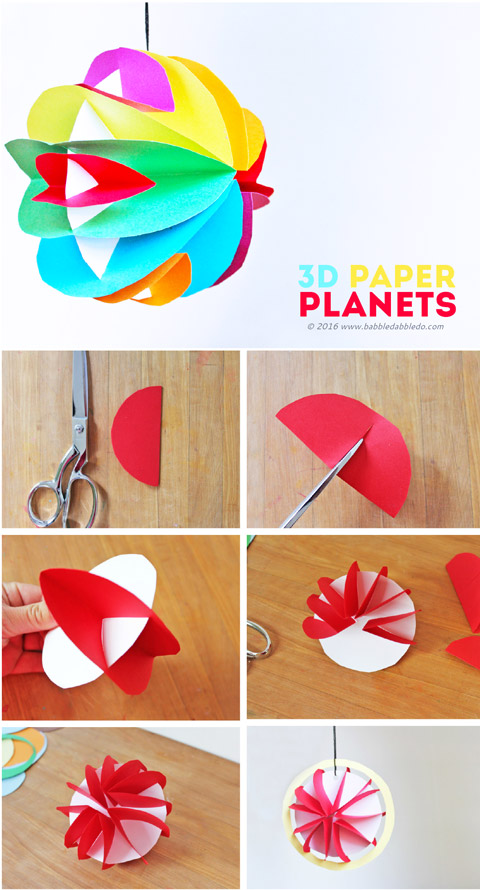
- Step One Trace circular objects on your paper. We used some cans and food containers. Cut out circles.
- Step Two Fold one circle in half.
- Step three Cut a slit down the center of the circle stopping short of the edge by about 1/4″.
- Step Four Cut slits in additional circles.
- Step Five Take an uncut circle and begin sliding the slit circles onto it.
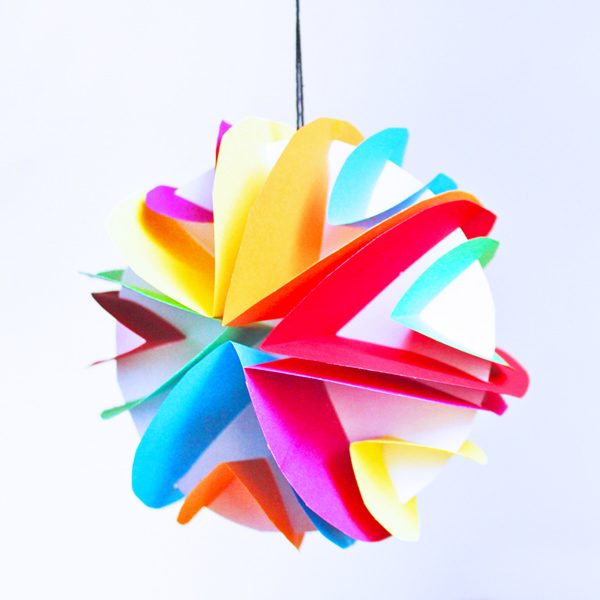
- Step Six Continue adding slit circles until you get the shape you want. If you cut different sizes of circles you can layer them on the main disc.

- Step Seven Add a little glue if you want at the connection points to secure everything in place.
- Step Eight Optional Using a Q-tip or paintbrush add glow in the dark paint to your finished planet. Your best bet for glow in the dark effects is to paint dots of paint onto the planets. We tried painting some of our circles with a coat of paint so that the whole planet would glow evenly but when the paint thins out it’s less effective. The paint does not dry entirely clear so make sure you paint it on nicely. I obviously didn’t do that here!

- Step Nine Punch a hole in the top of the main disc
- Step Ten Thread your string through the hole and hang.
What I found most valuable about this paper planet craft was the introduction to 3D forms using a simple 2D material: Paper. Most people do not think of paper as a 3 dimentional material but with a few cuts and folds it is one of the best materials you can use to quickly and easily create interesting 3 dimensional shapes.
If this project piques your child’s (or your own) interest in what you can make with PAPER check out these 60 Rockin’ Paper Crafts for even more projects to try using this humble material.

Wow an awsome project! And there’s so many way to costumize it with printed paper also. Didn’t knew that book, Thanks for the tip!
Sjovt at se dig her 🙂
Thanks! Using different papers really opens the possibilities up!
What a terrific project. I will definitely show my son this project. Love it!!
Thanks Katja!
How cool! These would be neat for a party too! Found you @Diana Rambles:)
Thanks Amy!
I love this! It is so different from the usual paper crafts – especially at a level for kids. Your glow-in-the-dark effect is a nice finishing touch too!
Visiting from Diana’s party…..
Thanks Joyce! Glow-In-The-Dark paint is a lot of fun to work with!
What a fabulous project!! Thanks for linking up to my Linky Party!
Fun idea…and great site!!!
Such an amazing result with just a few simple cuts! I love it and will be featuring it on The Crafty Crow!
Thanks so much Cassi! I love the Crafty Crow and am excited to be featured! You rock!
Ana
It looks like you made this with card stock. Do you think it would still work with construction paper?
Hi Amy,
Thanks for stopping by! I actually made them with heavyweight paper similar to construction paper so I think construction paper would also work. Let me know how it goes!
Ana
This particular paper craft looks so unique.I will certainly try and let you know how my little tiny tots enjoyed.
Please do Kanthi! Post a pic on our FB age of the finished product. I’d love to see it!
That sure looks like a fun activity for the kids. They would be all over this idea.
Thanks Lewis!
How fun! Love the colors!
Thanks Dana!
Ana,
The resources on this website are perfect ways for students to challenge their creativity. I shared this website in the STREAM resources in the Spring edition of Big Deal Media Technologies for K-12 educators. https://marketingprojectsinc.leadpages.co/opt-in-k-12-spring-16-bdbt-temp/
I also mentioned this site as a fantastic resource for classrooms that are looking for ideas to get students Making/Designing/Engineering in the classroom setting.
Keep up with the creative ideas! Thank you for sharing the love of learning and exploring a range of creative activities.
Love learning,
Karey Killian
@CoLIBRAtoRY
Thank you so much for including us!