Let’s learn how to make a paper helicopter! They are a wonderful and easy engineering project for kids!

This post contains affiliate links.
How to Make Paper Helicopter
NOTE: If you don’t have access to a printer follow the visual guide below.
Materials
- Template
- Construction paper or card stock
- Paper clips
- Tape
- Scissors

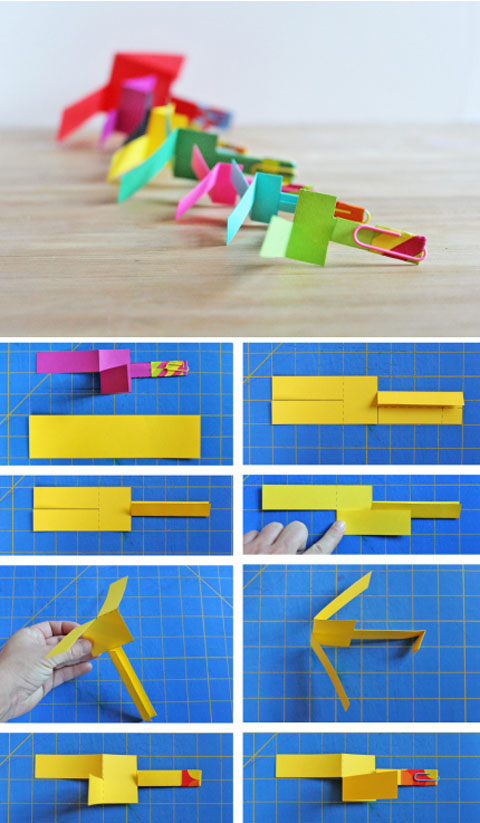
Guide: At first I was a little concerned that most of the templates I found for paper helicopters did not include measurements. Then we started experimenting with making them different sizes and the fun really began. We actually found that the bigger they were the better they flew. A 2″ by 8″ piece of paper was just right. Here are the proportions we used, you can increase or decrease them as desired. Cut along all solid lines. Fold along dotted lines as shown in the next steps. You may want to lightly score the dotted lines to make folding easier.

Instructions
- Step One Cut your paper and draw guide.
- Step Two Fold section D along long dotted line
- Step Three Fold Section C along long dotted line
- Step Four Fold Section A along dotted line towards you
- Step Five Fold Section B along dotted line away from you
- Step Six Fold bottom edge of section C/D towards you
- Step Seven Tape folded end of C/D I couldn’t resist adding a little flair with some decorative tape.
- Step Eight Add a paper clip to the taped end
 You’re done! Take them outside and throw them like you would throw a ball or paper airplane. They should spin like a helicopter to the ground! If you have a two story space you can also drop them down and watch them spin. My kids enjoyed playing with them but once I got my camera out my son got into all the “action” shots I was taking. You really don’t need to throw them that hard!

Let’s Talk STEAM
The Science: Actual helicopters fly by generating lift. Lift is an upward pushing force that occurs when the blades of a helicopter rotate and a difference in air pressure is created on either side of the blades. Under the blades the air pressure is high and above the blades the air pressure is lower. This allows the helicopters to ascend into the air.
Our paper helicopters don’t generate lift or ascend, but the force of air upward on the blades as they fall is what causes our paper helicopters to spin. As a paper helicopter falls, air presses on each of the blades with an equal force but in the opposite direction and the helicopter spins around.
The Engineering: Once you know how to make a paper helicopter expand the project by introducing engineering challenges. Kids can modify the basic paper helicopter and explore how each modification changes its behavior. Here are some challenges to present:
- Try switching the direction of the folds for blades A & B. Make note of the direction the helicopter spins this time.
- Weight affects how quickly the helicopter spins, try adding additional paper clips and watch how the helicopter spins faster!
- Make the helicopters in different sizes. Does any size work better or worse than the others?

Learning how to make a paper helicopter is not only a simple and fun activity, it has a lot to teach kids about science and engineering. I also have lots more DIY Toys with things to teach kids here:
More DIY Toys to try:
Are you passionate about raising creative kids?
Join over 22,179 parents and educators who want connect with kids and nurture their creative process through magical, easy projects you can do TOGETHER.
Subscribe to our email list to receive project ideas as well as offers for some our creative products.
If you want to read our privacy policy before subscribing, hop over here.
This is so cute and I like that you showed how it worked with a live model. 🙂 Nice post. I’d love to have you share this at my linky party on what to do on the weekends. Take care, Linda
http://twosucculentsisters.blogspot.com/2013/01/hi-everyone-welcome-to-what-to-do.html
Thanks Linda! I just shared it on your latest Linky party!
these are brilliant, i have to make some of these for my son, he LOVES helicopters
Thank you so much! Love your Linky Party!
Wonderful idea. Love how colourful they are, and really love your adorable action shots!
Thanks Bella! Loved your mosaic heart box this week on Art Club Blog!
Those are so fun! Love your addition of washi tape! Thanks for linking up!
Thanks Diana!
Looks like something my boys would definitely enjoy. Thanks for sharing!
Georgia
Thanks for stopping by Georgia! Posting another one your boys might enjoy tomorrow: Tin Can Stilts. We love making DIY toys:)
What a great tutorial – I love the vintage diy toys that we had as kids, they offer so much creativity and great hands-on experiences. Really enjoying your blog!
Thanks Jacquie! I appreciate you stopping by!
Thanks for the tutorial. I made a cutting file from your instructions so my Silhouette machine can now cut as many as I want!
Hi Kelly,
I love that you made a Silhouette file from my template! I’ve been dying to get a Silhouette myself! Great idea.
Ana
Thanks so much for this fun and super-easy activity! My 2.75 yr old loved decorating the pieces of paper, helping me cut, folding, taping, and putting on the paperclip. By the time we took the helicopters outside to watch them twirl, we had already shared so much together that I was feeling very blessed. There was enough wind to keep them up in the sky for a very long time, and sometimes they went pretty far too. We will be making these over and over as she grows and I bet each time it takes on a whole new meaning for her!
Amy, this makes me so happy to hear! They really are a lot of fun and so easy. I stored our for use again and again!
I WISH YOU HAD PUT A PRINTABLE TEMPLAVE THAT COULD BE PRINTED AND USED WITHOUT HAVING TO MEASURE OUT EVERYTHING. NOT EVERYONE HAS THE TIME OR ENERGY TO DO THE MEASURE & THINGS THAT GO WITH IT…ANN
Thanks for stopping by Ann! I believe there are some templates on the web if you google paper helicopter template. Hope that helps and enjoy!
Anna, I’m just finding this now. Our youngest will love this!
I think I enjoyed flying them as much as my son did 😉
I love the animated pictures of your son! Thanks for sharing such a simple craft idea. Visiting from Crafts that Fly.
Thanks Lisa! He had a blast with it!
How incredibly talented AND thoughtful you are to share all these ideas with us!!!
I’m a first-timer – just subscribed.
THANK YOU, THANK YOU, THANK YOU!!! 🙂
Big hugs Sissy! Glad to have you aboard!
we love this! thank you!