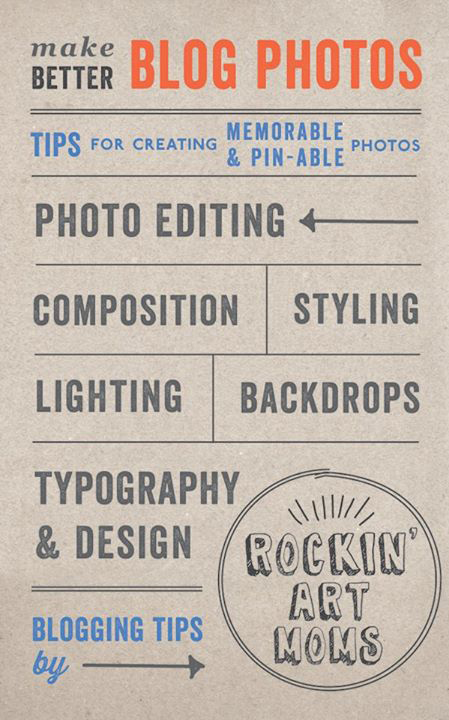
I’m thrilled to be part of the Rockin’ Art Moms Photo Series MAKE BETTER BLOG PHOTOS- Tips for Creating Memorable and Pin-Able Photos. I’ll be your stop for all things related to PHOTO EDITING. For other tutorials in the series see About the Series below.
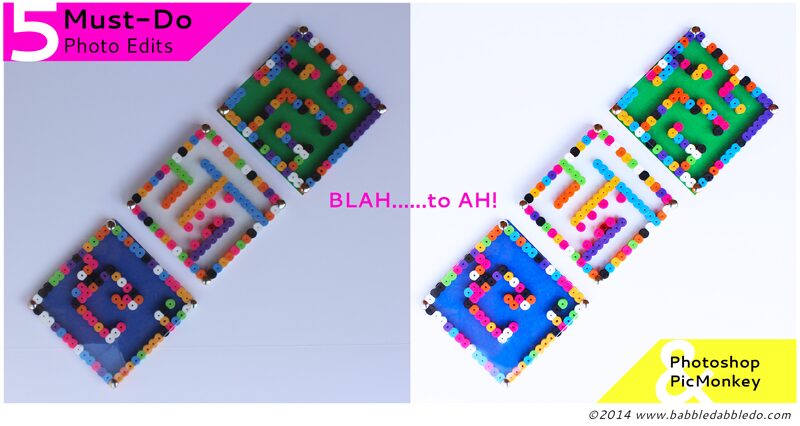 Photo editing is one of the best things you can do to make your images stand out. I can tell you that for every 500 pictures I take, maybe 1 needs no editing. That’s right, I edit almost every.single. photo. Partly that’s because I’m still learning how to use my camera well, but it’s also because I believe that most photos benefit from a few simple edits. I think photographers would agree with me on this one. So I’m here to show you the top 5 MUST-DO photo editing tools you should be using on both PicMonkey and Photoshop.
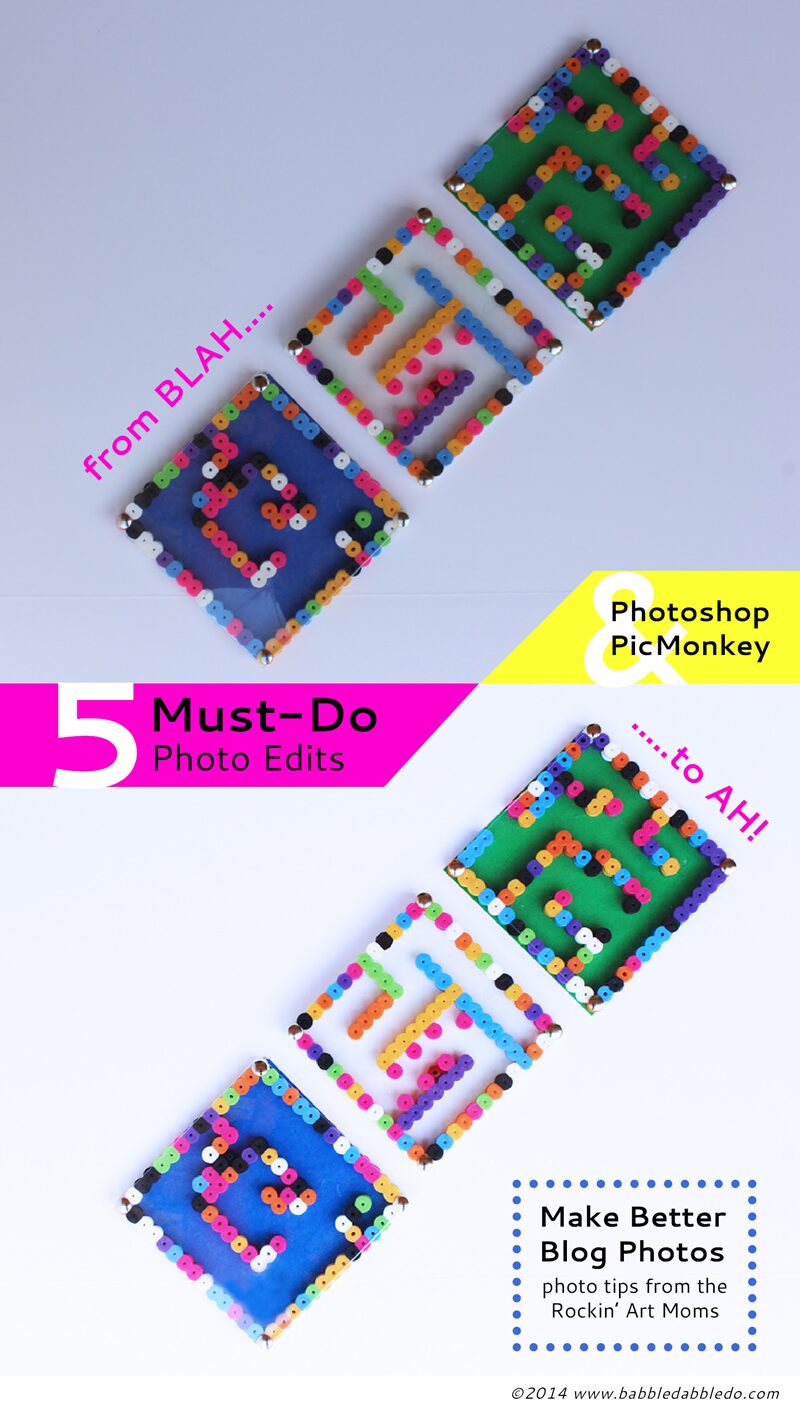
Not convinced you need to edit your photos? Take a look below. This is one of Babble Dabble Do’s most pinned images EVER. But look how it was straight off the camera. A little shadowy, some glare, a few colors looking faded….but with the 5 Must-Do Photo Edits below the photo looks so much more pin worthy!

Note: The techniques here are available in all photo editing software though you may have to search around for them; I have chosen to focus on PicMonkey and Photoshop because a quick survey of bloggers revealed those are the two programs 90% of them use.
What Program to Use:
I personally use Photoshop for all my editing. But I realize most folks out there don’t have this amazing program for 2 reasons: it’s expensive, it’s intimidating. I have a monthly Adobe subscription which brings the price down considerably. You can also check out Photoshop Elements which is a “lite” version of the program at a fraction of the cost. And yes, Photoshop is incredibly intimidating but also an incredibly powerful tool once you become familiar with it. I taught myself to use it then took a few extra courses to go a little more in depth. If you have been on the fence about using it I encourage you to make the leap, your photos will shine!
If you don’t use Photoshop for editing you probably use PicMonkey or a similar program. PicMonkey is a wonderful online program for bringing photo editing tools to the masses for free or a low monthly subscription. 4 out of the 5 basic editing tools (everything except the clone stamp) I’m going to show you here are all available on the free version.
This post contains affiliate links to products I love and recommend to my readers, plus it keeps this little blog o’mine afloat! Thank you!
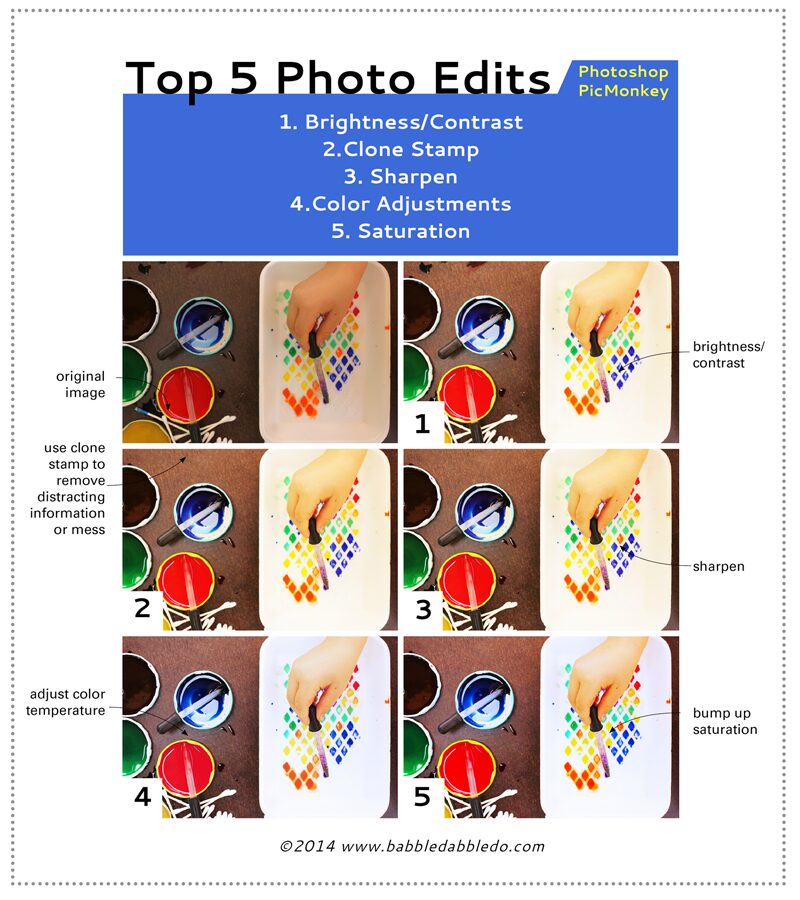
TOP 5 PHOTO EDITING TOOLS OVERVIEW
BEFORE YOU START- SAVING & IMAGE SIZE
Before I do any editing I take the following steps:
- Save originals in one folder and copy images I want to edit to a separate folder. That way you ALWAYS have a back-up of the original image!
- Since most images straight off a camera are large, I always go in and edit their size FIRST. Big image files are really cumbersome to work with. I save the images I will be editing for the web at 150 dpi and 11 x 7.3333 in.
Now you are ready to start editing!
TOP 5 PHOTO EDITING TOOLS EXPLAINED!
1. Brightness/Contrast
About
I rarely meet a photo that couldn’t benefit from being brighter! This is a somewhat aesthetic call, but on the web bright images stand out. Darker, shady images do not get shared. It’s simple. So if you do NOTHING else to your photos, please for the LOVE OF PETE go in and brighten them up a bit!
How
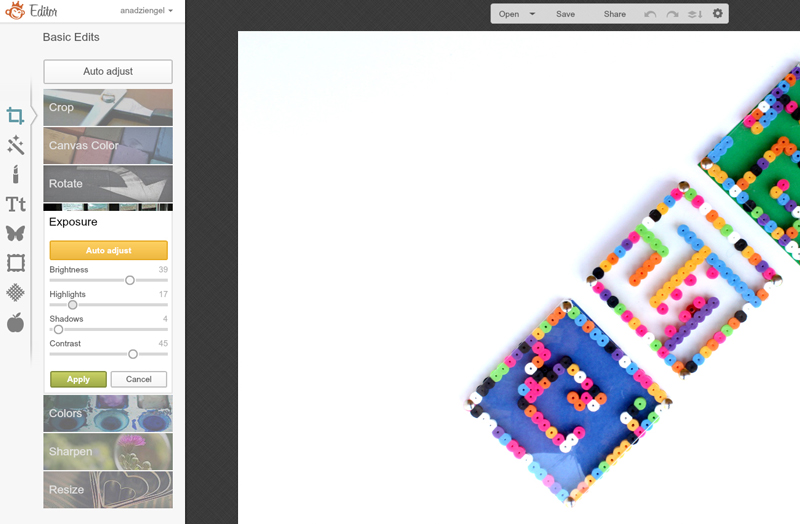
PicMonkey: Basic Edits>Exposure
In PicMonkey you’ll find sliders for Brightness, Highlights, Shadows, Contrast. Move them around to get a bright image with contrasting detail.
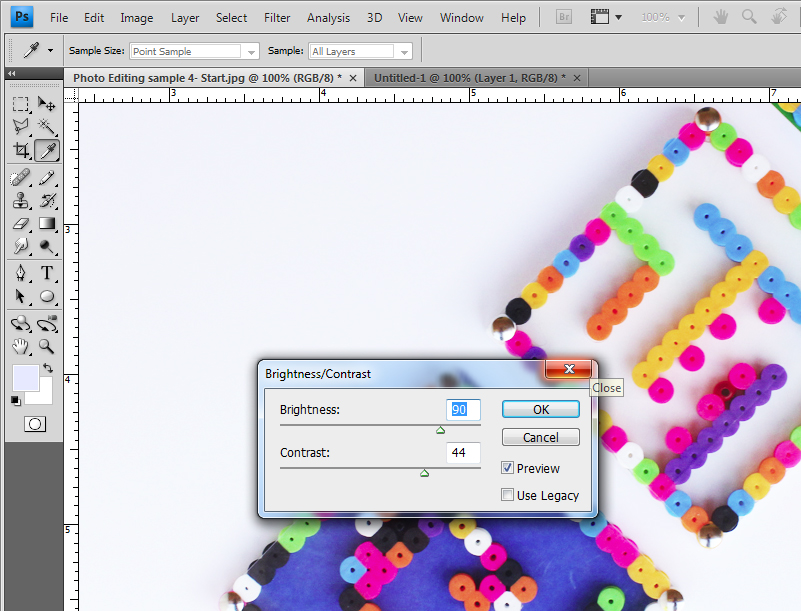
Photoshop: Image>Adjustments>Brightness-/Contrast
Image>Adjustments>Shadows/Highlights
In Photoshop (PS) use the Brightness/Contrast sliders to make adjustments. To bring up shadow levels go to the Shadows/Highlights tab and sliders. I stick with the default slider here and simply adjust it down a little in most cases. When you have black areas in your image you probably should skip shadows/highlights because is will make your blacks gray.
Tips
- When I adjust brightness I almost always adjust the contrast as well. You want your whites bright and your blacks dark. Contrast will help distinguish those darker details.
- In PS you can compare the new look to the original by checking and unchecking the preview button.
2. Clone Stamp
About
Glitter on your table? Dirt under your child’s fingernails? White board background not quite high enough to conceal messy room beyond? Enter the clone stamp, your new best friend. The clone stamp copies an area and allows you to stamp it on another area. This is the best way to clean up photos and make them look realistic since you are copying one area of an image to another area.
How
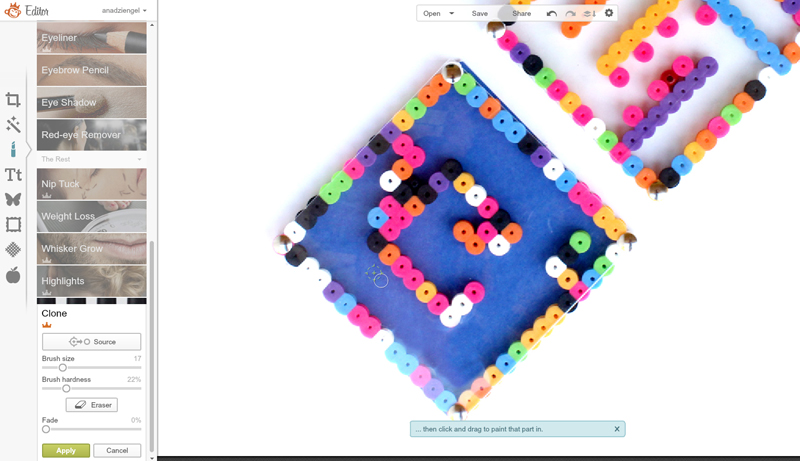
PicMonkey: Touch-up>Clone
This is the only tool I’m showing you today that is a Royale (paid) PicMonkey feature. The first thing to do is adjust the size and hardness of your brush. Hardness means how soft the brush edges are and goes from very soft edges (low percentage) to sharp edges (high percentage). Picmonkey has slider for this directly under the tool. Select your source area (the area you want to copy) first by clicking on it, then go to the area you want to clean and “stamp” the source area there. To change the source area simply go back to the source button and start again. In the image below I removed the glare in the bottom area using the clone tool.
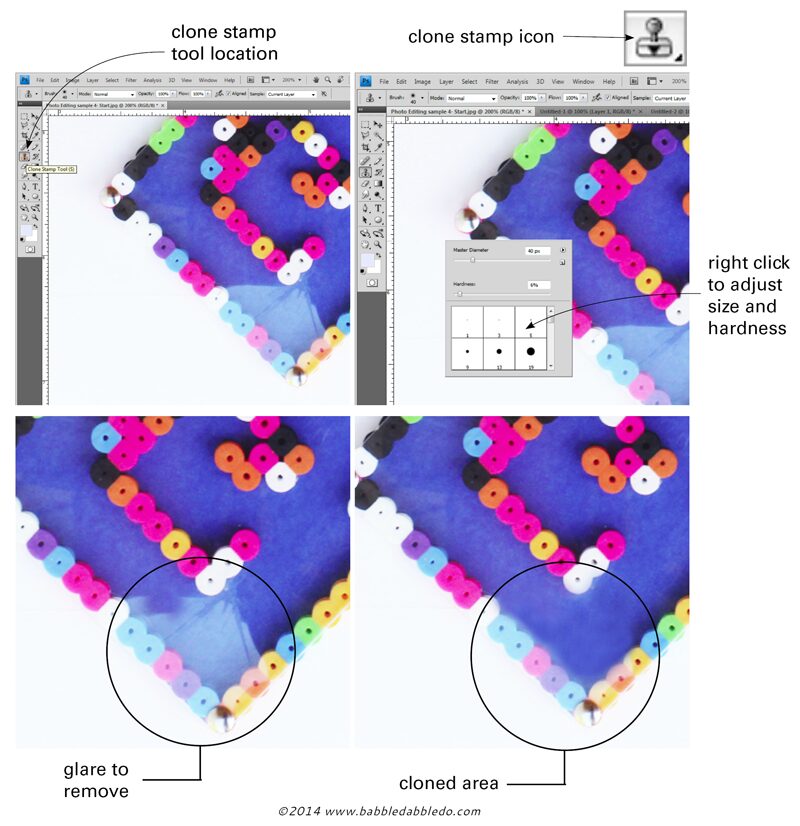
Photoshop: Clone Stamp Tool in sidebar.
To clone in PS first click the clone stamp tool, then right-click on your mouse and a pop up box will appear for size and hardness. Hardness means how soft the stamp edges are and goes from very soft edges (low percentage) to sharp edges (high percentage). After adjusting the size and hardness of your stamp select your source area (the area you want to copy) by holding down the option key and clicking on the source (Mac) or the alt key (PCs), then go to the area you want to clean and “stamp” the source. To change the source area simply hit option/alt and begin again.
Tips
- This tool takes some time to get to know but once you master it, it is a very effective tool for fixing/removing messy/distracting elements in your images.
- To get rid of small speck of glitter or dirt you will want to use a small sized stamp. If you are trying to fix a large shadowy area use a large brush size.
- To make a straight line of stamps in PS select your source area, click to set the stamp starting point, hold down the shift key, and then select the stamp end point.
- I often use the clone stamp to get rid of distracting items around the edges of my photos. If my white backdrop was too short I use the clone stamped to replicate the entire area of white backdrop just below it. I also use it to clean up color that is falling off the image or drawing the eye away from the main image.
3. Sharpen
About
I often see blurry or just slightly blurry images on the web. If your photo is just a hair blurry then sharpen it! Sharpening photos will bring out the details of edges. Just be sure to use it sparingly so you don’t end up with photos that look grainy or aliased (see below).
How
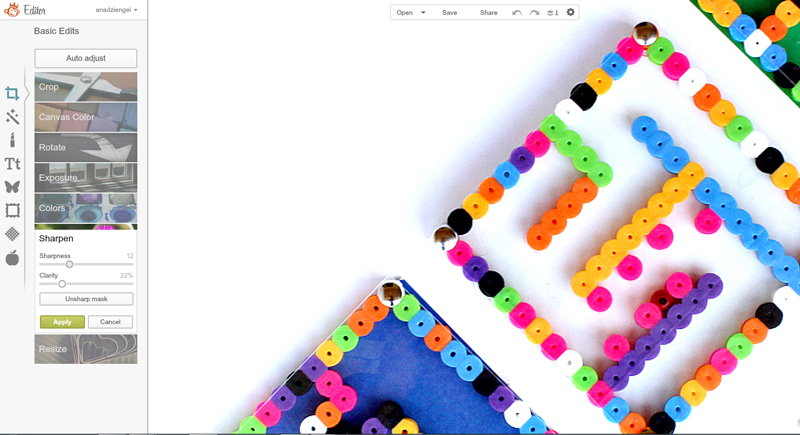
PicMonkey: Basic Edits>Sharpen
PicMonkey has sharpen and clarity sliders to punch up edges and bring out detail. Simply move then to adjust both the clarity and sharpness of the image and details.
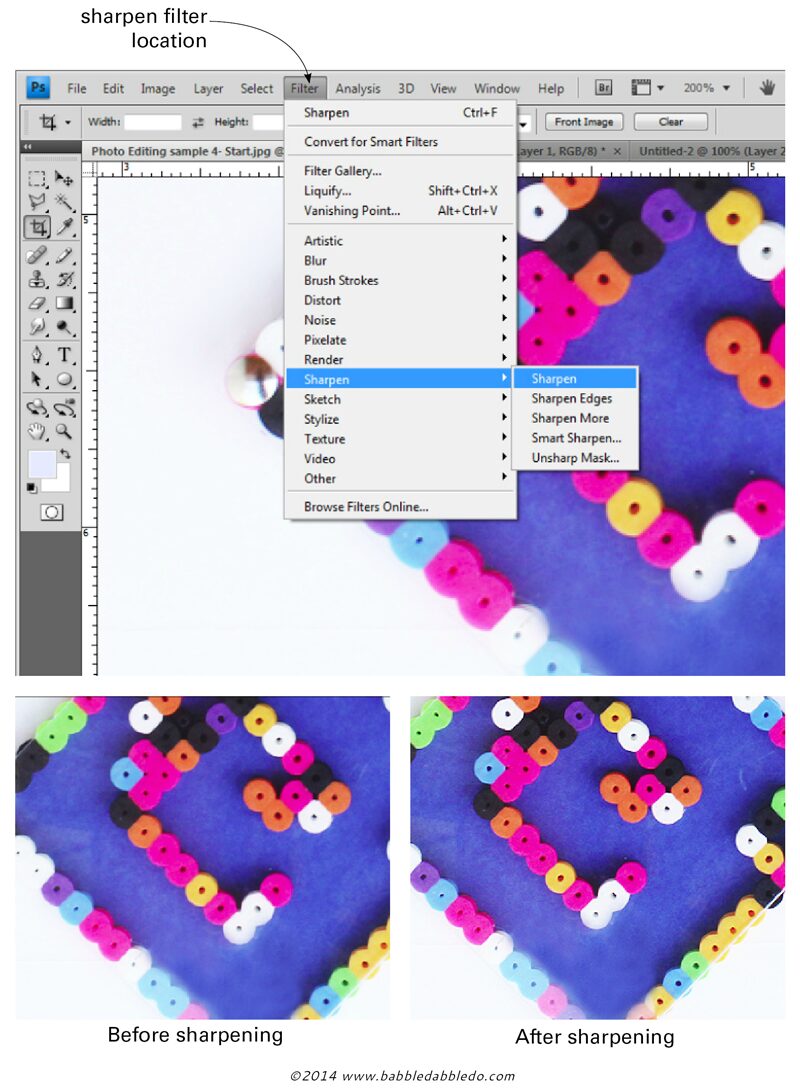
Photoshop: Filters>Sharpen
Filters>Sharpen More
In Photoshop I usually start with the basic Sharpen filter. All you do is select it and apply. If the image still isn’t crisp enough I will apply the Sharpen More filter.
Tips
- Photos that benefit from sharpening: Images of fabric, textures, and small items usually benefit from sharpening.
- Photos where sharpening should be used sparingly: Projects with lots of lines and text. These tend get aliased when sharpened. What is aliasing? It’s when straight lines start appearing as diagonal bits of line instead of a nice crisp line. Also too much sharpening can make a photo look grainy.
4. Color Adjustments
About
No matter how many times I adjust the white balance on my camera I still am never quite happy with the general tone of the pictures I take. I often photograph outside on my patio and my images are too warm or yellowed. To fix this you need to adjust the color temperature of the image.
How
PicMonkey: Basic Edits>Colors>Temperature
In PicMonkey it’s pretty straightforward, one slider allows you to adjust a picture’s temperature. Even slight moves greatly change the tone of an image so use this in small increments. Move the slider back and forth to adjust the entire temperature of the image. To make a quick color adjustment select the neutral picker, go to your image and click on a white area. It will adjust the tone of the entire image so that the white area selected is brightest.

Photoshop:
Image>Adjustments> Color Balance
Image>Adjustments>Hue/Saturation
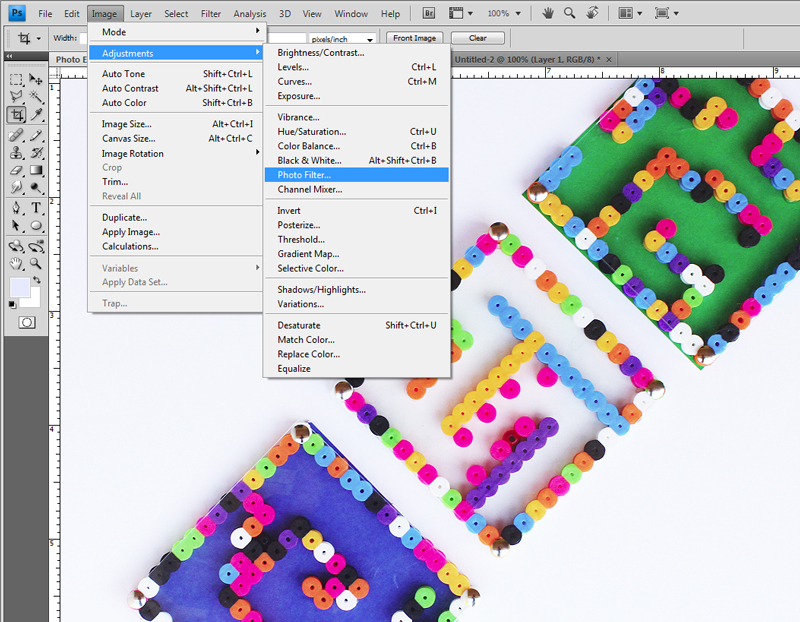
Image>Adjustments> Photo Filter
In Photoshop you have a host of ways to adjust the color and they all can achieve similar effects:
- Color Balance: This tool has three sliders for the different colors in the image and adjusts the tone of the entire image. FYI I typically do not use any of the tone balance adjustments.
- Hue/Saturation Great for isolating one particular color to adjust. To isolate a color, select it from the pull down menu and then use the sliders to adjust the hue, saturation, and lightness of the selected color. If Master is selected it will change the entire image.
- Photo Filter: A quick and dirty way to change the tone of an image. It overlays a color filter on the entire image. It’s great for making images warmer or cooler depending on your preference. For instance I use a blue filter often to cool down warm photos.
5. Saturation
About
The last thing I usually do to an image is bump up the saturation, just a hair. Never aim to make an image more colorful than it is in real life or it will look fake. BUT I have noticed that depending on lighting and the tone of what you are photographing, some colors just look dull when photographed. I have this problem a lot with neon colors. So bump them up to make them more like real life!
How
PicMonkey: Basic Edits>Colors>Saturation
In PicMonkey simply adjust the saturation slider as shown in step 4 to the right to bump up the colors.
Photoshop: Image>Adjustments>Vibrance
Image>Adjustments>Hue/Saturation
In PS there are several ways to adjust the saturation. I like to go to the Vibrance tab and adjust the sliders for both vibrance and saturation to the right. You can also go to the Hue/Saturation tab and adjust the saturation of the entire image by selecting Master or of a particular color by selecting it in the drop down menu. This is helpful if one particular color looks dull.
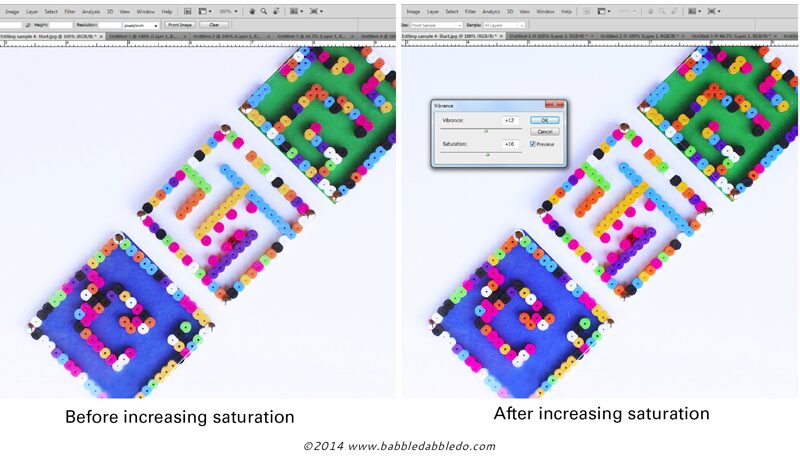
Tip A little saturation goes a long way so adjust these sliders in small increments. Don’t overdo it or your image will look faked.
Saving Your Images!
When you are publishing photos to the web they need to be of good quality but not so big that they slow down your site when loading.
How to adjust the size:
PicMonkey: In Picmonkey I suggest saving a large, Sean, file to have for your original, then saving a Pierce size for the web upload. If you know the width of your content area you can change the size of your photo width as you save it.
Photoshop: In PS I always use the Save for Web option to appropriately size the images I will be uploading to the web. I set the size of the image to match the content area of my blog.
Conclusion
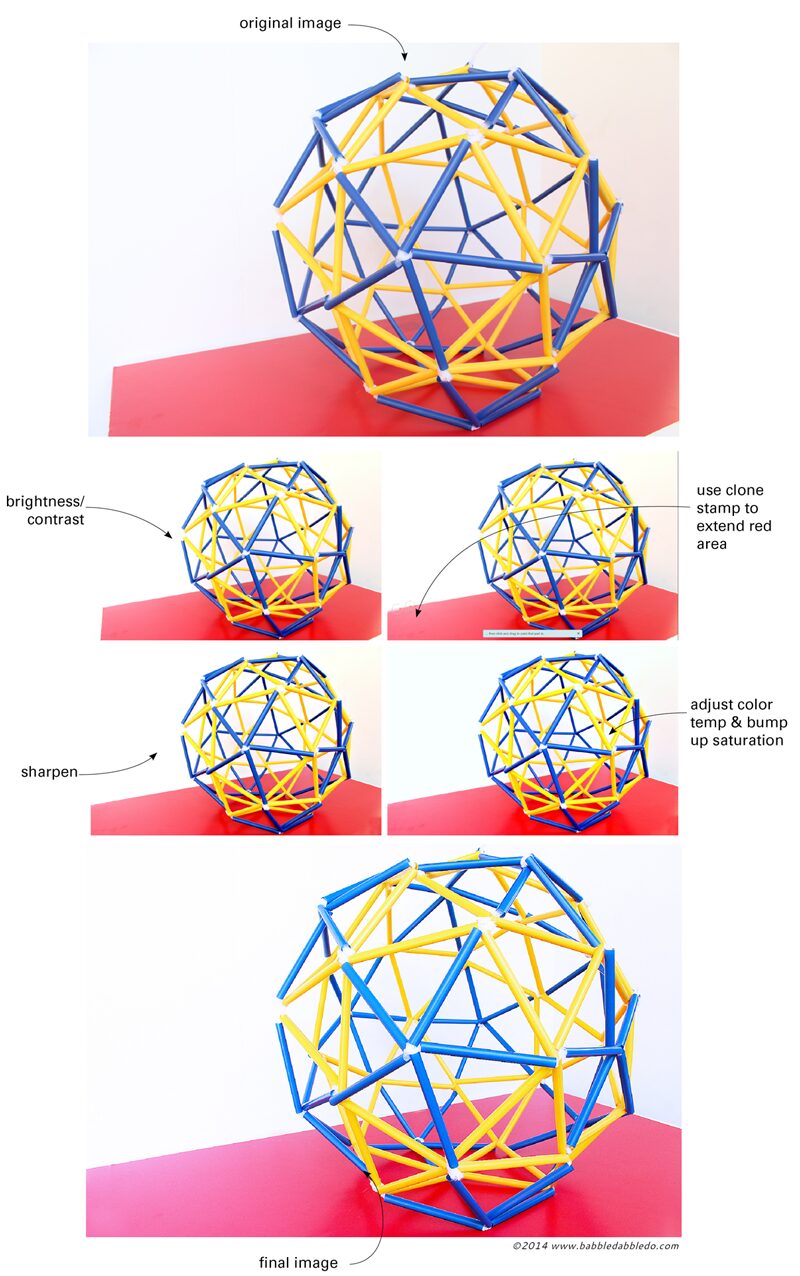
So there are a few trade secrets from a photo editing geek. I’m no expert but l believe a little editing goes a long way. To recap here are the basic steps I use to improve my photos:
TOP 5 Photo Editing Tools
Brightness/Contrast
Clone Stamp
Sharpen
Color Adjustments
Saturation
About the Make Better Blog Photos Series:
The Rockin’ Art Moms (RAMs) are 16 mom bloggers who believe in the power of creativity as a necessary part of family life! Make Better Blog Photos was developed in response to a question we hear often: “How did you take such a great picture?” We decided to show you how! Each RAM in the series will be speaking about a different photo related topic. Be sure to visit them all!
Part 1: Composition Meri Cherry
Part 2: Backdrops Mama Miss
Part 3: Styling Willow Day
Part 4: Lighting Tiny Rotten Peanuts
Part 5: Photo Editing Babble Dabble Do
Part 6: Typography Tips Art Bar
And be sure to follow the Rockin’ Art Moms on Pinterest:
Rockin’ Art for Kids Pinterest Board
To keep up with all the tips and projects here on Babbble Dabble Do subscribe below or like us on FB!
SHARING IS CARING!
Are you kidding me?!!!!! ARE YOU KIDDING ME????!!!!!!!! I no longer need to take a photoshop class. THANK YOU!!!!
LOVE YOU Miss Meri!
THIS IS FANTASTIC; as I knew it would be. So informative and also, so much fun to get a chance to see your beautiful work again! GREAT!
GREAT, great. great post ANA! This is such practical advise and you’ve used perfect images to illustrate it! Not only is the info keyed in on exactly whats necessary but, it’s such a treat to see your beautiful photos! Beautiful and smart! like all that associate with you!
Blushing miss Gina 😉
Oh My God!! Those tutorial images are GORGEOUSSS.. Wow! Thanks for the advice and tips.
Yay Suja! Thanks for your kind words 🙂
Brilliant tutorial -one that no doubt I shall return to again and again.
Thank you Emma! I’m glad you found it helpful!
Awesome post!!
Thanks so much Melissa!
I am loving this series! You all are sharing some great tips! My photography issues are with grainy shadows and blurry subjects who keep moving… But I see you don’t really focus on the kids, but more of what they are creating instead. So maybe I should just stop trying to make my blurry action shots work for my blog?
Ha! I do take shots of my kids doing projects and always use the action setting on my camera when I do.The fast shutter speed will help the shots be less blurry. Or you can manually set your shutter speed to be super fast when shooting the kids. I use the same editing tools on those pics, particularly shadows/highlights and color balance. I have learned that shooting the kids in action AND having some more set-up shots where I can control things helps me get a wide variety of pictures for use in a post, plus it adds a little variation.
Ah the clone stamp is my best friend… that and white balance! LOL
So many great tips, thank you!
Clone stamping is game changing right Kate?
Thanks so much for all of the great info! Pinning this post now and will be referring back to it as I work on improving the images we use on our site. Thanks!
Fantastic! I hope you find it useful!
Love this post, very helpful!
So glad to hear it Monica!
Great! Thank You very much, I have a lot of problems with my photo and now I know how to fix it!
I will try to combine with Saturation and Sharpen 🙂
Yay! Glad to hear this post was helpful!
This post is my jam! GAH!! Love every single word! I’ve been using PicMonkey since I started and I spend so much time messing around and going back and forth and second guessing myself. It really made me hate editing photos and it was a big reason I recently took a step away from the blog. But now I’ve edited some photos using these exact steps and it is so much faster, and I’m already way more confident! Thank you thank you thank you!! I can’t wait to start posting new content again!!
Erin this makes me so happy to hear!
excellent tutorial for image editing have several photos to be repaired in Photoshop … now I have to start. thanks…
Glad you found it useful!