This basic weaving for kids activity features weaving techniques and a simple loom made from recycled packaging!
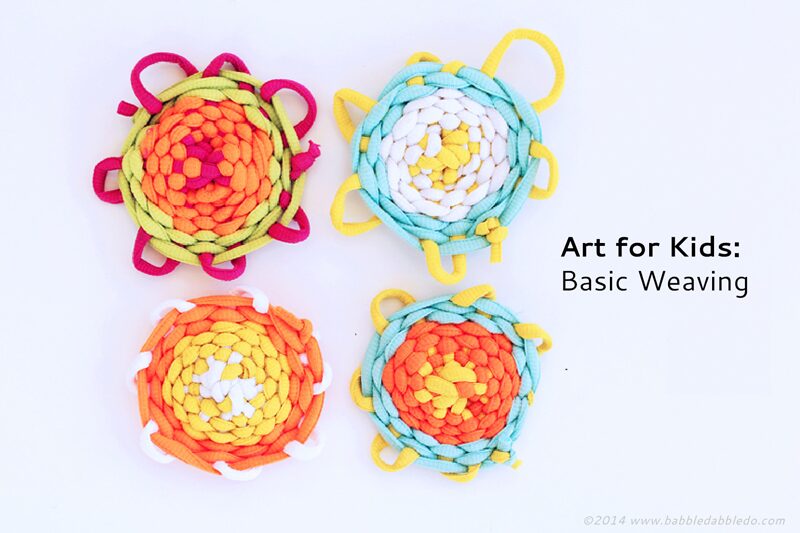
Weaving is an activity I return to over and over again on Babble Dabble Do because I seriously cannot get enough of it. I love the way texture and color interact with woven projects and it is such a great way for kids to develop fine motor skills.

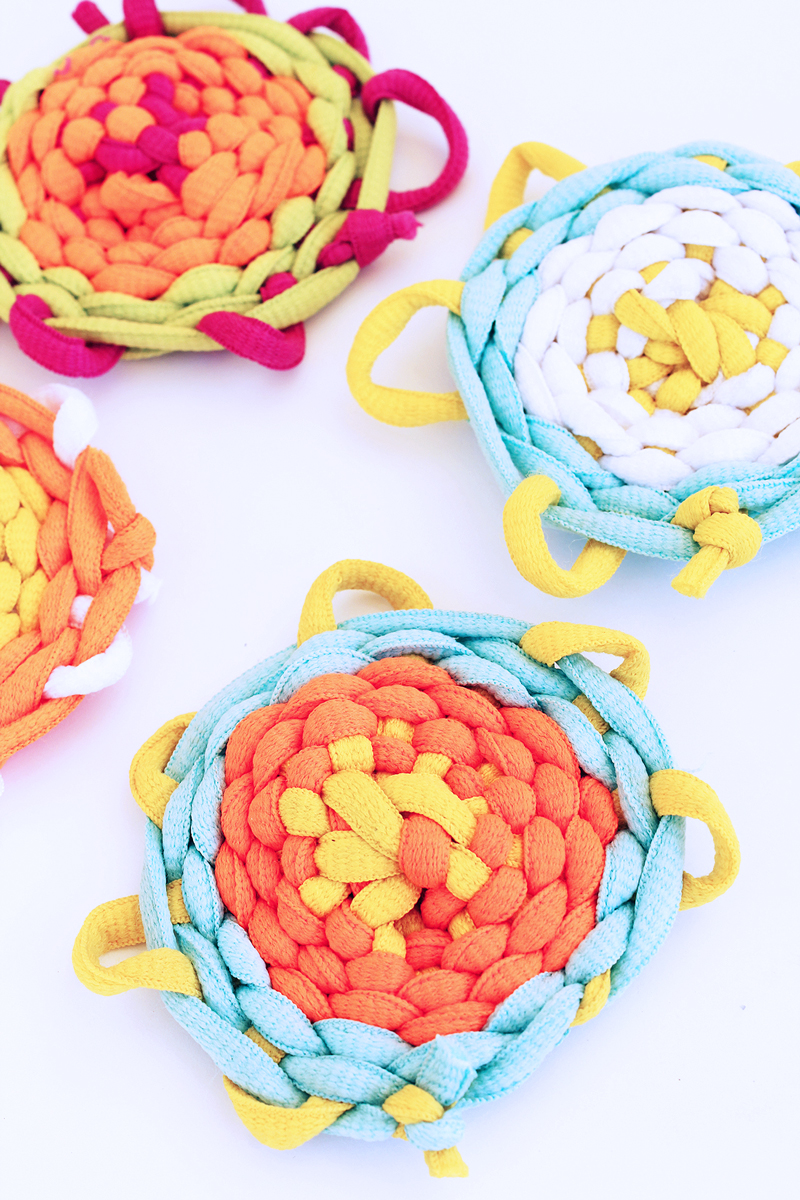
One of the things I love about weaving is that you really don’t need fancy looms to make incredible projects. Looms can be made out of things like paper plates, cardboard, and Styrofoam trays. We eat a lot of berries in our house and it dawned on me one day that the lids from the berry containers would make ideal looms for small children. They are already perforated with large holes and they are see-through, which adds a nice way to view the weaving from both sides. So I started stockpiling the lids and combined them with another favorite of mine, shoelaces, to bring you this sweet little weaving and/or sewing craft for kids.
Before we get started I wanted to introduce you to a few weaving terms that will help as you try the tutorials.
Basic Weaving Terms
- Loom A frame or device that allows for thread to be held taught and woven together.
- Warp The threads held in tension across the loom.
- Weft The threads that are woven over and under the warp threads to create patterns.
This post contains affiliate links.
Basic Weaving for Kids Using Recycled Plastic Looms
Materials
- Recycled plastic lid from a berry or veggie container. It should have perforations for venting.
- Long colorful shoelaces like these
.
- Scissors and/or Exacto knife
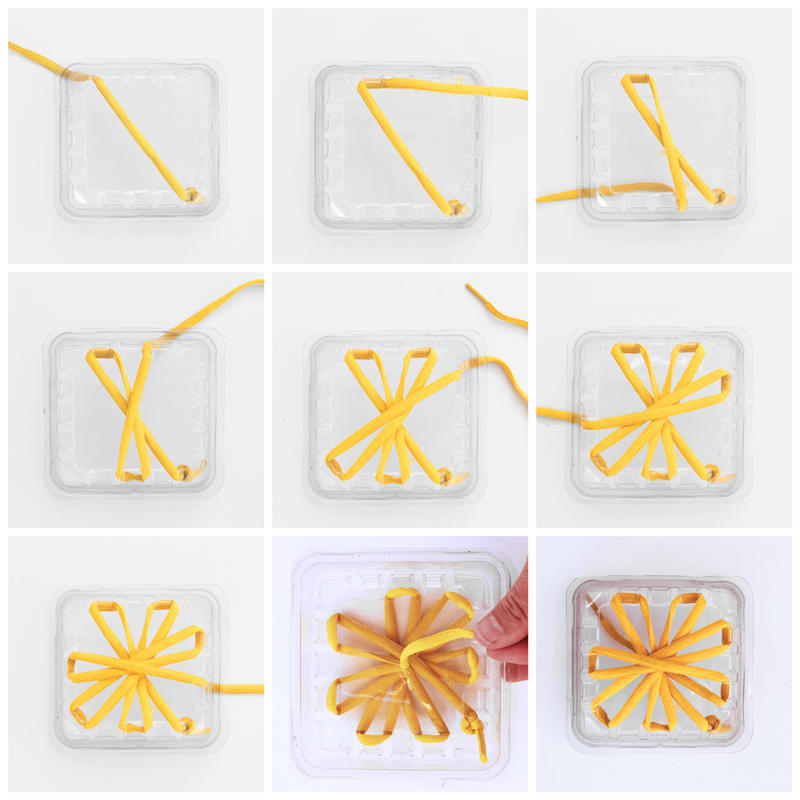
Instructions- Spiral Weave
Hint: This weave is best suited for square lids.
For a spiral weave you need an odd number of warp strings so you will need an odd number of holes. If your lid has an even number of holes skip threading one of them.
- Step One Poke a small hole through the center of the plastic lid using scissors or an Exacto knife
- Step Two Double knot one end of the shoelace so that it won’t slip through the plastic container holes. From the backside, thread the shoelace through one of the corner holes.
- Step Three Pull the shoelace across the lid diagonally, through the corner hole, then under the lid to the next adjacent hole. Pull the lace up through that hole and again diagonally across the lid. Repeat to form a starburst pattern.
- Step Four When you have threaded through the last odd numbered hole, bring the lace back to the center, thread the end of the string through hole you poked through the lid and knot. This will ensure an odd number of warp strings.
- Step Five Starting at the center of the loom tie a small tight knot around one of warp threads. Tuck the plastic end of the shoelace under the center section or trim the plastic end off. Now begin weaving the lace over one warp string and under the next. Pull the weft strings tight as you work around the circle.
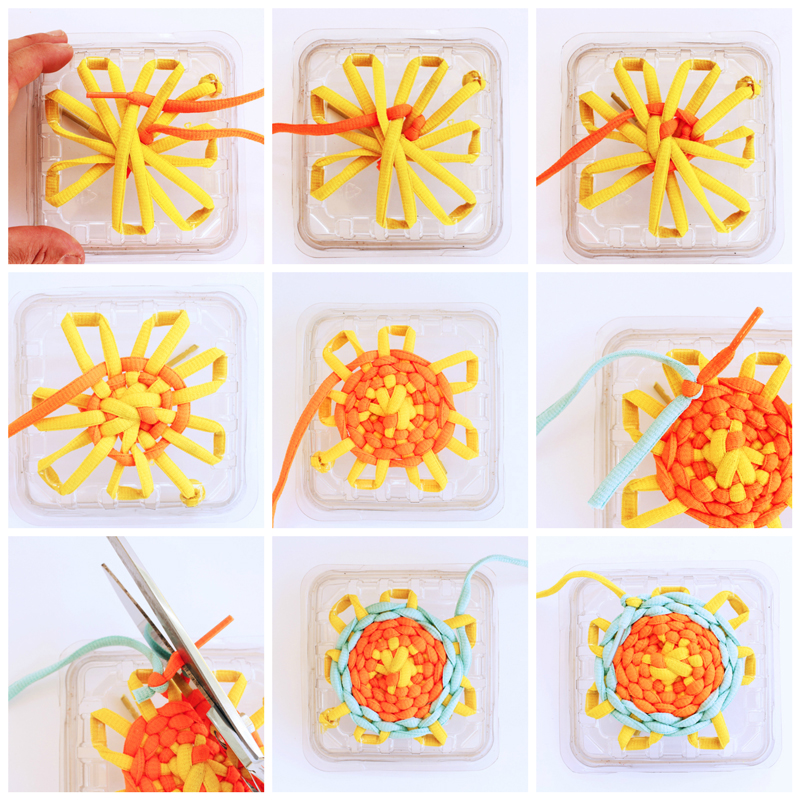
- Step Six When one shoelace ends, tie it to the next shoelace using a square knot. Trim the ends, tuck the knot under the loom strings to conceal it, and continue weaving.
- Step Seven When you are finished weaving the last weft lace tie it in a knot around a warp string and trim the string ends.
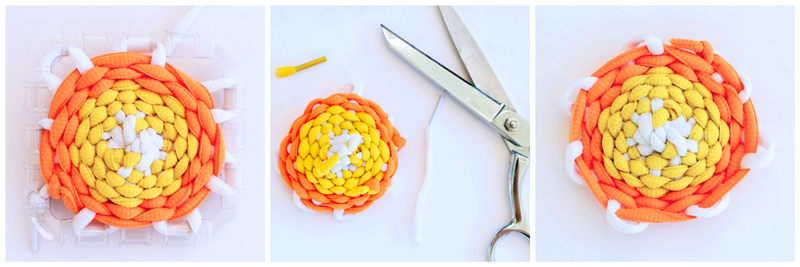
- Step Eight Renove the weaving from the loom by carefully cutting the plastic lid at the perforations. Gently slide the finished piece off the plastic edges and unthread the center string.
- Step Nine Knot the center string and any other loose ends. Trim all string ends close to the knots.
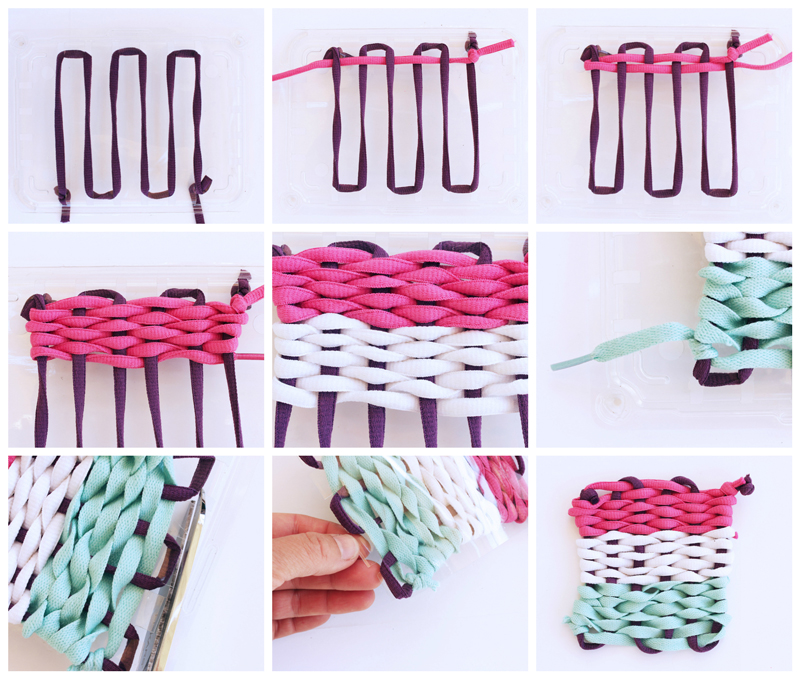
Instructions- Plain (Rectangular) Weave
Hint This weave is great to use with rectangular lids. The warp should be threaded across the width of the lid.
- Step One Tie a double knot on one end of your string. Starting from the backside thread one shoelace up through a corner hole, across the lid to the hole directly across from it, over to the next adjacent hole, up through the lid, and back across the lid. Continue threading until you reach the last hole.
- Step Two Tie your first weft string onto one of the warp strings in the corner of the loom.
- Step Three Begin threading the weft up and over the warp, alternating back and forth when you reach the edges.
- Step Four When one shoelace ends, tie it to the next shoelace using a square knot. Trim the ends, tuck the knot under the loom strings to conceal it, and continue weaving. When you reach the end, knot the weft around a warp string and trim off the end of the string
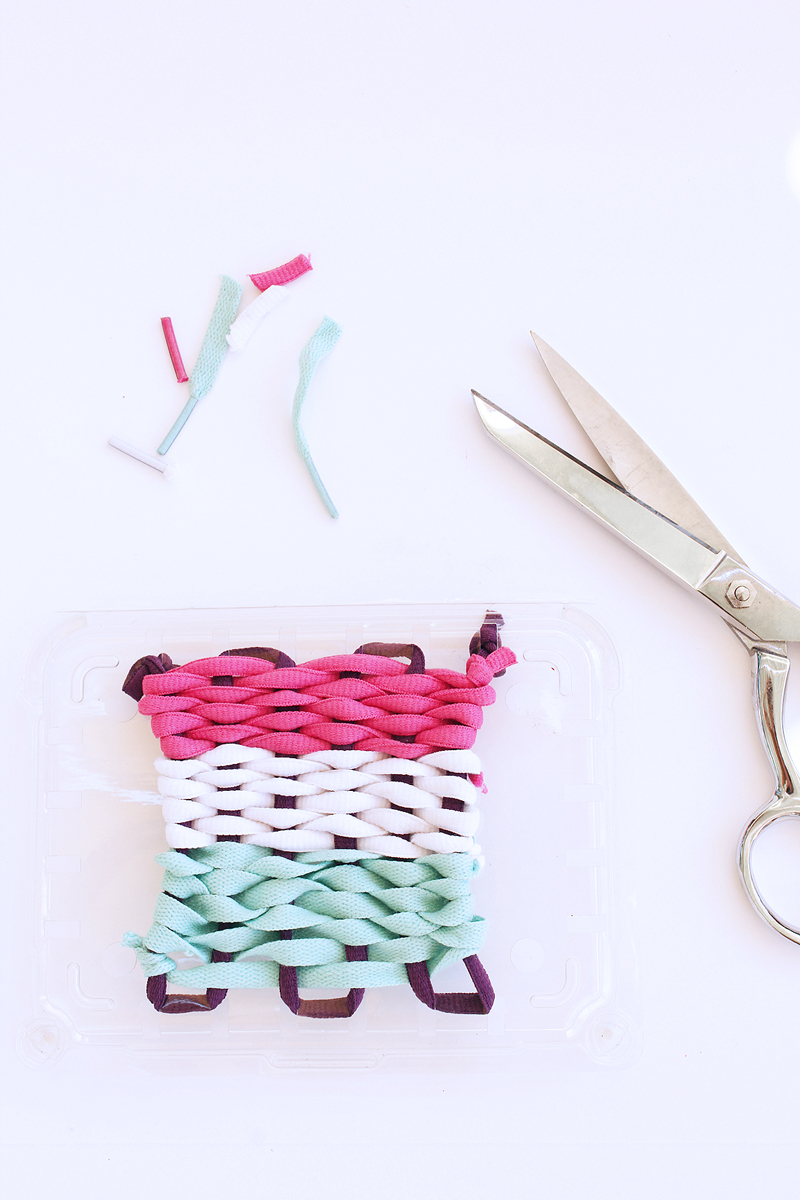
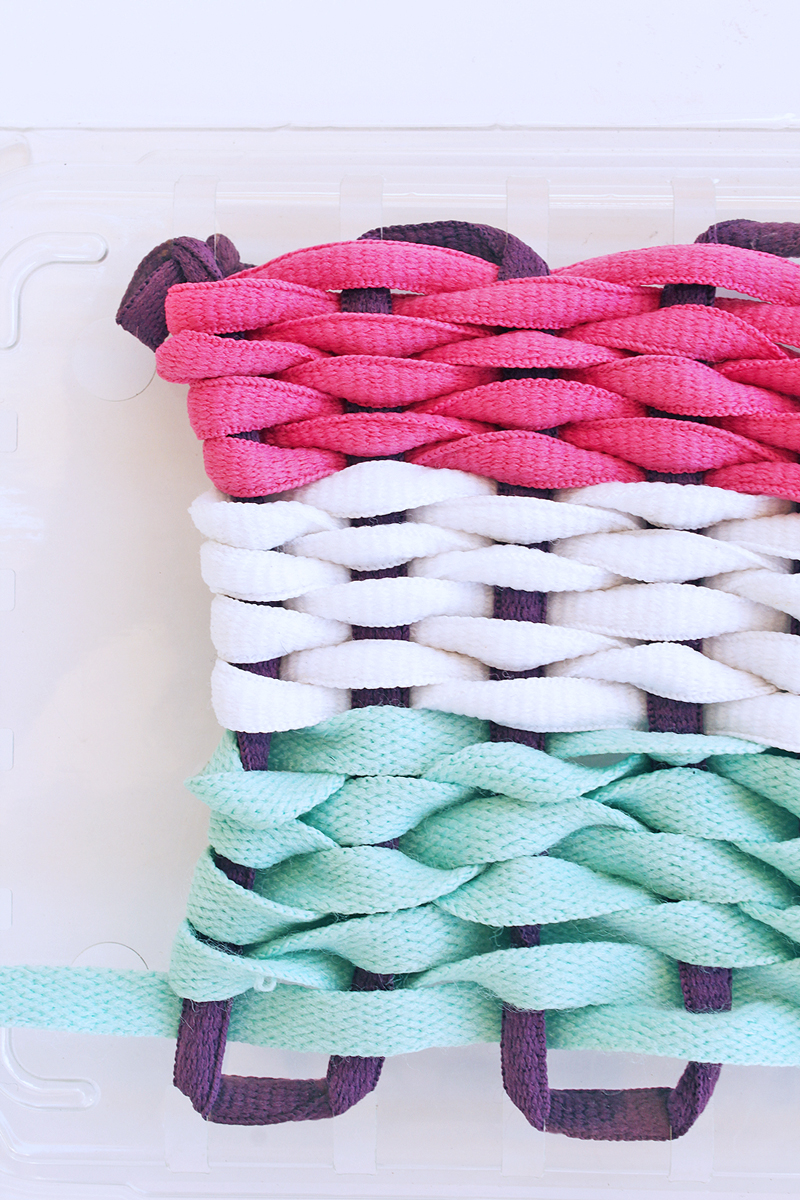
- Step Five Remove the weaving from the loom by carefully cutting the plastic lid at the perforations. Gently slide the finished piece off the plastic edges.
- Step Six Trim all loose edges and knot any loose strings as necessary.
You’re done! Fun right?
Tips:
- Lids with a minimum four holes per side work best for circular weaving.
- You can do this project with yarn, ribbon or other materials. I like shoelaces because the plastic ends act as a built-in “needle”. If you don’t use shoelaces try purchasing a few of these types of needles that are easy for kids to use.
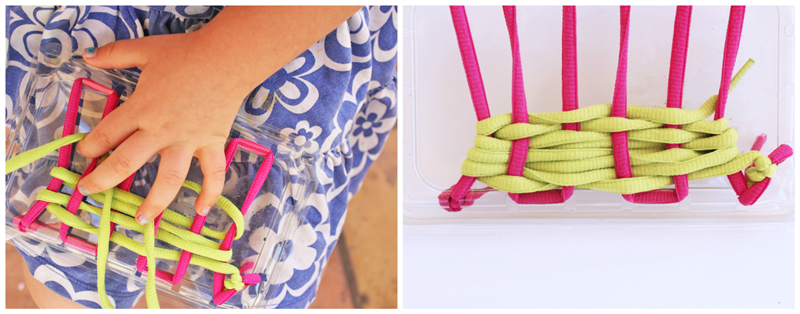
- For younger children, adults should thread the warp strings and start a sample row of weaving to introduce the technique to kids.
- Spiral weaving is best suited for children 6+. It’s a little tricky to start even for adults! Basic weaving is suitable for kids 4+. Here’s is my daughter trying out a basic weave.
Looks Like
Patricia Urquiola. Patricia Urquiola is a very famous Spanish furniture designer who brought back delicacy to modern design. I remember first seeing her work as a lucky young student who won a chance to go to the Milan Furniture Fair. Her designs are modern yet they always incorporate classic production techniques or motifs. Her Tropicalia chairs are woven using modern and colorful patterns. They are not to be missed!
Conclusion
Oh how I love weaving! The techniques used in this basic weaving for kids activity can yield such colorful results! And it’s so easy to try especially when you use materials you already have on hand for the loom, such as the plastic berry packaging we used. I also think weaving is perfect for kids because, in my humble opinion, imperfection leads to even more beautiful woven designs.
More
- For more basic weaving for kids ideas here on Babble Dabble Do hop over to Frame Lacers, Paper Weaving, and our Natural Loom.
- Be sure to check out these other lovely weaving tutorials for kids from 3 wonderful blogs: Circular Weaving with Cardboard from How We Montessori, Plastic Cup Weaving from Pink Stripey Socks, Popsicle Stick Looms from Buggy & Buddy
Gorgeous!
Thanks Leslie! I love your cup weaving project like crazy!
This is all kinds of awesome!!! I just love it Ana!!!! WOW WOW WOW!
Thanks Miss Meri!
These look fabulous! I have been collecting plastic lids like these for quite some time, without any real purpose – I will have to try this soon 🙂
Now you found their true calling 😉 Ha!