We are back with our fourth installment of our Book Art series in collaboration with Erica from What Do We Do All Day! If you haven’t seen the first installments in this series here’s how it works: Erica will be creating book lists for kids based on a topic and I’ll be supplying a companion activity. We want to inspire the young creators and authors in our children!
In honor of going back-to-school today’s booklist and project celebrates journaling. Journaling is a tremendous way to encourage young writers and artists. Journals can be used as diaries, scrapbooks, for sketches, lists, stories, and more. Talk to your children about the different kinds of information they can keep in a journal and encourage them to keep a few handy for on the fly inspiration. To make today’s project we recycled children’s art which helps personalize the journals. Depending on the age of your child they can also tackle the bookbinding aspect of this project. 8+ is a good age for the steps.
P.S. This is my absolute favorite method for colorful, simple bookbinding. I don’t think it gets much easier than this. Erica also used an equally easy method for binding their art journals. Be sure to hop on over here to see it!
This post contains affiliate links.
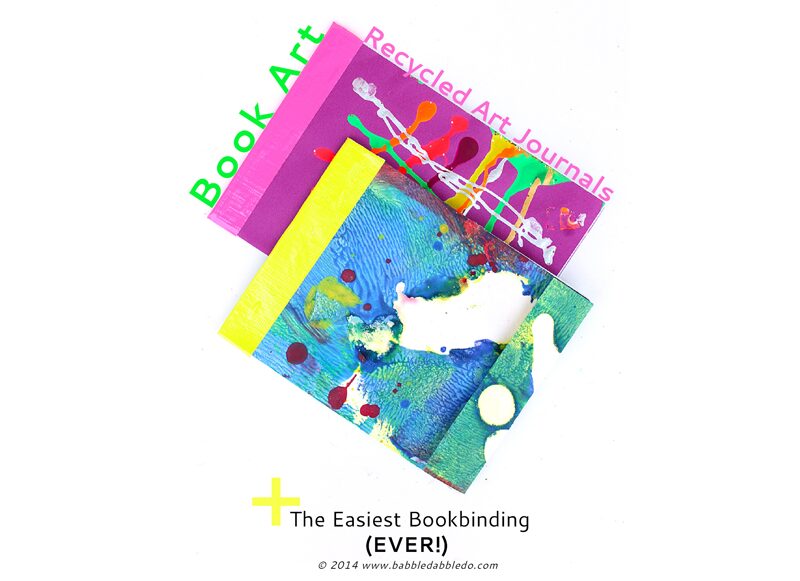
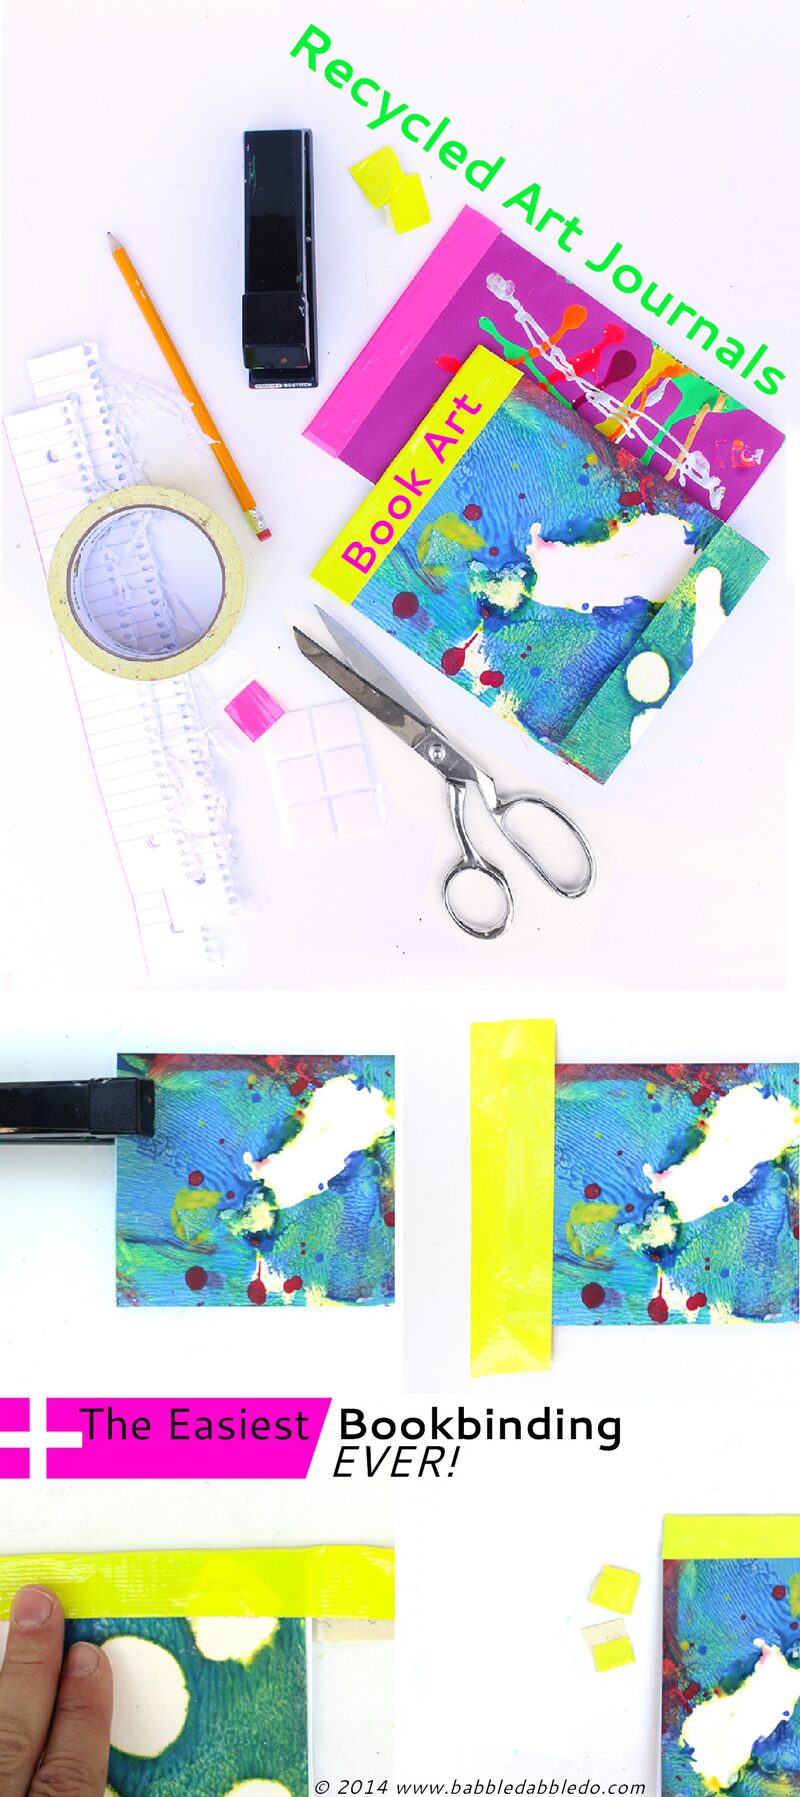
Recycled Art Journals + The Easiest Bookbinding
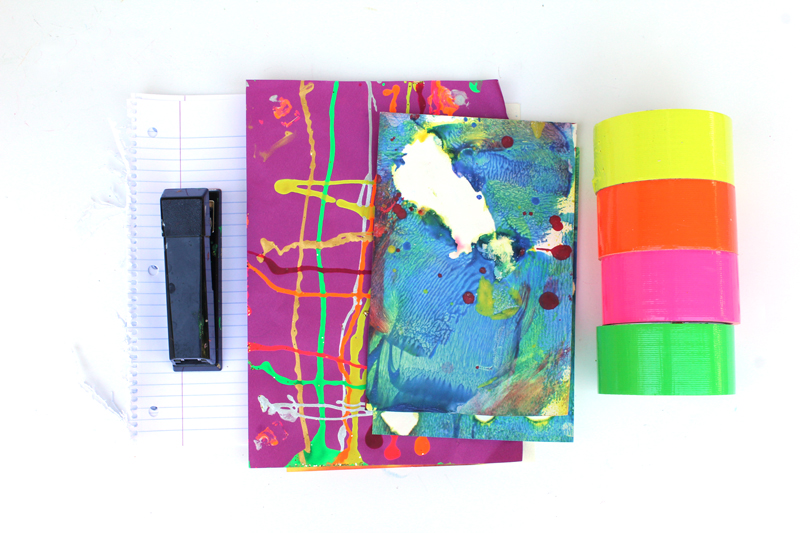
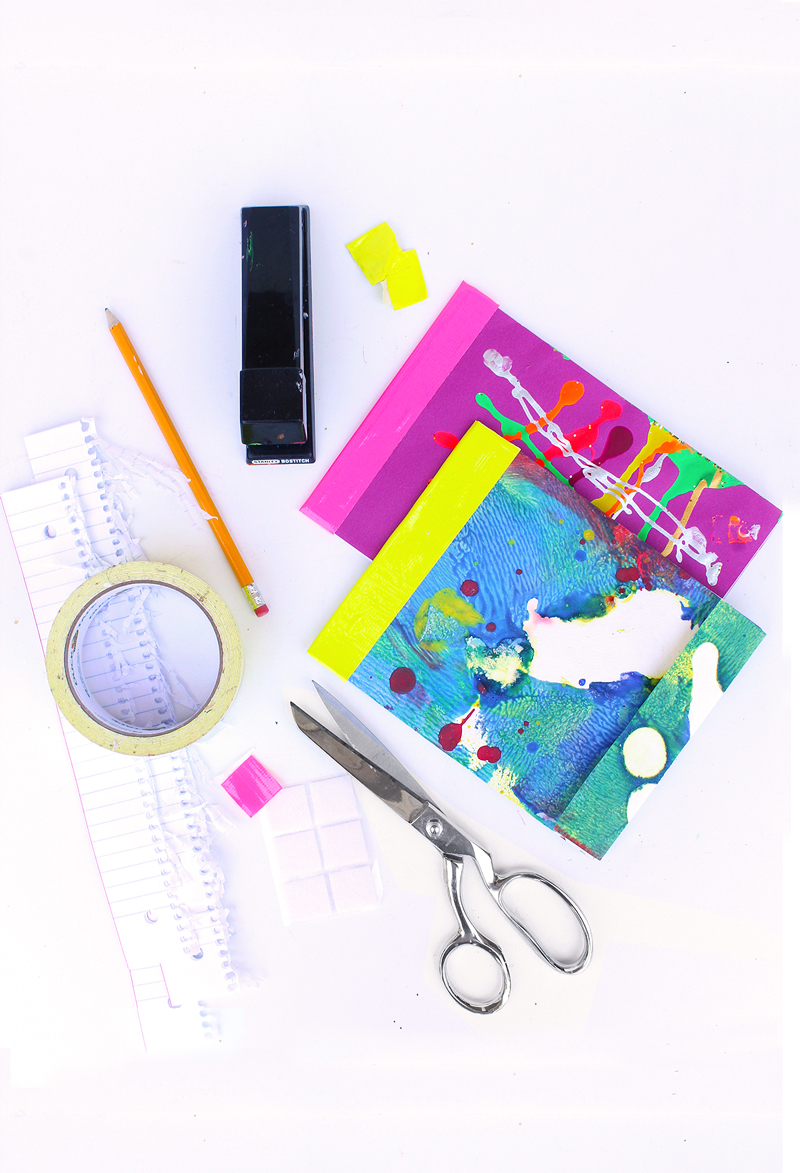
Materials
- Artwork by kids
- Recycled paper lined, gridded, or blank
- Staples and stapler
- Duct tape
- Paper cutter/scissors/Exacto (adults only)
- Velcro Stickers (optional for latch)
Before You Start
- Paper Types This project is all about recycling/up-cycling! For the blank pages inside the journal use leftover pages from old notebooks. You can also use the back side of old papers and flyers from your recycling bin.
- Thickness The type of stapler you are using you will determine how thick your book can be. Heavy-duty staplers can handle many sheets, up to ½” thick. Standard office use staplers can handle about 1/8” of page thickness total.
- Determine Book Size Your journal size will depend on the artwork selected and the blank pages available. To make the most efficient use of your paper I suggest starting with your blank sheets and cutting them in half. If you are using lined paper be sure to factor in the orientation of the lines when you trim your paper. You can also simply use standard sheets of paper untrimmed for larger journals.
- Choosing the Artwork Let your children make the selection of which art they will allow you to use for the covers! Otherwise you might inadvertently cut up your child’s “favorite piece of art!”
Instructions
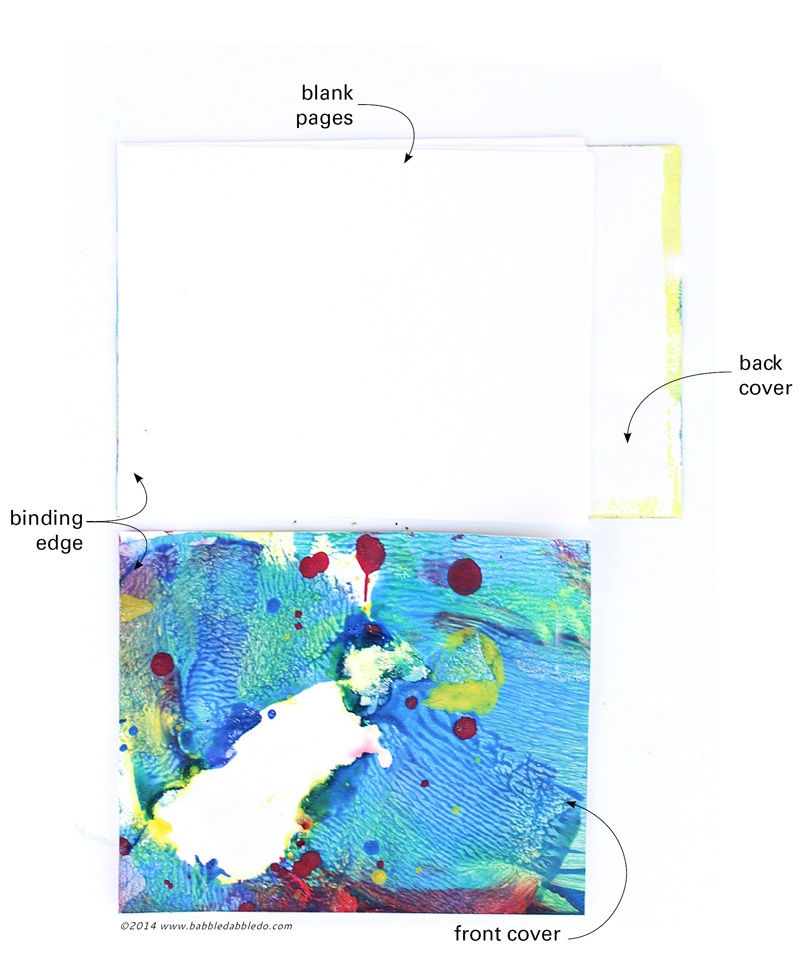
- Step One Trim the inside pages and your front and back cover artwork to match. If you are including the optional Velcro latch the back cover should be 1-1/2 to 2” LONGER than the front cover.
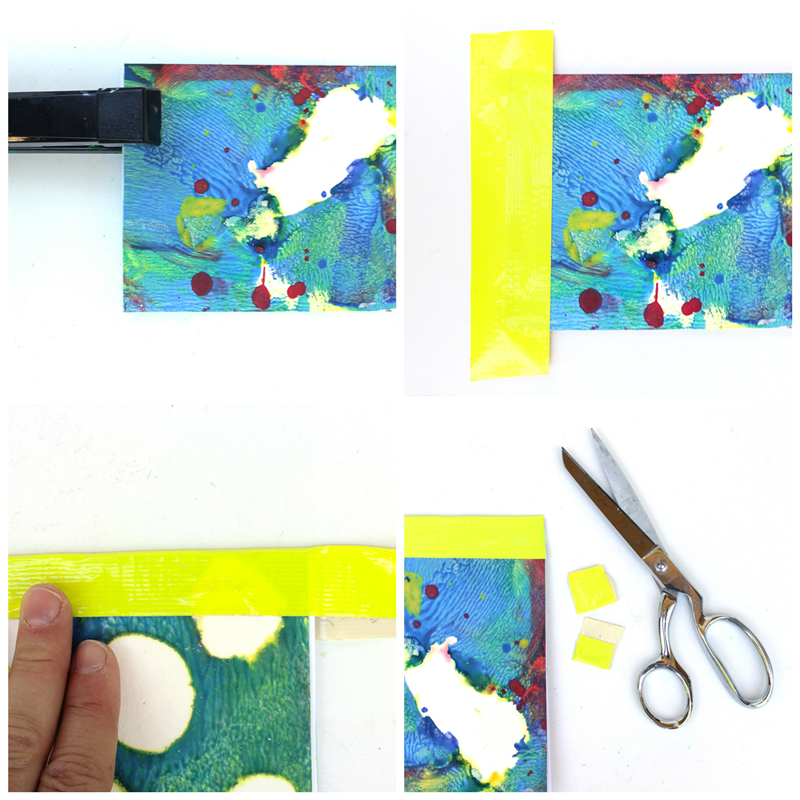
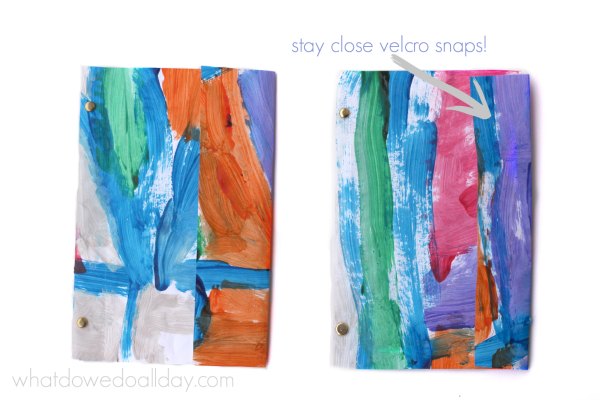
- Step Two Stack the sheets and covers neatly. Staple them along the binding edge. Staples should be about ½” from the edge. Use a minimum of 3 staples along the side.
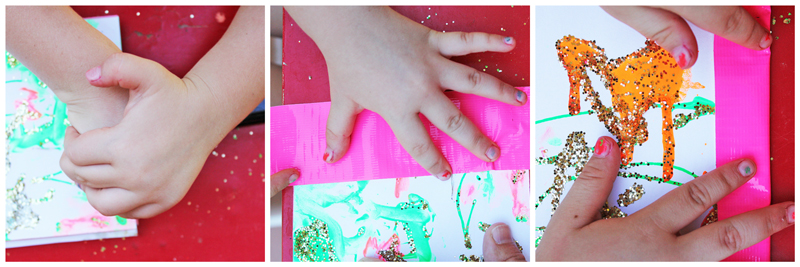
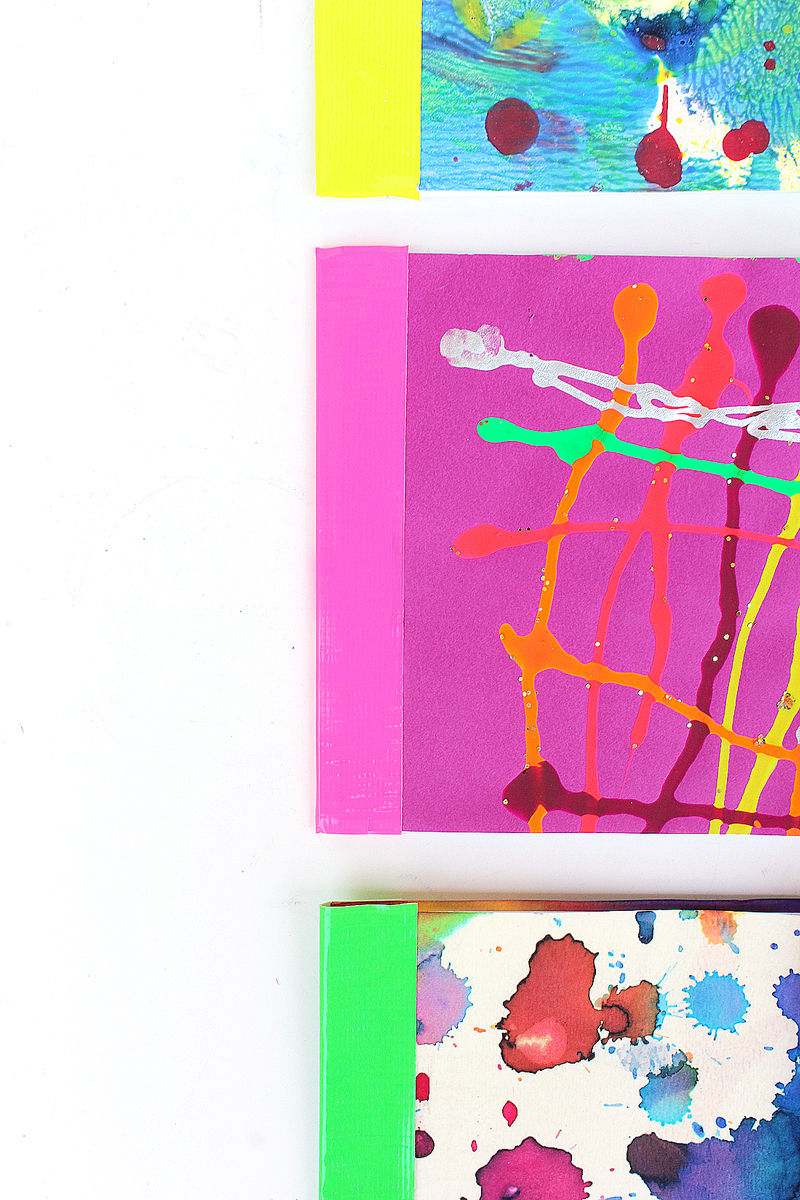
- Step Three Cut a strip of duct tape slightly longer than the edge of your book. Place the duct tape so that half of it is affixed to the front cover. Turn the book over and wrap the duct tape over the back cover. Burnish the tape on both sides using your finger. Trim the excess tape off both ends of the book.
Optional Latch
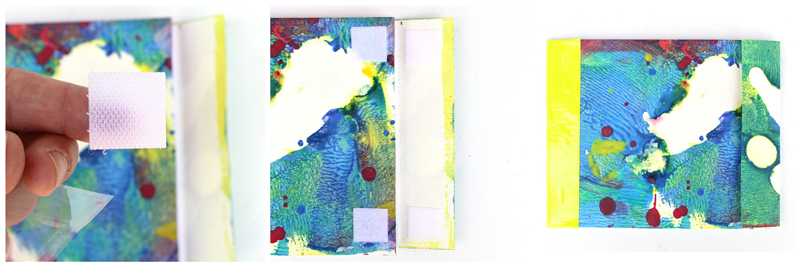
- Step One If desired use an Exacto knife (adults only) to score a fold line on the back cover at the width of the front cover. Kids can simply fold the paper and burnish the fold with their fingers. The idea is to get a nice crisp crease along the overlapping back cover.
- Step Two Place the latch side of the Velcro sticker on the center of the back cover flap. Place the loop side of the Velcro sticker on the front cover opposite the latch sticker. Alternatively place the stickers near the top and bottom of the journal for more security.

You’re done! How easy was that?
My kids tried it too! They struggled a little with the stapling and tape but were surprised at how easy it was “to make a book.”
Books To Encourage Young Writers
Now it’s time to encourage your young writer! What better way that the books below to get them excited? Take it away Erica!
1. Little Red Writing

This is a clever retelling of the Red Riding Hood fairy tale in which a red pencil embarks on a writing assignment with her basket of nouns. This is a very funny book for older elementary children because the text is rich with puns and word play, but it will go over the head of very little ones. During her journey she heads to Principal Granny’s office where she meets the mean and wolfish pencil sharpener! I’ve always loved Melissa Sweet’s art and she cleverly merges illustration and text to enhance the story. Delightful.
2. Rocket Writes a Story

In his first book, Rocket learned how to read and now he’s ready to write! His friend and tutor, the little yellow bird, introduces him to the tree of words and tells Rocket that all he needs is a little inspiration. What I like best about this book is that Rocket’s story telling journey is not a smooth one. He crosses out sentences, rewrites descriptions and works hard on making just the right illustration. Kids who have their own difficulties with writing will relate to Rocket’s struggle and perhaps be inspired to give their own storytelling another chance. Very sweet.
3. The Little Red Pen

I love Janet Stevens’ books for their dramatic flair. Just try reading this one aloud and you will see exactly what I mean. As with Little Red Writing Hood, the word play in this book makes it best suited for older elementary children. This story is reminiscent of The Little Red Hen, in which a group of individuals — in this case, anthropomorphized school supplies — learn that they are stronger when working together. Hilarious.
4. Nothing Ever Happens on 90th Street

This is a great book for kids who whine, “But I don’t know what to write!” Sitting on her stoop on 90th street, Eva has writer’s block. As she sits, a parade of eccentric characters pass by to offer her advice and inspiration. “Stretch… Use your imagination…” says the ballerina. “Add a bit of spice,” says her neighbor who is making soup. And just as a writer might urge a story along, Eva sets in motion an amusing cascade of events with her simple “what if?” suggestions to her neighbors. Inspiring.
5. Ralph Tells A Story

If your little writers are too young for Nothing Ever Happens on 90th Street, introduce them to Ralph. Ralph is having trouble writing a story in class, the ideas are just not coming! He always gets stuck after writing his name at the top. One day in class, however, he recalls finding an inchworm and prompted by the encouragement of his classmates, he turns a simple idea into a wonderful tale. I love how the kids work together to help Ralph! Charming.
Erica has 5 more books to encourage young writers over on her site! Get the rest of the list here. BONUS see her family’s art journals and another fabulously simple binding technique….here’s sneak preview….
Conclusion & More
I love this back-to-school project because you can to reuse some of the art your kids make that probably is collecting dust in a stack somewhere…am I right? Giving kids a chance to journal in a book made by them is great way to incorporate art and making into the writing experience.
For more projects in this series check out Pop up Books My Shape Book and Mini Bookmarks
These are absolutely adorable! I think I might make mini versions with my kids’ artwork to give away as Christmas presents. They generate a massive amount of art.
That would be such a cool idea! I was thinking of doing an artwork collection book, just for that reason. Maybe an upcoming post….
Love these colorful journals! The coordinating duct tape it a nice touch.
Thank you so much Ann! We love colorful duct tape!