Easiest.crystals.ever. That’s how I would describe Borax crystal growing. We have grown Epsom salt crystals and bluing/salt crystals and failed miserably at alum crystals and out of all these experiments I can say that borax crystals are the most foolproof ever. The solution is easy to mix, the crystals grown in a day, and are lovely and chunky with the quality of a geode.
For this reason growing Borax crystals is what I call a classic science project for kids; what I love about these crystals is that they have both the magical wow factor and are very, very easy to grow with some adult help/supervision. If you want to do the classic project see the instructions directly below. But if you want to expand your crystal growing into something a little more…well, elaborate, this Crystal Wind Catcher is just the project for you!
Crystal Wind Catchers are suitable for older kids 9+ (perfect for the science fair I might add) who can handle stringing beads, measuring, and testing their set-up.
The Classic Borax Crystal Project:
If you have kids 8 and under I recommend you mix up the Borax solution as described in the steps below and pour it into several smaller glass jars. Ask your children to bend a pipe cleaner into a shape then hook it onto a skewer laid across the top of the jar. Let it sit overnight and your kids will wake up to amazing crystals that will have grown on the pipe cleaner. You can get detailed instructions for the classic project here.
Today’s post is part of a fabulous series 28 Days of STEAM where you will find tons of great STEAM ideas to try with your kids.
To see the series in its entirety hop over here.

A Note on Borax Safety
Borax is a natural mineral and used by many as a cleaning product. There is a lot of information and misinformation on the web about its safety, especially when it is used in children’s projects such as slime and crystal growing. After doing much research I concluded that I felt safe using it in science projects with my kids while supervised. I highly recommend you read this article which has tons of great information Borax: Is it Safe or Not? so you can make an informed decision about its safety with regards to your own family.
This post contains affiliate links.
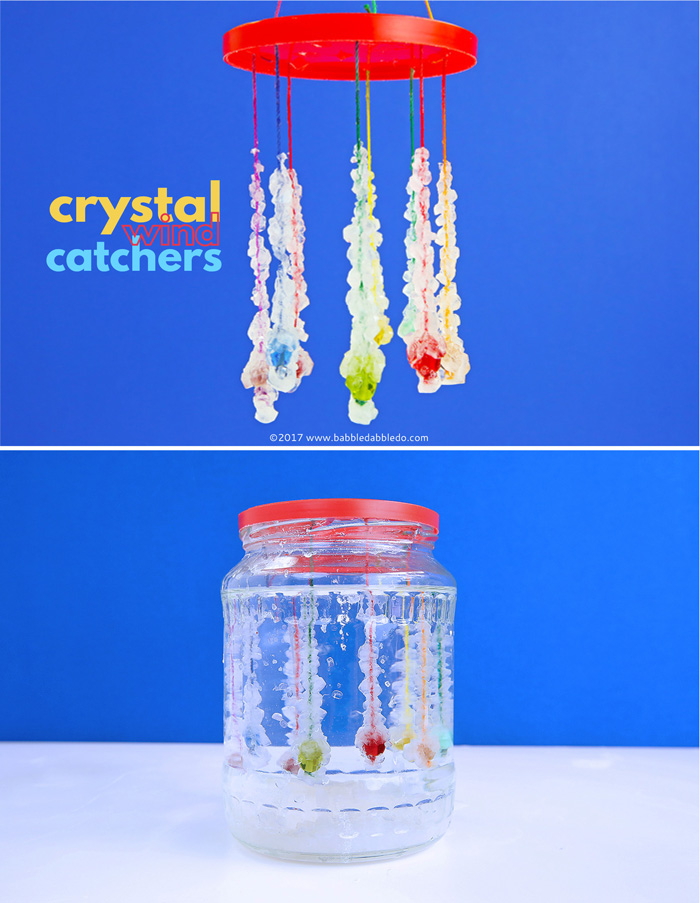
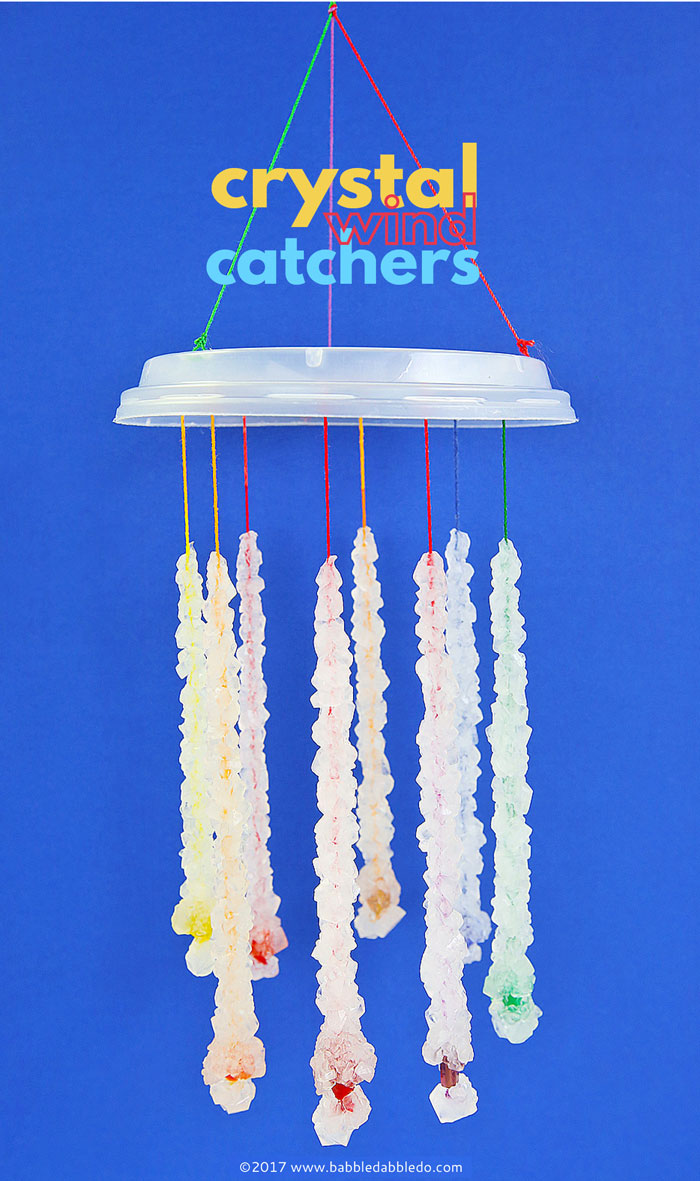
Borax Crystal Wind Catchers
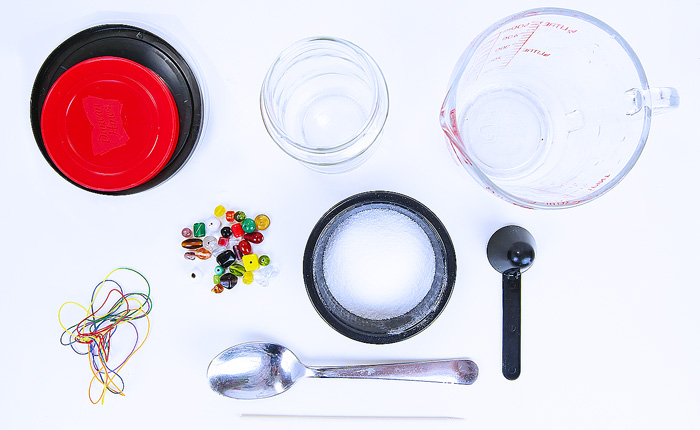
Materials
- Borax
- String I love this crochet string
- Large Jar
- Plastic Lid
- Beads (heavy beads preferred)
- Skewer
- Tape
Note on beads: I recommend you use heavier glass beads for this project to weigh the strings down. If the beads are too light they will float in the water and the string may tangle while the crystals grow.
Note on lid/jar testing: Make sure to test your jar/lid assembly before doing the Borax step. You want the plastic lid to be able to rest on the rim of the glass jar.
Instructions
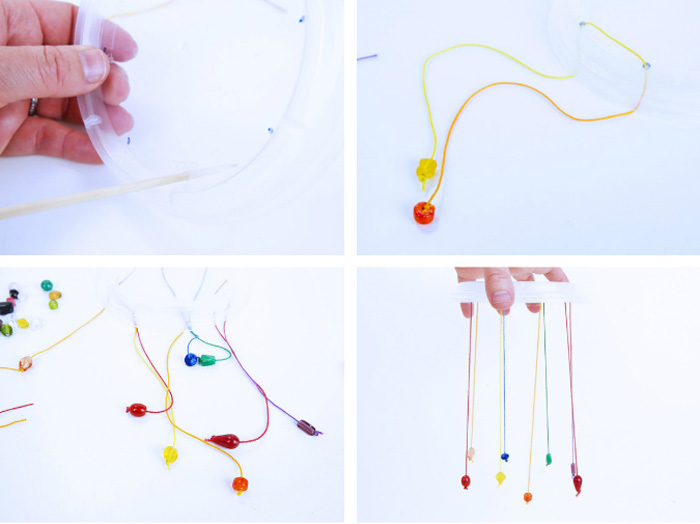
Make the Wind Catcher
- Step One Mark an even number of holes around the edge of a plastic lid. Use a skewer to poke a hole through the plastic (adults/older kids only)
- Step Two Cut several equal lengths of string. The length will depend on the height of the jar you will be using and should be approximately twice the height of the jar.
- Step Three Thread a bead into one end of the first string and secure with a knot. From the underside, thread the string through one hole in the lid. Continue threading it back down through an adjacent hole.
- Step Four Pull the thread so that the two lengths are roughly equal. Test the length of the thread by placing it in the jar. Make sure the ends to not touch the bottom or the sides of the jar! Trim the string as needed if it’s too long. Now tie a bead on the loose end of string and tape the string to the top of the lid to keep it in place.
- Step Five Repeat Steps 3 & 4 for all the holes in the lid until you have something that resembles wind chimes.

Mix the Borax Solution
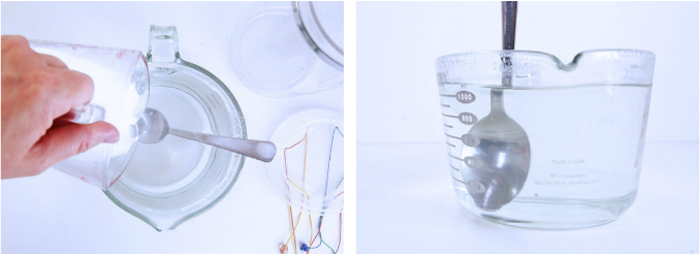
- Step Six (Adults only) Boil water on the stove. Let cool to warm but not scalding.
- Step Seven Pour 4 cups of the hot water into your jar. Stir 3/4 cup of Borax into the water. If you are using a small jar you may mix up a smaller amount of the solution according to is the basic ratio on the 20 Mule Team website. We will need a larger amount of the solution to fill a large jar.
- Step Eight Stir the solution until the Borax is completely dissolved.
Grow the Crystals
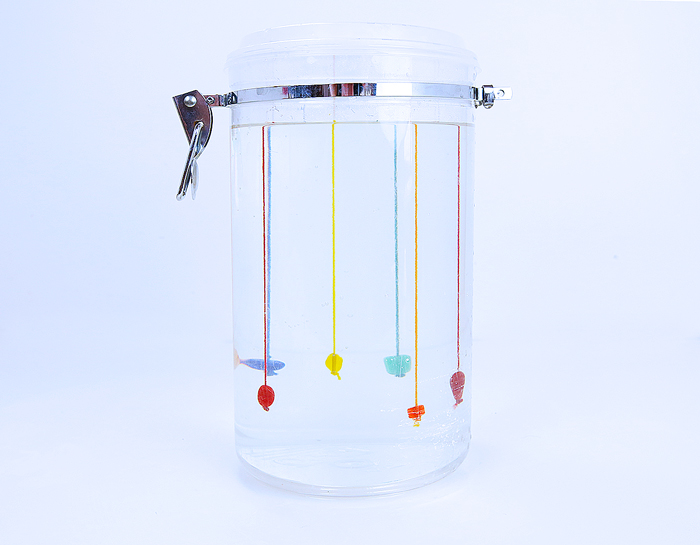
- Step Nine Carefully place your Wind Catcher assembly into the jar with the lid resting on the jar edge. Once again: Make sure the beads are not touching the jar bottom or sides! If they do they will potentially fuse with crystals that may grow on the sides of the jar.
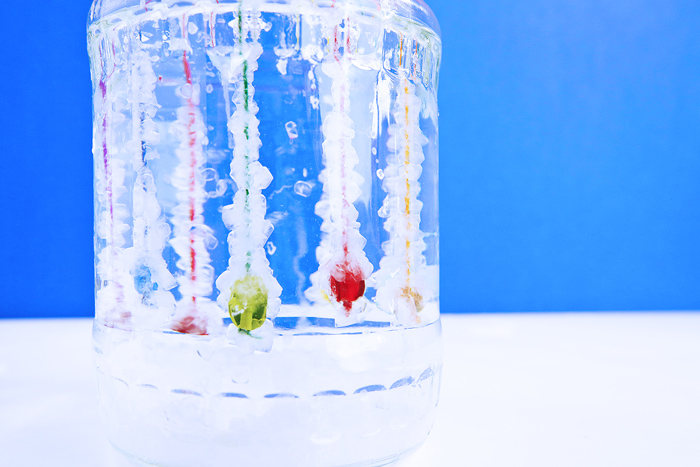
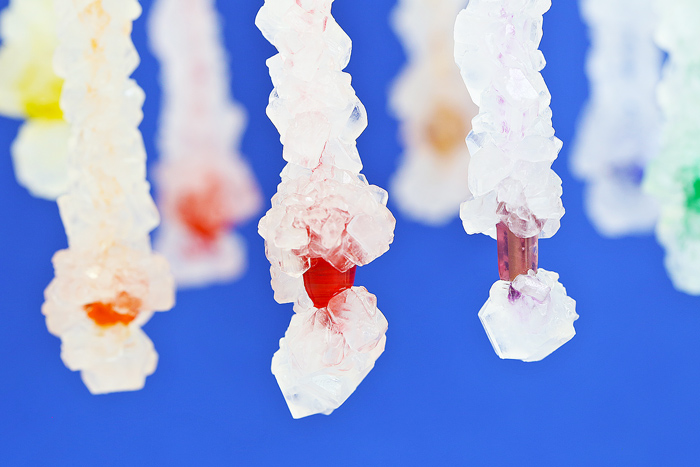
- Step Ten Wait. No really, go do something else for 12-24 hours! When you come back you will have lovely strands of crystals dangling from the jar lid.
You’re done! Add in three strings at the top to act as a hanger and place the wind catcher in a sunny spot where it can catch a light breeze.
Tips
- To best observe crystal growth on the strings it is preferable to use a glass container. Crystals will also form on the sides of the containers, especially plastic ones, which will make it harder to see the crystals without lifting the whole thing out of the solution.
- If you do use a plastic jar/container make sure that it can withstand the heat of boiling water and will not melt/deform.
- If any of your strands fuse together, gently pull them apart. Borax crystals are pretty hearty.
- To remove any crystals that may have grown on the sides of your jar simply fill the jar with hot water and let the Borax dissolve.
Now that you know how to whip up a Borax crystal solution and use it to grow amazing crystals you are probably going to want to experiment with just what you can grow crystals on! Did you know you can grow them on flowers (artificial ones hold up best but roses work too), rocks, and shells? You can also add food coloring to the solution to create crystals of different colors. The sky’s the limit!
Borax Crystals are a great introduction to the magic of growing your own crystals at home using simple materials. What I love most about Borax crystals is that they are no-fail; we have done this project numerous times over the years and I have yet to have any duds, unlike some of our other crystal growing experiments which didn’t work 100% of the time. Try your hand at the Classic Borax expert in the introduction and then move on to more experiments including our wind catchers and whatever other ideas you come up with!
Are you passionate about raising creative kids?
Join over 14,890 parents and educators who want connect with kids and nurture their creative process through magical, easy projects you can do TOGETHER.
Send me awesome creative project ideas!
Hi,
I am looking forward to trying this project with my grandchildren !
However, I find the below statement confusing….please clarify:
Tips
◦We found that crystals were more likely to grow on plastic containers than glass containers, making if preferable to use glass jars when possible so you can easily observe the crystal growth. If you do use a plastic jar/container make sure that it can withstand the heat of boiling water and will not melt/deform.
You say the crystals are more likely to grow on plastic containers, but them o on to recommend glass ones. Or do I misunderstand you ?
Many thanks for your wonderful articles.
Marilyn.
Thanks for the question! I meant to say that crystals will form on the containers as well as the strings and to better observe crystal growth on the strings it is preferable that they don’t grow on the container, therefore glass is preferred. I’ll fix this statement- it is confusing!