DIY lights are one of my favorite project types to tinker with! One of the most interesting classes I took in art school was a lighting course where we played with light every week. Some of the final projects were absolutely amazing, like a pendant made out of Dixie cups, a network of LEDs that looked like fireflies and my personal pet project, an egg lamp, made out of raw eggs. I gotta find a pic of that one….For our first project exploring light this month I wanted to continue that tradition of playing with light to make something decorative and pretty. And I wanted it to be kid friendly!
Most lighting projects are not so kid friendly because working with light involves electricity, voltage, and… shocks! Trust me, been there done that! But then I remembered this awesome product called Electroluminescent Wires (El Wire) and hurried to buy a couple kits online.
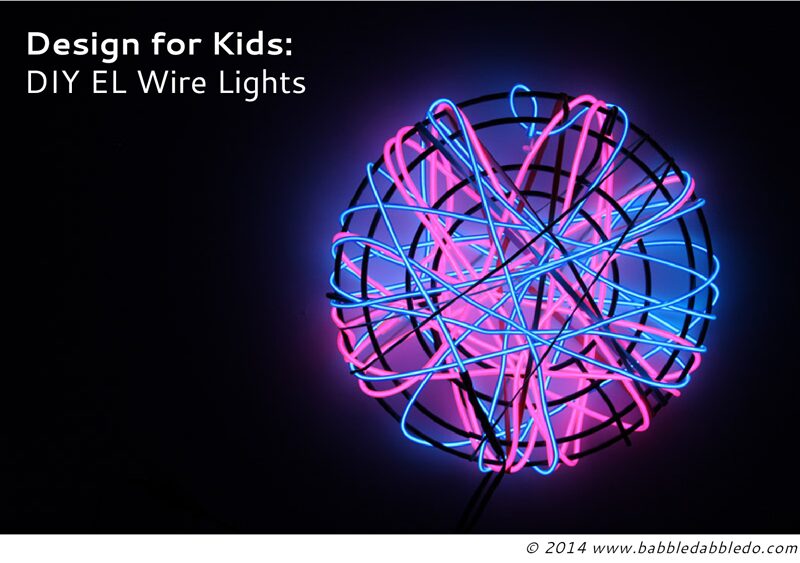
What is EL wire and is it safe? Electroluminescent Wires (El Wire) is a soft glowing plastic strand of light that runs off a battery pack and two AA batteries. It is often used for costumes with glowing features. The kits sold with battery packs and inverters are a great choice for lighting projects with kids because the wire doesn’t get hot. However if you bend it too much you might get a small shock, especially if you are wearing them on a costume. Avoid using this product with kids that put things in their mouth however, it’s never safe to eat a light! If you have questions about the safety of using EL wire with kids check out this article: How EL Wire Works. EL wire is also relatively inexpensive. I highly recommend buying some of it and experimenting with the possibilities!
This post contains affiliate links to products I love and recommend to my readers, plus it keeps this little blog o’mine afloat! Thank you!
DIY Lights with EL Wire
Materials
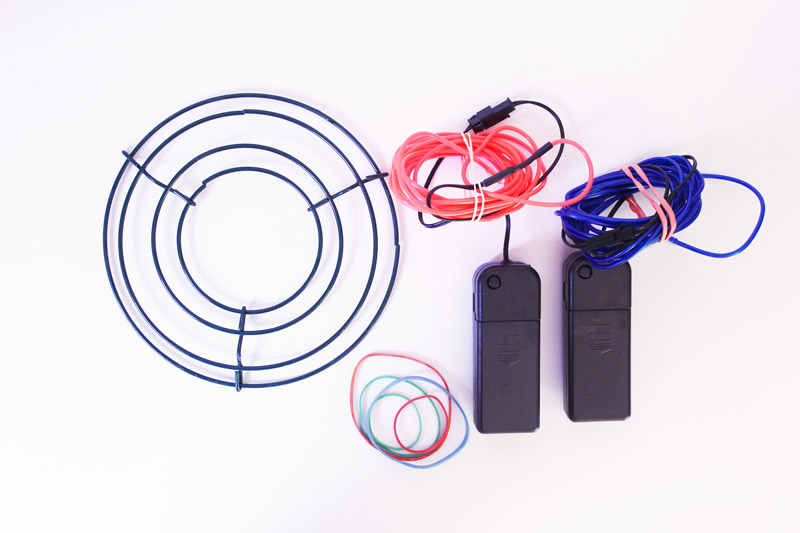
- Electroluminescent Wires (El Wire)
- AA Batteries
- 6” wire wreath form (Amazon sell them 12″+)
- Rubber bands
Instructions
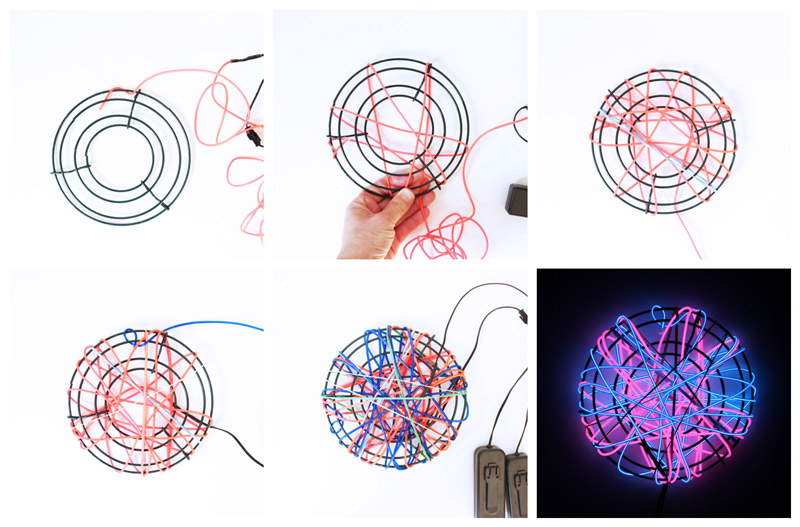
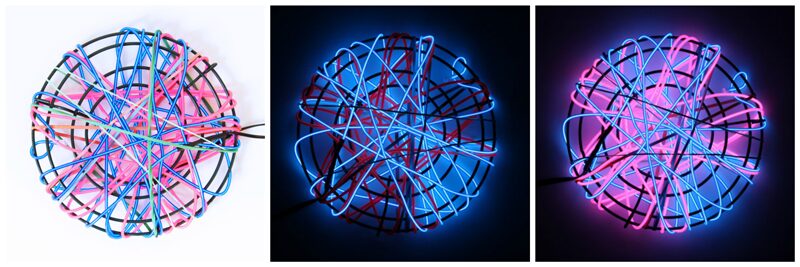
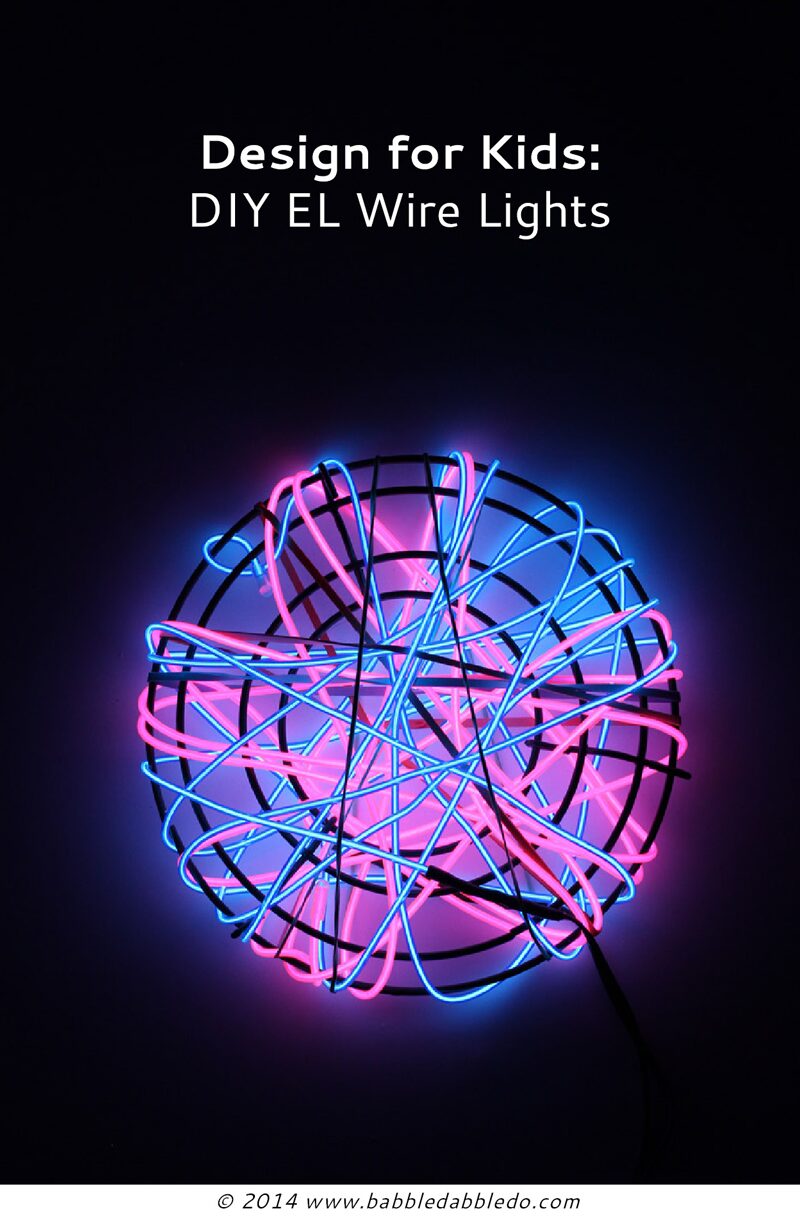
- Step One Unfurl the EL wire. Tuck the loose end of the wire underneath a section of the wire wreath.
- Step Two Start wrapping the wire around the wreath form. Add rubber bands at intervals to prevent the wire from slipping off the form. When you are done wrapping the wire add another rubber band or two to secure it in place.
- Step Three Wrap a second and or third strand/color of EL wire around the form and secure with rubber bands.
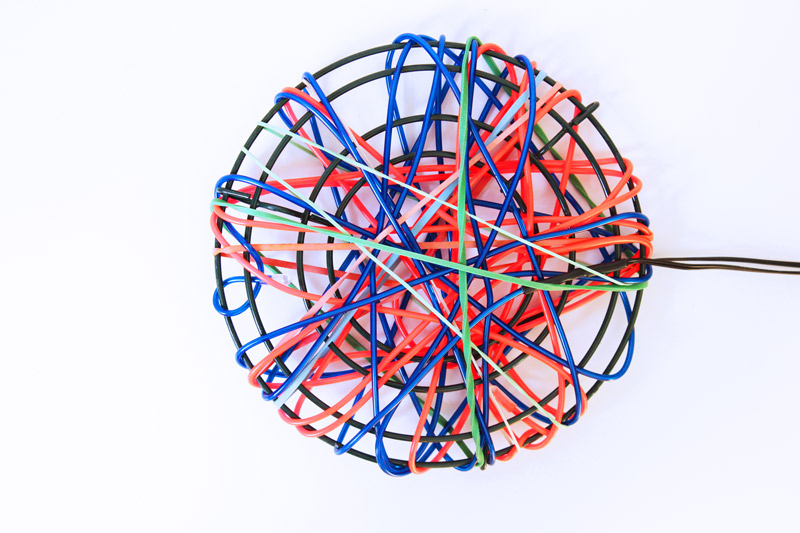
You’re done!
Note: These kits are strobing so when you press the button you get different lighting effects. The first press turns the light on, the second and third presses initiate the strobing effects at different intervals. The fourth press turns the lights off. My kids didn’t make this project abut they did enjoy sitting in a dark room and pressing the buttons to look at the different light patterns as the lights blinked off and on.
Here it is in action:
Tips
- If you don’t have or can’t find a wire wreath form you might also want to try cutting a disc out of cardboard with slits around the edges and wrapping that. You could also try wrapping it around a whiffle bell.
- Dark spots may appear at bend points on your EL wire so be aware that there may be dark spots if you repeat this project many times or kink the wire too hard.
- EL wire hums slightly. If you plan on using this in a kid’s room as a night light consider placing it across the room from the bed!
Looks Like
Dan Flavin. If I had to pick a favorite artist of all time I might just have to pick Dan Flavin. Dan Flavin was a minimalist artist who gained notoriety in the 1960’s by using fluorescent lights as his artistic medium. His work may appear simple at first glance but his exploitation of color, light, and reflection is incredible especially if you have the chance to experience it firsthand. When I lived in New York the Dia Art Foundation had a permanent installation of his in their stairway. I remember the first time I climbed the stairs and thought that they had some pretty cool lighting going on. That’s actually the first time I discovered the work of this amazing artist. Curious what it looks like? Check it out here: Dan Flavin Untitled
Conclusion
DIY lights using El Wire are a captivating way to introduce your kids to the wonders of working with light. Kids and grown-ups alike are always mesmerized by glowing, flickering, pulsing light and this project will hopefully get your kids (and you) thinking about the possibilities of incorporating light play into your regular routine of kids’ activities. What other projects would be cool to make with EL wire? If you have a good one leave a comment below!
More
- This is our first light project on Babble Dabble Do! But we have had fun with suncatchers which are a way to exploit sunlight. Check out our suncatcher projects out here, they are some of the most popular projects on Babble Dabble Do to date: Cosmic Suncatchers and Crystal Suncatchers.
- If you want to make more DIY lights with/for kids or yourself check out this great round up from Instructables: DIY Lamps
- Instructables also has this great round up of EL wire projects: Easy EL Wire Projects
- For another kid-friendly lighting source, check out fiber optiocs. They are inexpensive and always fun to play around with: Assorted Colored Fiber Optic Novelty Lamps.
And don’t miss out on more design here on Babble Dabble Do! Your child’s inner Dan Flavin thanks you! Subscribe below or like us on FB
SO. COOL. I am mesmerized by light projects of all kinds, so I am going to enjoy this month tremendously at Babble Dabble Do!
Thanks Stephanie! I’m a light junkie! I was this close to becoming a lighting designer at one point……
OH MY GOODNESS!!!! This is awesome and totally inspiring!!!! I have to buy this stuff asap and put it in my girl’s tee pee!!!
Thanks Meri! These would be awesome inside a tee pee!
This is probably the coolest thing EVER. I am so impressed by your lighting prowess and my head is spinning with lighting ideas (that I’ll never get around to making 🙂
I just needed an excuse to have fun with these Jeanette!
Wow! I’m starting my annual Summer activity hoard , and this will be FABULOUS. My daughter will go nuts over it. The closest I’ve been to light play, was making a ‘tooth fairy light’. It was simple: consists of just popping open a few glow tubes-(the ones from the fair,or 4th of July), and pouring the glowing liquid they held into a mason jar. I also added a few spoonfuls of various glitter to see if it would enhance the glow, which it did. Then, I screwed the lid on-but if you have young ones who may try to open the jar, use a bit of super glue to adhere the lid permanently. Lastly, I decorated it with ribbon & flowers. I was shocked how neat it looked & how long it lasted with regular sun recharging.. My daughter was fascinated with it & still displays it in her room! Obviously, while the glowing liquid is non-toxic, according to packaging-an adult must do this! It’s possible to cut the top and pour the liquid out, just be slow & careful, it can splatter easily.
Anyhow-this is the 100% more awesome version of that! Thanks for the idea, I’d honestly never heard of such a thing!
Sounds like a fun project Ana!!!!
This is one of the coolest light projects I have seen for kids. They can keep changing the look and shape of the light. The colors are just amazing. This year I was planning to gift my nephew a subscription for an educational game like Jumpstart (http://www.jumpstart.com/), but then after seeing this, I am just going to get the EL wire and help him make his own designer light! Many thanks!
Rock on! So glad to hear it!
Where do I purchase EL lights?