I love making our own art materials. I can spend a fortune in an art/craft store in the blink of an eye so it is such a relief to make our own materials with inexpensive ingredients at home. Colored salt is a very easy material to make with ingredients I bet you have lying around the house at this very moment. And this project is great for little hands. My daughter couldn’t wait to start mixing!

How to Make Colored Salt
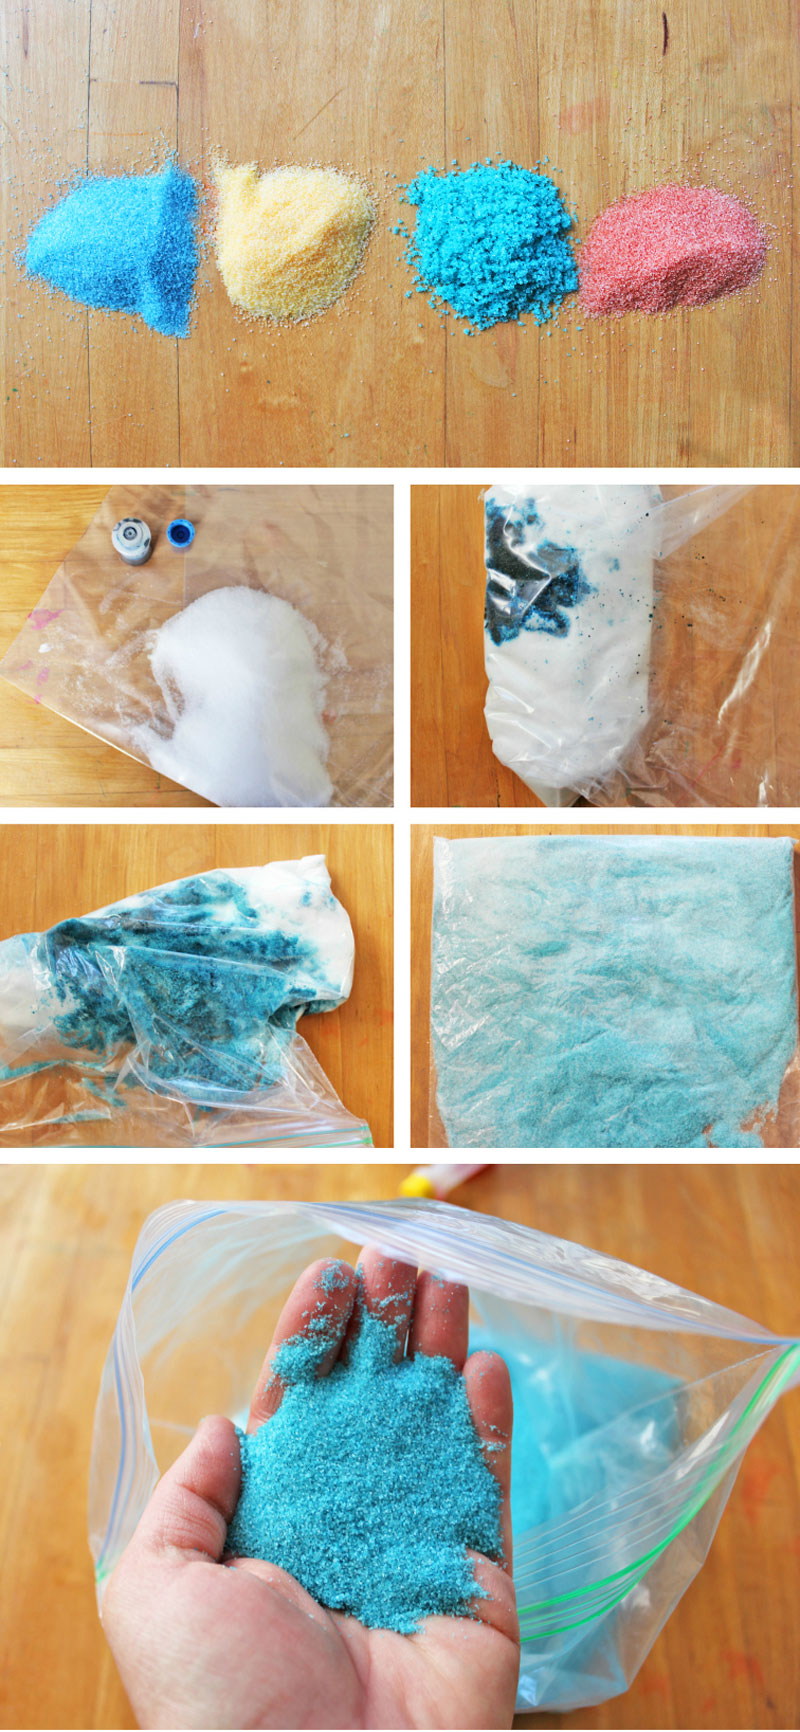
Materials
- Salt
- Food Coloring or Liquid Watercolors
- Ziploc Bags

Instructions
- Step One Add the desired amount of salt to a Ziploc bag.
- Step Two Add food coloring to the bag. The more food coloring, the more saturated your colors.
- Step Three The most important step! Press out all the air from the bag and securely close it. The last thing you want is a bag of exploded food coloring and salt all over your house!
- Step Four Knead the salt and coloring until it is all mixed together. I found that waiting to mix everything a minute or so after adding the food coloring made for less coloring clumps and an easier mixing process.


You’re done! If you’ve added a lot of food coloring you may want to let your salt dry out a little by leaving it exposed to fresh air. Otherwise, you can either store it in the Ziploc bag or another airtight container.

So now that you’ve made colored salt what do you do with it?
- Water Color Painting with Salt Salt adds a great texture to water color paintings. If you haven’t tried it, have your kids sprinkle some salt on the page the next time they do a watercolor paining.
- Salt and Glue Paintings Have your child “paint” a picture using glue, sprinkle salt over the glue to create the color, then shake off the excess salt.
- Salt Layering Give your child a clear glass bottle, a spoon, and several colors of salt, then ask them to layer the various colors.
- Ice Sculptures We made these last year at my children’s preschool and they were a hit! Sprinkle colored salt over large chunks of ice; the colored salt both helps to melt the ice and create colorful patterns.
- Salt Pendulum This batch of salt was made specifically for this science/art project. Check out the tutorial here.
For more fun projects using colored salt check out the web. Unless the project involves water or a living plant, colored salt can easily be substituted for colored sand in many an art project.

Fill your child’s life with more art, design, and science!
Subscribe to our free newsletter and check out our FB page where I share tons more creative ideas and resources from around the web.
Thanks for stopping over to my blog! I love this idea, and I want to try it with the glue painting. I’m following, and I can’t wait to read more fun ideas.
Thanks so much Becki!
I love this idea! The colours are so intense, and I can’t wait to try it out with ice sculptures.
Thanks Bella! I’m so pleased to hear it. I’m a regular follower of your Art Club Blog! BTW check out what we did with the salt; I think you’ll like it: https://babbledabbledo.com/science-for-kids-salt-pendulum/
Who knew it was just that easy! I can’t wait to try this for my daughter. I’m pinning it too!
Thanks Bonny! Hope your daughter enjoys creating with the salt!
Great idea! Never knew about this!
Thanks Diana! Super easy and fun!
How do i get my salt to be a true red? Mine came out orange?
You’ll need to use a LOT of food coloring, but it is hard to get really vibrant colors. I just started working with liquid watercolors, you could try substituting them for the food coloring 🙂
I just tried this with sugar too. So far the results are similar, except the kids want to eat it more.
Ha!
Hi
does the coloured salt fade over time? does anyone know?
Not that I recall 🙂
I am 74 years old and have a hard time seeing how much salt i’m using on my food this seem to be a way that i can see the salt if it were colored, my question is, can i use this colored salt method and still use it on my food?
Thank you
Hi Vince- If you use food coloring you can use this on food.