In the realm of arts and crafts ideas for children, rubber stamps rank pretty high up there, and for good reason; using stamps is easy for little hands and the results are magical for kids.
I have to admit I never tire of the look of something hand stamped either; the combination of ink’s uneven texture and the idea of “self-printing” are just irresistible. But hold on there, have you seen the price tag on rubber stamps? It’s high enough that I own exactly four of them, one for the holidays, two I bought for my wedding invitations, and my architectural stamp, no joke. My daughter has one mini animal stamp set too, so I guess that counts but you can probably tell where I’m going with this…..time to learn how to make a stamp!
This post contains affiliate links.
How to Make a Stamp

Materials
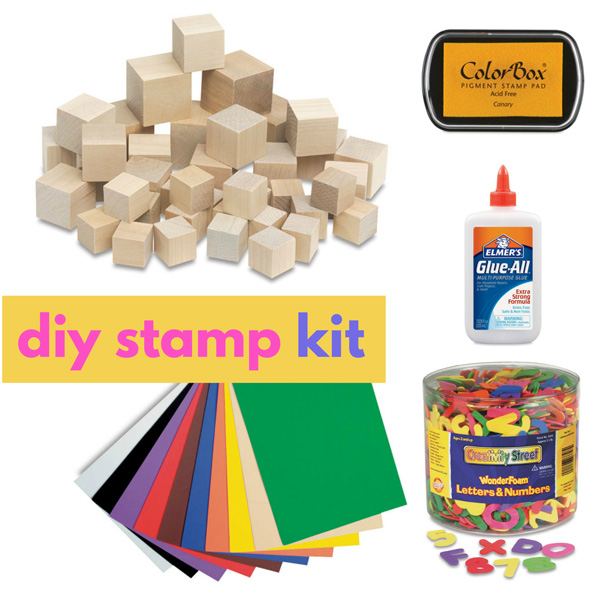
For the Stamps:
- Plain Wood Blocks
- Craft foam sheets and/or Pre-Cut Foam Letters
- Glue
- Paper
- Stamp Pad
If you don’t feel like going out and buying the above materials you can order them here:

Tools:
- Scissors/X-ACTO Knife (ADULTS ONLY)
- Cutting Mat (optional)
- Hole punch (optional)

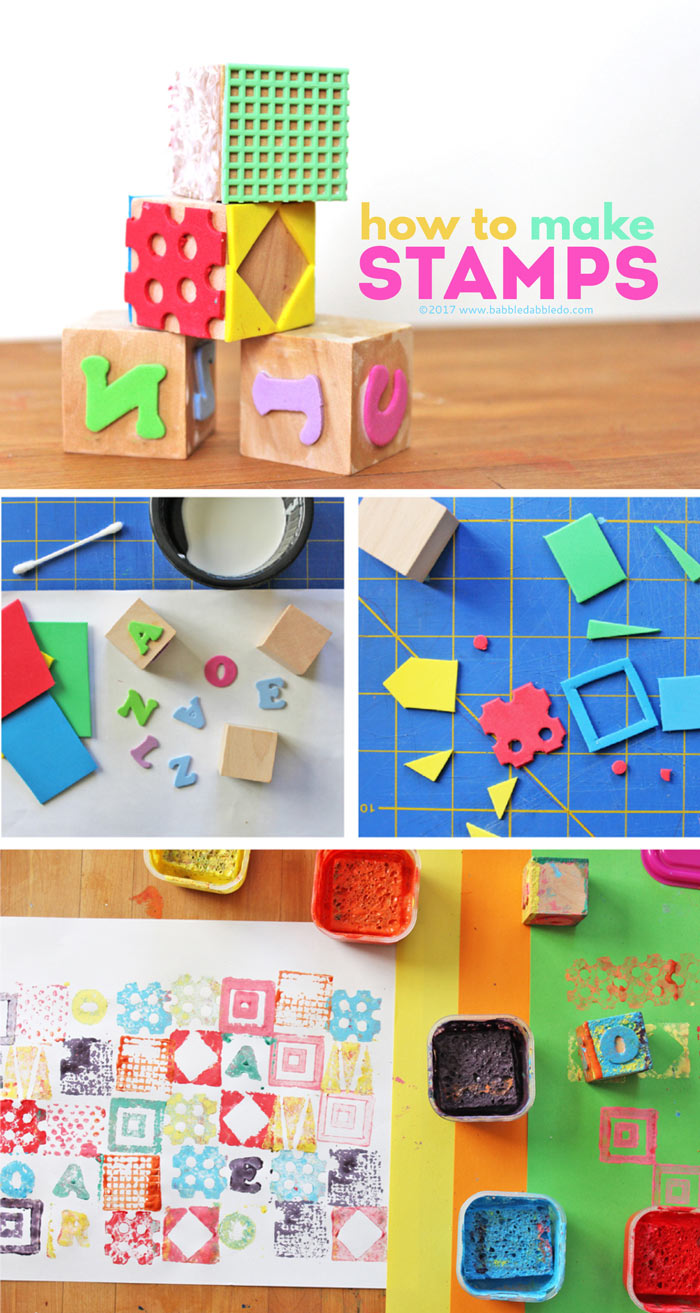
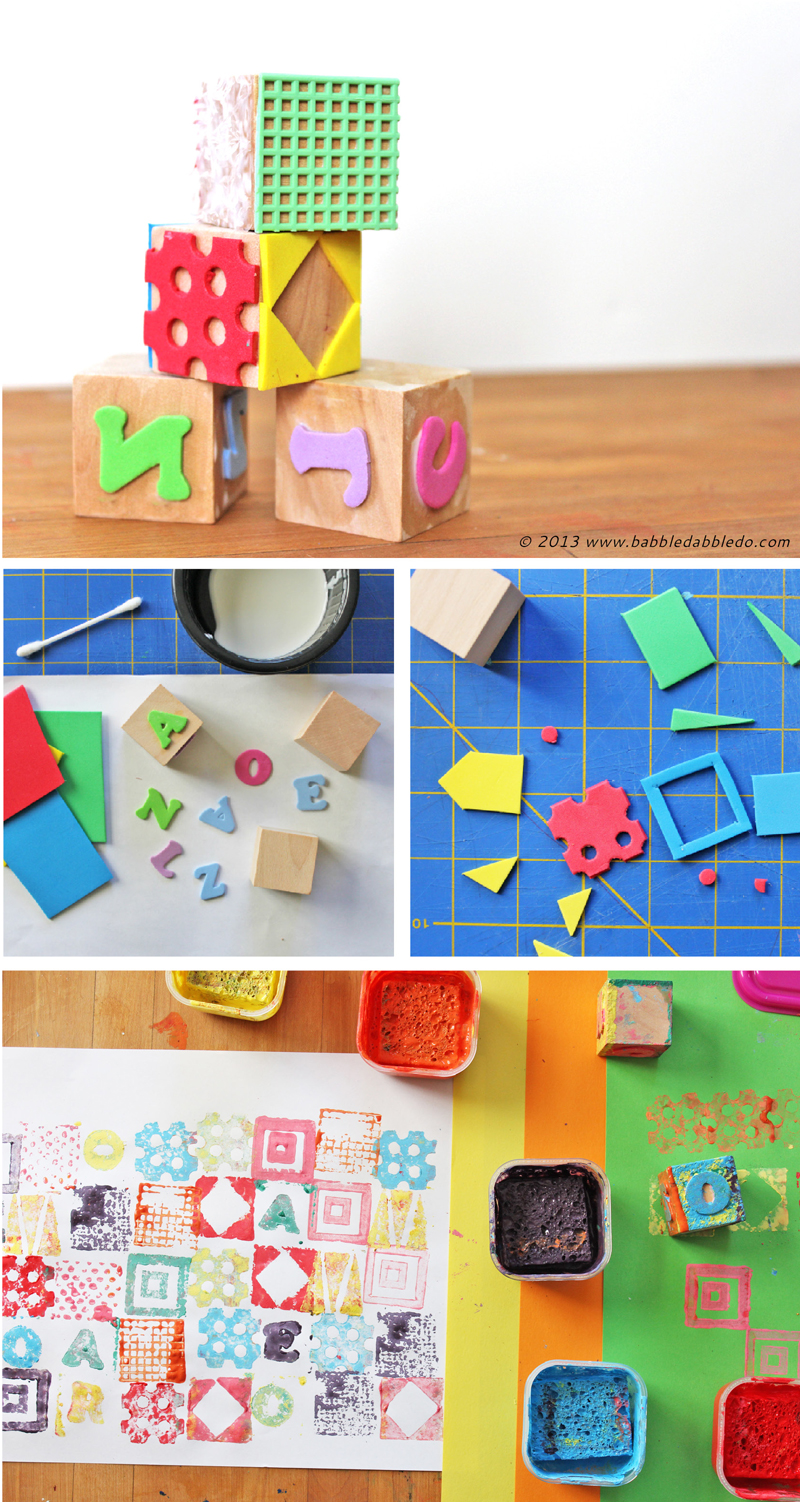
Making a Stamp:
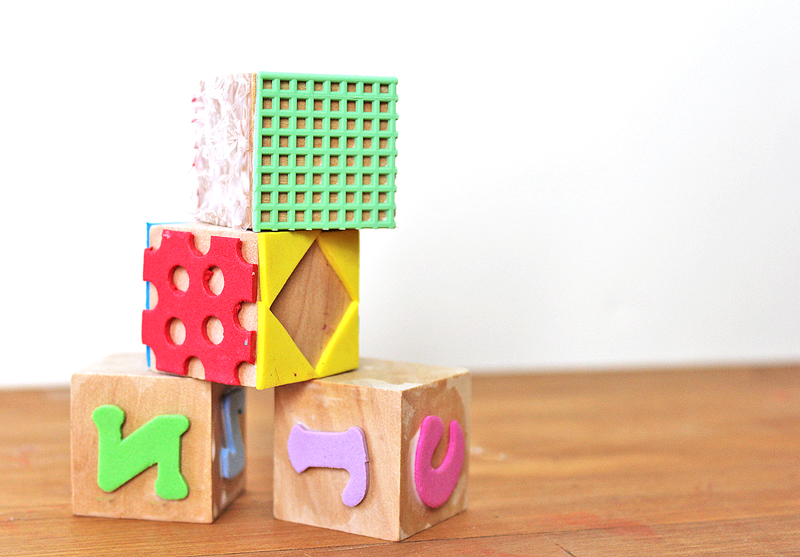
You will be covering 4 sides of a 6-sided cube with foam. Leave two opposite sides empty so you can hold the finished stamp without getting your fingers inked.
- Step One If you are using adhesive backed pre-cut pieces of foam simply peel and stick them to the sides of the wood block. If they are not adhesive backed, spread white glue on the side of your block and glue the letter or shape down. This is easy even for little hands!
- Step Two If you are using foam sheets, start by cutting it into square shapes that roughly match the side of the cube.
- Step Three From there, cut out a variety of shapes and start gluing them to each side. I used a hole punch to cut out circles from the foam.
- Step Four Let the glue fully dry.
IMPORTANT: If you are making alphabet or number stamps be sure to reverse the letter or numeral when gluing it to the wood block; otherwise it will read backwards when you stamp it!

Of course because I am an aesthetic snob I had to make the blocks look colorful despite the fact that after one use they were covered in ink! Still if you make these as gifts, taking a little time to “dress them up” is worth it. Since these are foam stamps you can either use them with store-bought ink pads as you would any other stamp or you can make your own stamp pad.
Making Stamp Pads:
Materials for the Stamp Pads
- White glue
- Tempera paint
- Sponges
If you want to make your own stamp pads here’s a simple recipe:
Mix tempera paint and glue with the following ratio: 3 parts paint, 1 part glue
Cut sponges to fit some small plastic containers (use inexpensive new for the dollar store or recycled plastic tubs), and mix the paint/glue right in the container to make mini ink pads. I suggest making more “ink” than you think you’ll need, if left overnight the sponges really soak up the paint/glue and by the next day our stamp pads were a little gooey. Cover them tightly with a lid to prevent drying out.
NOTE: These pads will dry out over time. Try refreshing them with little bit of water on the sponge.


There you have it, simple, inexpensive, custom stamps!
After I made these I started thinking about the endless variety of stamps possible, not just out of foam but out of textures and other objects. For one block I used a plastic grid, rubber shelf liner, burlap, and bubble wrap on the sides. I also covered a lint roller with shelf liner (again peel and stick, how easy is that) and had my own roller stamp which made the dot texture shown below.

One final note, texture stamps work better when using paint rather than a store bought ink pad. You need a lot more of the paint medium to make the texture show through on the final stamp. But the result is worth it!

More
Wanna make you own stamp and font? Check out our fun Design For Kids Series that will teach you both:
If you enjoyed making DIY art materials be sure to check out these posts:
Are you passionate about raising creative kids?
Join over 14,890 parents and educators who want connect with kids and nurture their creative process through magical, easy projects you can do TOGETHER.
Send me awesome creative project ideas!
I LOVE the final art work! And the the stamp idea is fun too! Thank you for linking up to Monday Funday!
Thank YOU Jaime for stopping by! I’m a big fan of your blog and tweets!
I’ve made a few stamps before, so fun. Love your ideas – especially the grid shelf liner & the rolling one.
Thanks Leah! Your blog is wonderful. Looks like we have similar philosophy regarding creativity: Do something creative everyday.
Wow, so simple and clever! I especially like the part where you used the lint roller.
Found the post via PinMe party at dianarambles.com
Thanks! Next time I’m at IKEA I’m gong to pick up a ton of their 50 cent lint rollers to make more stamps. SO easy!
Ana
Great post. Sooo cool! I’ll be trying it out this weekend with my granddaughters. I found your blog at the Pin Me Linky Party #21 and will be pinning it momentarily.
Glad you liked it Darlene! Thanks for stopping by!
What a great idea!! Love it!!
I’m visiting from Diana Rambles’ pin party. What a great idea! I hope you’ll link this up today (or anytime this weekend) at One Creative Weekend on OneCreativeMommy.com. (Pinned.)
Thanks for the invite Heidi! I linked up at One Creative Weekend! Thanks for hosting!
I’m so glad you linked up. I love the projects you created with the stamps. They look like so much fun, and my kids would love to be allowed to create such a messy project! (I mean the paint is messy-not your art!) I’ll be featuring your project tomorrow night on One Creative Weekend at OneCreativeMommy.com. Please stop by and grab a featured button if you’d like. I can’t wait to see what you link up this week!
Wow Heidi, thanks so much for the feature! I’m looking forward to this week’s link party! Thank you for hosting 🙂
Great idea! I love this…I’m a stamper, too. 😉
Pinning!
<3 Christina @ I Gotta Create!
Wildly Original link party is open.
Thanks Christina! Making your own stamps is a lot of fun!
I love this so much! That patchwork of stamps is amazing…can’t wait to try this!
Looks like lots of fun… thx for the inspiration 😉
Thanks for checking them out Rebecca!
So many great patterns from simple designs! I’ll be featuring this on The Crafty Crow!
Hi Cassi,
I’m so pleased to hear it! The Crafty Crow is always full of such amazing projects. Thank you for including me!
Ana
The link on the paint/glue mixture is not working. Do you happen to remember the ratio you used? Thanks!
Hi Tori, Sorry for the late reply! Thanks for letting me know about the broken link. I updated the page to reflect the right ratio. It 3 parts paint to 1 part glue. Hope that helps!
Thank you for sharing these wonderful ideas! Such a frugal fun way to make your own & have the children in on the process! Plus, your stamps appear very well-designed when used! Amazing to achieve the aesthetics at the same time! Most of our art looks like foam stickers n wood blocks lol–these look like stamps 😀 Thanks for sharing your tips & best with us all. PS–have old wood blocks in shed, got small containers; excitedly I bought the sponges today & ordered some tempura for the first time on line! Once it arrives, we will have all the pieces to build our very own. Many thanks again. I just LOVEEE your entire website!
THANK YOU Jeanine! I really appreciate your kind comments!
Can I use acrylic paint rather than tempera paint? I’m looking for a more waterproof end product.
Hi Becky,
I’m not sure but I would imagine acrylic would also work well 🙂
hey there becky, just wondering if you tried this and have any tips!!???
I actually just came back to visit cuz were making these today but only have acrylics left!! LOL
Can you help!!!??? Did acrylic work? I bought sponges for stamp pads and the containers…i just
wonder if it’s worth it to try? maybe you could send me an email answer directly on my blog linked under my name, under my Contact Us page…? THANK YOU ALL!!
Ana!!! You’re never gonna guess what i tried and it worked well & was good lookin too! ?! 😉 We just happened to be working with our liquid watercolors and mixed them with condensed milk, & they lasted three days in fridge lol 😉 It was all we had at the time!! Thanks!
Jeanine that is so cool! I have been wanting to try working with condensed milk paint. Thanks for letting me know; I’m inspired to try it now! Was the paint thick?
I’m inspired! Thanks!
Yay!
What a great idea! I’m a children’s librarian, and I plan to make these for a craft program.
One question – what’s the purpose behind mixing in some glue with the paint? What would be the effect of leaving it out and just using tempera paint?
I think you could do that. The glue just thickens the paint a bit