I’m a wreath nut. But not your traditional foliage style wreath. Oh no, I like off the beaten path wreaths and have tons of them lying around in various states of completion…..this is NOT one of them!
I first posted this DIY wreath tutorial on a collaborative site a couple years ago and I finally am sharing its goodness with you here today. Yarn wreaths are one of my favorites types of DIY wreaths out there; they require a few inexpensive materials and a bit of patience but will last forever. This little puppy is now on its third holiday season being displayed at our house.
I particularly love the modern minimalist feel of yarn wreaths. They are also a great arts and crafts projects for older kids. We tried them at a wreath making party and a few of the 6 year old girls tackled them with aplomb.
DIY Yarn Wreath Tutorial
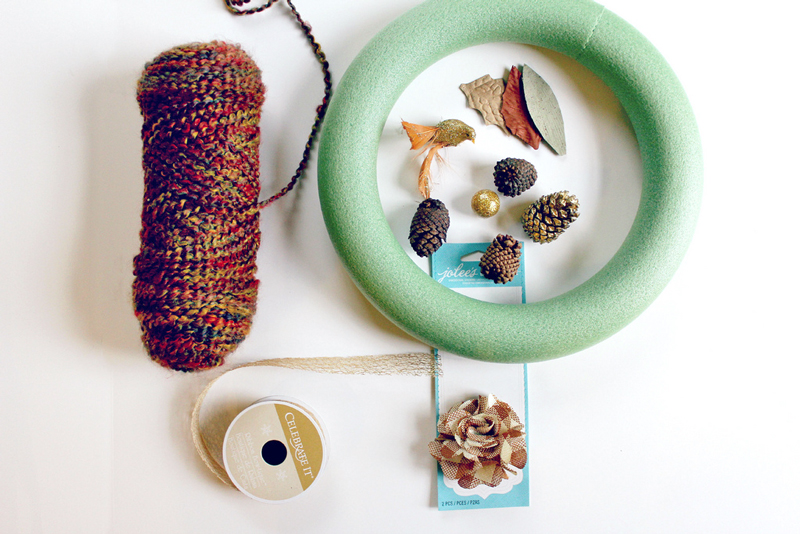
Materials
- Styrofoam Full Round Wreaths Available online or at your local craft store
- Yarn
- Decorative Elements- I raided the dollar bins at my local craft store for fun decorations.
- Ribbon
- Scissors
- “Disappearing” Pins
- White Glue
- Glue Gun/Hot Glue
Instructions
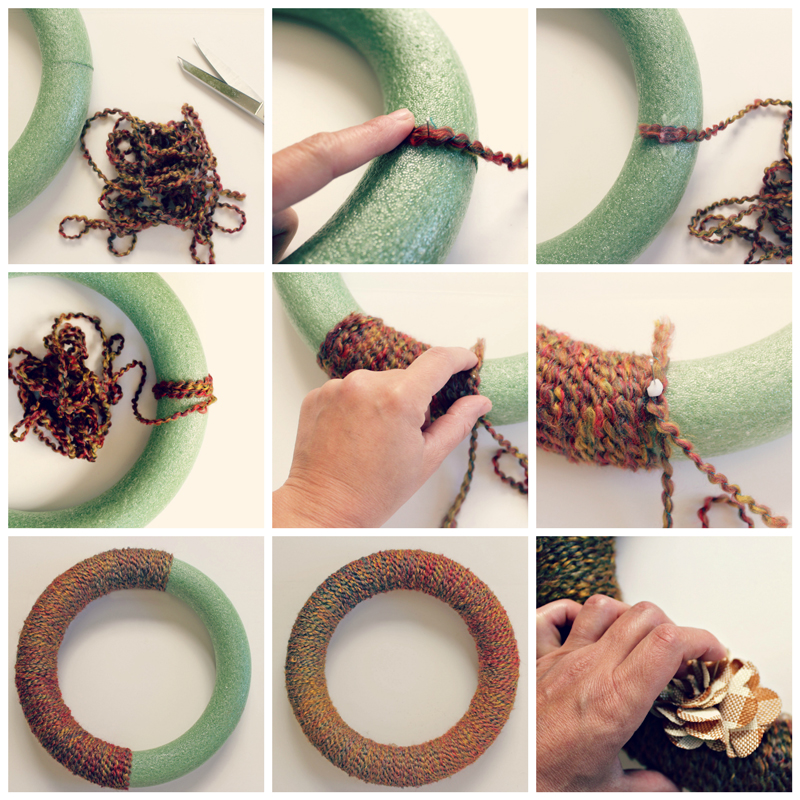
- Step One Cut a long usable length of yarn (wrapping an entire ball of yarn through the wreath is cumbersome).
- Step Two Pin the end of the yarn to the back of the wreath form and add white glue to hold in place.
- Step Three Start wrapping! It really doesn’t take as much time as you think it will, trust me. You can watch a movie while you wrap!
- Step Four When you reach the end of one length of yarn, cut another strip and tie it to the first piece. Make sure the knot is positioned to the back of the wreath. Trim the loose ends, pin the knot down, and add a little white glue to secure it in place.
- Step Five Continue wrapping.
- Step Six Finish up the yarn. When you get to the end make sure to pin down the last length of yarn, glue and trim. I also added more white glue to the places I had pinned for more durability.
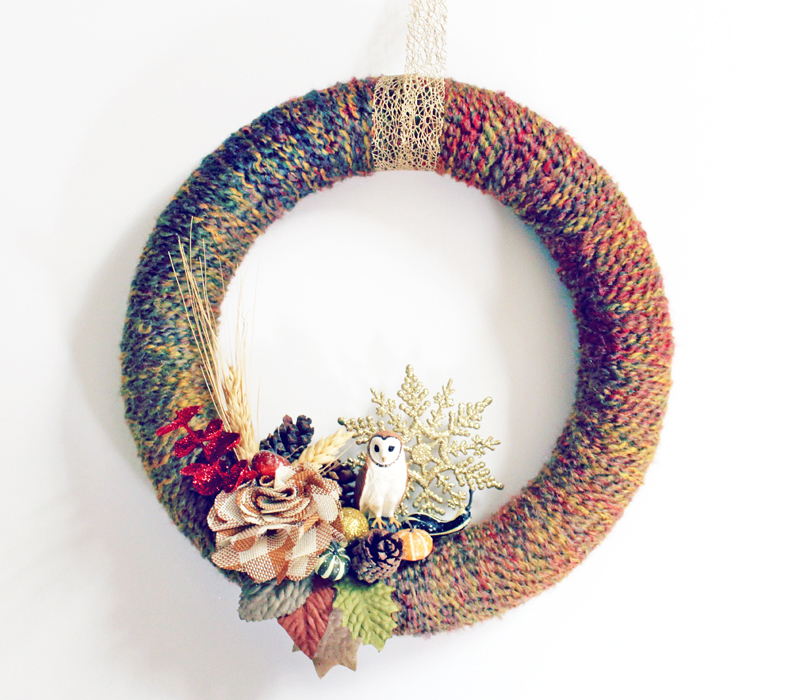
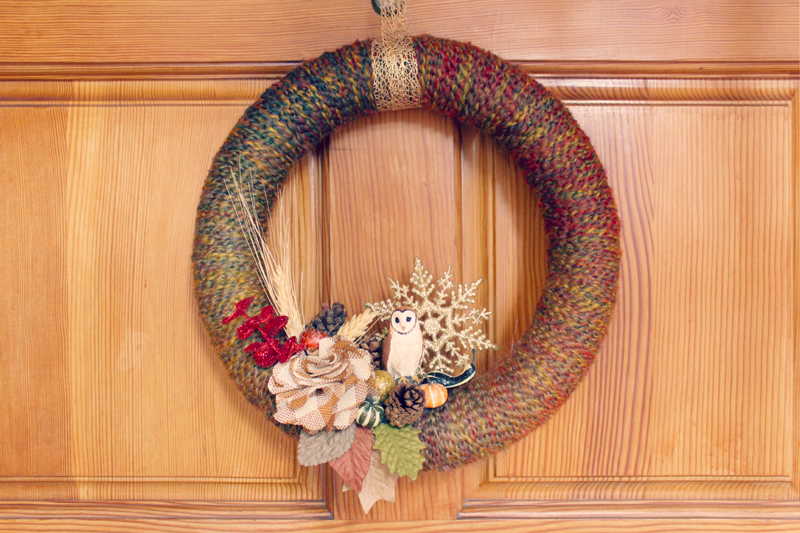
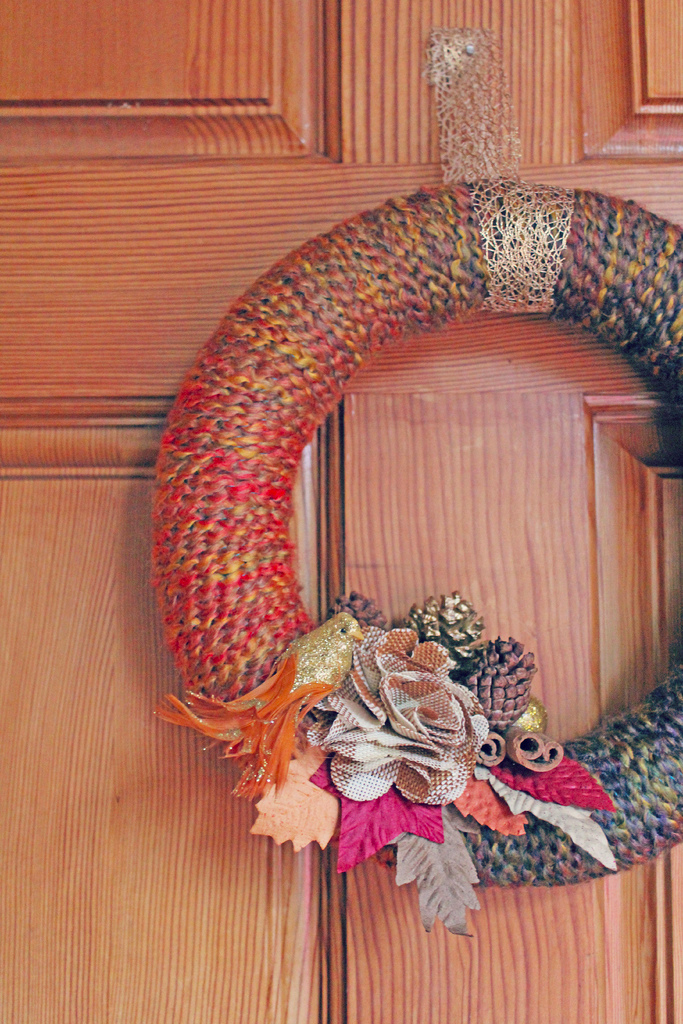
- Step Seven Adorn them! Use a combination of hot glue and pins to affix decorative elements to the wreath. For a list of cool items to add see below.
- Step Eight Hang it! Cut a length of ribbon and loop it around the top of the wreath to use as a hanger.
Tips
- Make sure to keep the yarn tightly wrapped and squish it next to the adjacent rows. The last thing you want is to expose the wreath form. I prefer non overlapping rows but I have seen more free form wreaths. It’s up to your aesthetic taste!
- A slightly off-center assemblage of decorations looks best!
Goodies
Not sure what to add to your wreath? Try starting with some of these items:
- paper leaves
- burlap flowers
- plastic animal figurines
- mini pinecones
- mini gourds
- glittery snowflakes
- cinnamon sticks
- fake birds
- acorns
Looks Like
Magda Sayeg. Are you familiar with yarn bombing? If you aren’t it’s kind of like knitted graffiti. Yarnbombing was invented by textile artist Magda Sayeg who started adding knit pieces in public places in 2007. The idea became a sensation and has spread colorful warm fuzzy joy to urban locations throughout the world! You will not want to miss images of an entire public bus wrapped in yarn in Mexcio City or the yarn wrapped tree “forest” in Austin. I love artists like Miss Sayeg who take a traditional craft and completely reinvent it. I mean who would ever have thought to combine knitting + graffiti? BRILLIANT!
Conclusion & More
Yarn wreaths are one of the easiest DIY wreaths you can make. Trust me, you need NO experience to be successful at this! I’ve made dozen of them over the years and they always look pretty even when unadorned.
Are you a wreath nut too?
- If you want a SUPER EASY wreath you can make with kids hop over to our Craft Stick Wreath.
- And for the grown-ups out there who fell for yarn wreaths here is list of yarn wreath tutorials and resources I compiled: Winter Wreaths and Medley of Online DIY Wreath Tutorials.
If you are looking for fun holiday wreath ideas for kids check out these wreath projects:
- Construction paper wreath from Our Small Town Idaho Life
- Fall Leaf Wreath for Kids from Mama Pea Pod; one of the top pins ever on my Natural Materials Craft Board
- Oh and what to do with all the bucket loads of candy you are about to get next week? Turn them into a Candy Wreath like this from Crazy Little Projects.
Check out this Rockin Holidy board I contribute too with some other Rockin’ Art Moms Follow Melissa {Mama Miss}’s board Rockin’ Holiday on Pinterest.
And don’t miss out on more holiday crafts here on Babble Dabble Do! Your child’s inner Magda Sayeg thanks you! Subscribe below or like us on FB!

Hello, I’m in the middle of making one of these wreaths right now after seeing this post. The only difference is I only found the white styrofoam forms that’s a little bit thicker then the one you used. While wrapping i noticed you could see in a few areas a little bit of the white peeking through. Did you wrap your wreath more than once with yarn? I’m wondering if I’m using to thick of a wool yarn and if the acrylic would have worked better? Never made a wreath before? Any suggestions would be so helpful!!!
Thank you,
Catherine
Hi Catherine, Thanks for your question! I only wrapped once but was very careful about making sure to cover the foam. I would occasionally squish the yarn together to prevent the white from peeking through. You can wrap it a second time or perhaps you can wrap a some smaller pieces of yarn over the areas where you still see the foam. Post a pic on our FB page when you are done. I’d love to see it!