Babble Dabble Do is devoted to kid’s projects but every once in a while I like to feature a little goodie of all you grown-ups, after all you’re the ones reading the blog! In that vein this project is for you.
 Note: This post originally appeared as part of the of a 2012 series Holidays Homemade. This is the first time it is being published on Babble Dabble Do in its entirety.
We are garland fans around our house. Seriously we have garland coming out of …well, let’s just say it’s everywhere! Today I’m going to show you how to make “Ribbon Candy” felt garland. Last year I went through a felt obsession, and it continues to this day. Felt is a wonderful material for kids and grown-ups, the texture of wool felt is luxurious, and the “stickiness” of felt is why it has become so popular for use in kid’s activities.
Now, I have only one rule when it comes to working with felt: buy the good stuff. The pre-cut pieces in the craft section of fabric stores have a shiny, synthetic look to them, so go ahead and splurge on the $8.99/yd wool-blend felt on rolls. Trust me, it will make your project look rich and warm. I bought mine at JoAnn Fabrics; they have a reasonable selection of colors and the product is easily available. If you want a bigger selection of colors you can order your felt online.
Now that we are past the rule, let’s get moving on our tutorial….
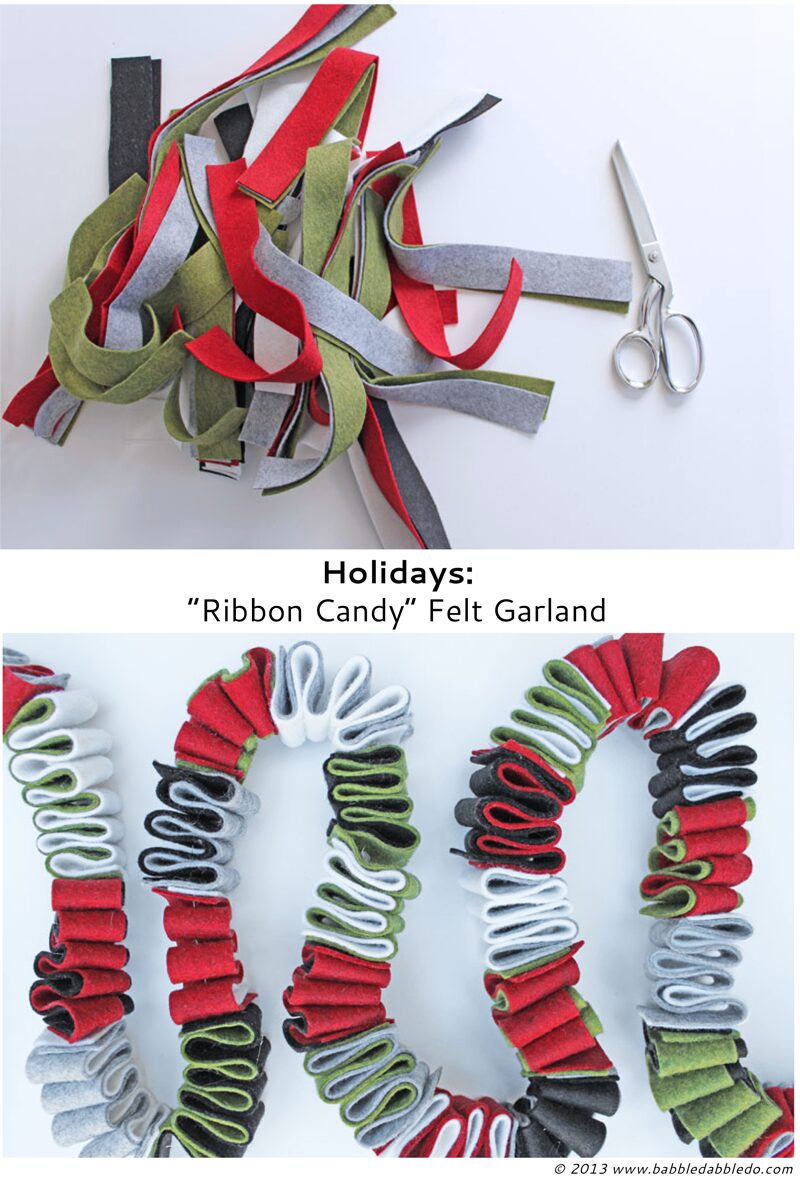
“Ribbon Candy” DIY Felt Garland
Materials
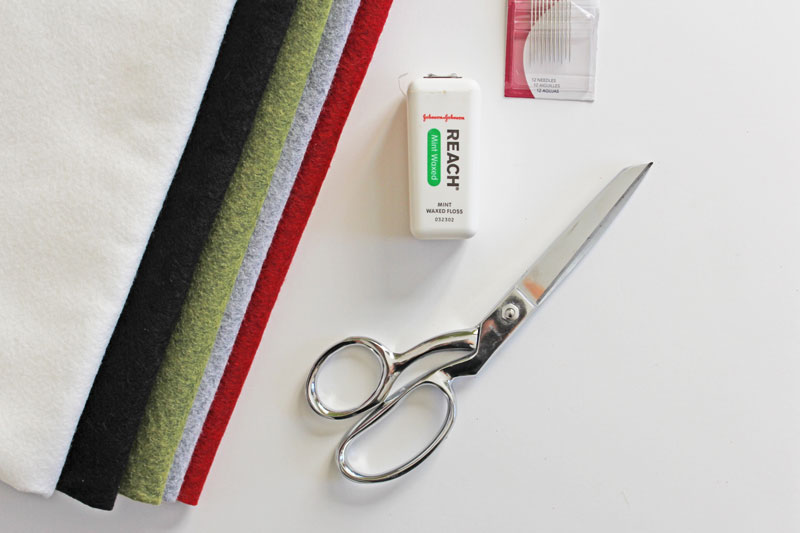
- ¼ yard each of felt in 5 different colors (I used green, red, white, gray, and black)
- Dental Floss
- Embroidery Needle
- Hot Glue
- Scissors
Instructions
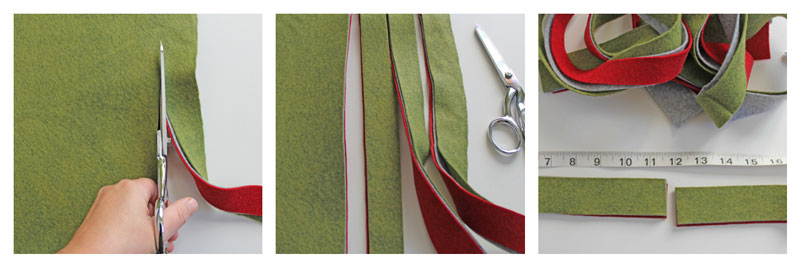
- Step One Cut your felt into long 1” strips. I stacked a few layers of felt before cutting to streamline the process. Don’t worry about being perfect here, you can eyeball the 1” measurement.
- Step Two Cut your long strips into roughly 12” sections.
- Step Three Thread your needle. For the best final garland result, one long 12’-0” strip of dental floss would be ideal. However if you are like me and easily knot up long threads, you will end up tying sections of this garland together. In this case cut your dental floss into manageable lengths.
- Step Four Take two felt strips and align the edges. Then start folding the strips into roughly 1” sections to make an accordion shape.
- Step Five Center your needle on one end of the accordion shape and sew through all the folded layers.
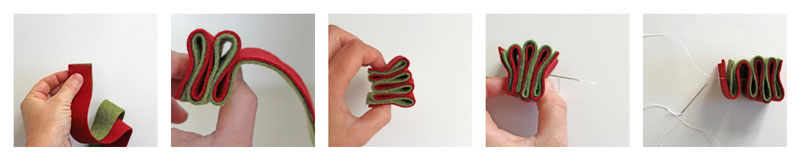
- Step Six Repeat. This is garland so you’ll be repeating this step a lot! For subsequent sections alternate your colors. Having five colors total allows you to mix and match layers so you don’t have to repeat any one color in adjacent sections.
- Step Seven Tie your larger sections together. Knot then end of the floss in one mini section close to the felt to hold everything in place. There should be a little breathing room for the accordion shapes but too much space at the end of the string will cause them to spread out uncontrollably. Then tie the next large section on. Add a dab of hot glue to secure.
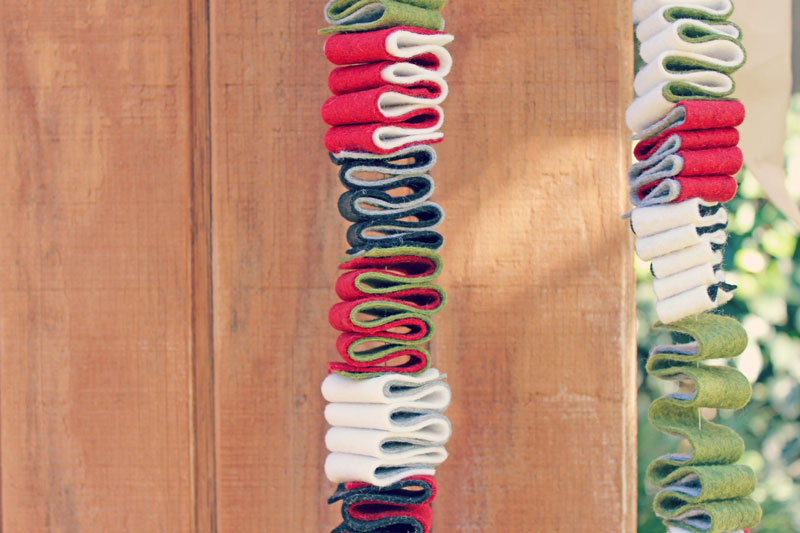
- Step Eight Adjust your layers so that you alternate between seeing the accordion sides and the tops/bottoms.
You’re done! My daughter immediately grabbed this and threw it on like a scarf and I had a sudden bolt of inspiration but I’ll save that for another post!
Looks Like
F.B. Washburn. I know I didn’t know who that was either until I started researching ribbon candy. Well that is the gentleman you have to thank for this lovely holiday treat, invented in 1856. Embarrassingly enough I didn’t even know what ribbon candy was until a reader of the original post mentioned it. And once I saw it I was mesmerized. Not by the idea of eating it but by the colors…wowza! We all know that there is a huge design component to food; the more appetizing a meal “looks” the more we savor it. And candy screams to be noticed with it’s bright colors and fun shapes. The next time you or your kids are eating candy think about a fun design project for it instead!
More
On that note, a few fellow bloggers did a wonderful series of candy related projects that did not involve making or eating it earlier this fall. Check out the Candy Activities Seres here. If you like making holiday decorations for your home be sure to pop over to our Wood Block Christmas Ornament post or Winter Terraiums made from upcycled jars.
Don’t miss out on a our upcoming projects! Be sure to subscribe below or like us on FB!
Oh my goodness, this is so gorgeous!!!
Thanks Erica! I love felt!