This simple circuit project is a fun way to introduce kids to electricity and how it moves from a battery through a circuit to power an LED. Psst….it would make a great science fair project!
One of the most intriguing and mysterious scientific phenomenon is electricity. Electricity is the flow of electrons from a power source through a conductor to something needing power (lights, machines, devices). Current is the flow of electrons in a circuit. There are two types of current: Direct Current (DC) and Alternating Current (AC). Batteries use DC current which is the type of current we will be discussing in this project. In a DC circuit, electrons can only flow in one direction which is why we have a negative and positive side to wiring and batteries.
Think of the flow of electricity in a DC current like a line for your favorite amusement park ride. You and the other people waiting are the electrons. You can only move in one direction to enter and go on the ride. If you want to repeat the adventure you have to start all over again at the end of the line. This is a great place to read more about the science behind electric current.
In this project we are going to explore how electricity moves from a battery (the power source) through a conductor (salt and water) to an LED and back again to the battery to close the loop.
If you are a teacher and would like to try this in the classroom be sure to check out our Salty Circuits in the Classroom section here.
This post contains affiliate links.
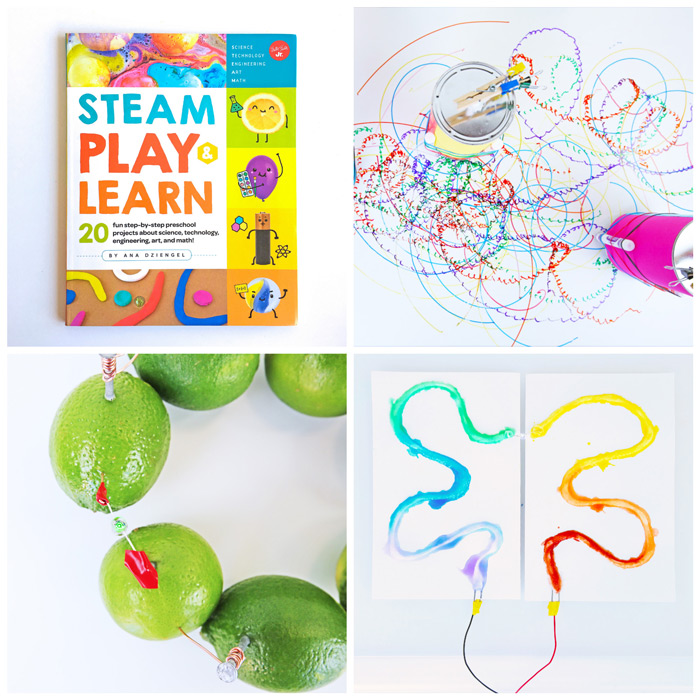
Salty Circuits is a project from my book STEAM Play & Learn. STEAM Play & Learn is geared towards preschoolers but many of the projects especially this one and the other electronics project in the book, are suitable for kids of all ages. You can check out my book on Amazon here:
[click_to_tweet tweet=”Create a simple circuit using…salt?” quote=”Create a simple circuit using…salt?”]
SAFTEY NOTE: LED’s have pointed leads which can be sharp. Always supervise children when using batteries.
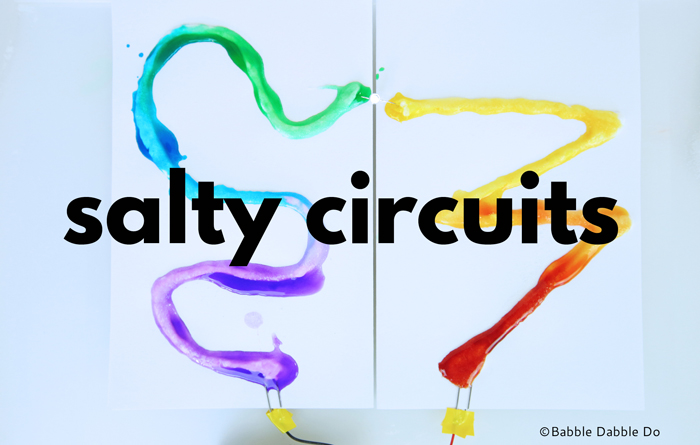
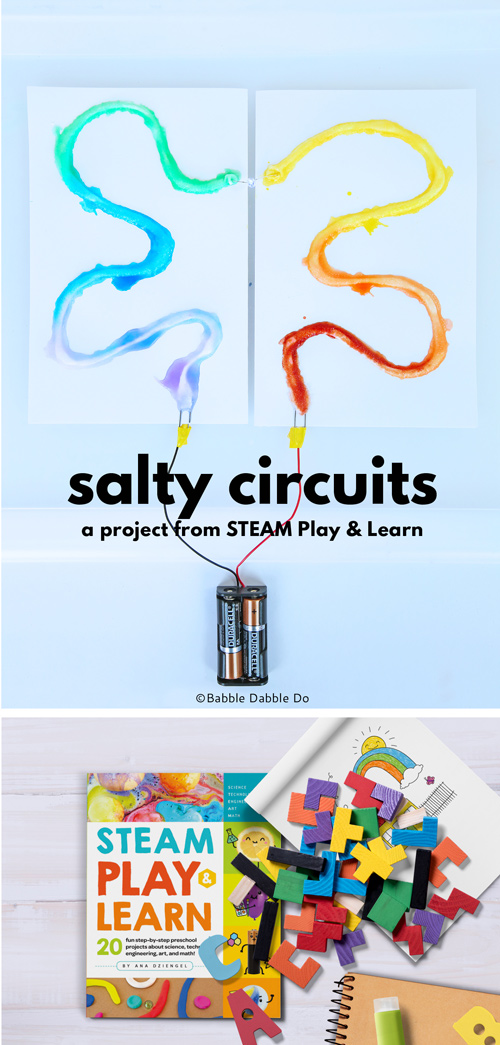
Salty Circuits: A Simple Circuit Project
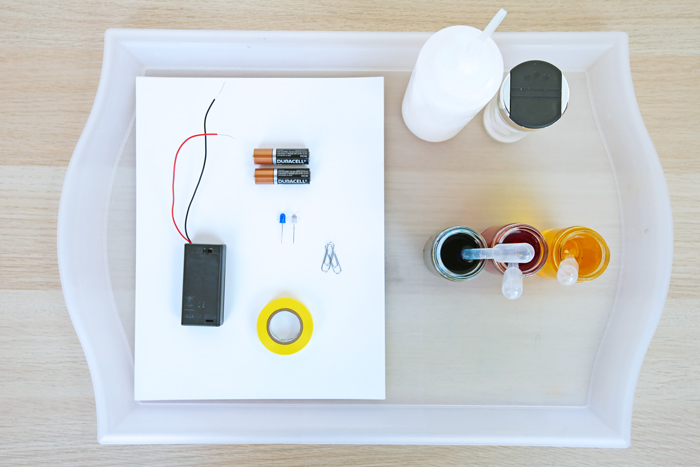
Materials
- Salt
- Glue
- Battery pack with AA batteries
- LEDs
- (2) sheets of Cardstock or thick paper
- Paper clips
- Electrical Tape
- Tray
- Watercolors or Food coloring
- Pipettes or paint brushes
Instructions
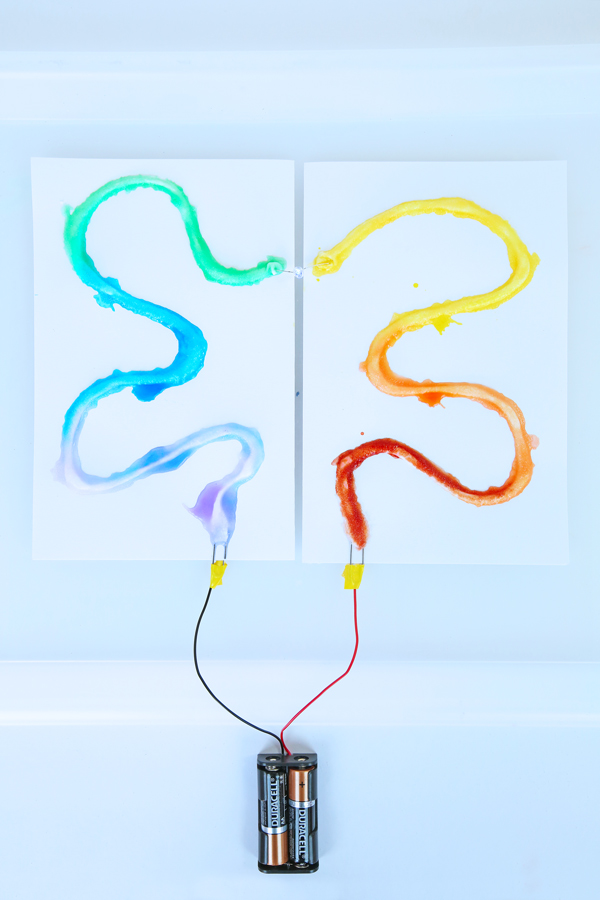
- Step 1 Fold each sheet of paper in half and place a paper clip at the bottom. Place the sheets of paper next to each other on a tray.
- Step 2 “Draw” a line using glue from the paper clip up the paper and then towards the edge. Be generous with the glue.
- Step 3 Sprinkle a good layer of salt on the glue. Lift the paper and dump the extra salt on the tray. Tilt the tray to move the salt to the side.
- Step 4 Take the exposed red wire from the battery pack and wrap it around one of the paper clips. Secure in place with electrical tape. Make sure the wire and paper clip make good contact.
- Step 5 Repeat with the black wire, attaching it to the other paper clip and securing the connection with electrical tape.
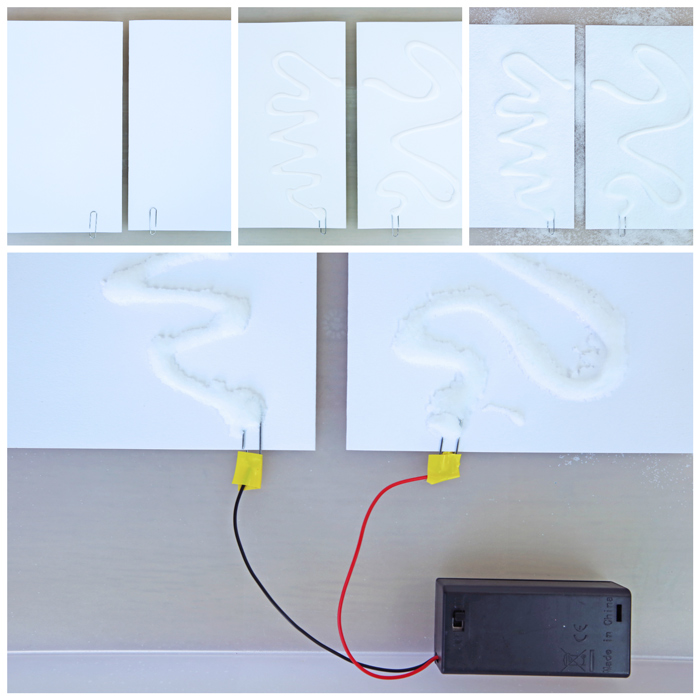
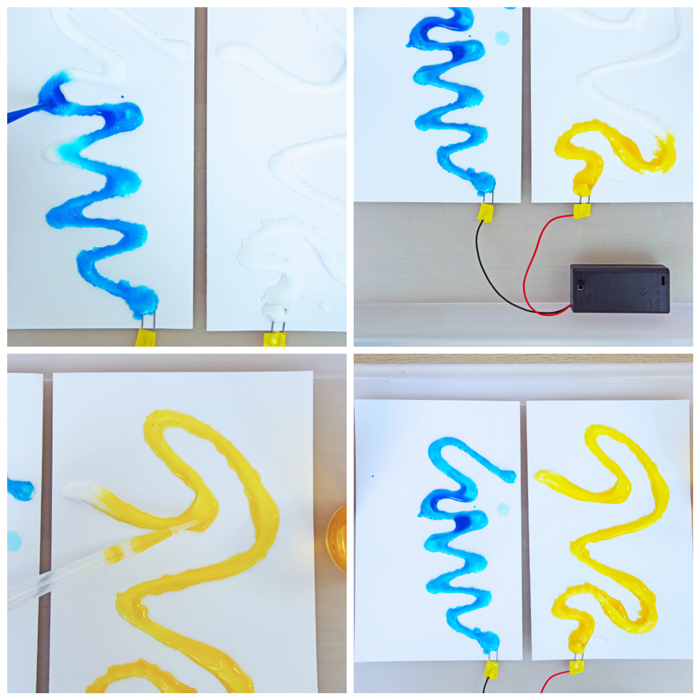
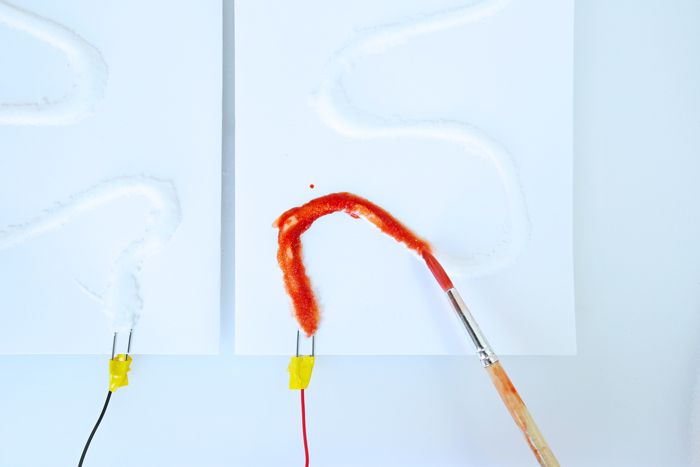
- Step 6 Add watercolors to the salty glue lines using a pipette or the tip of a paintbrush. It will flow along the salt and glue drawing.
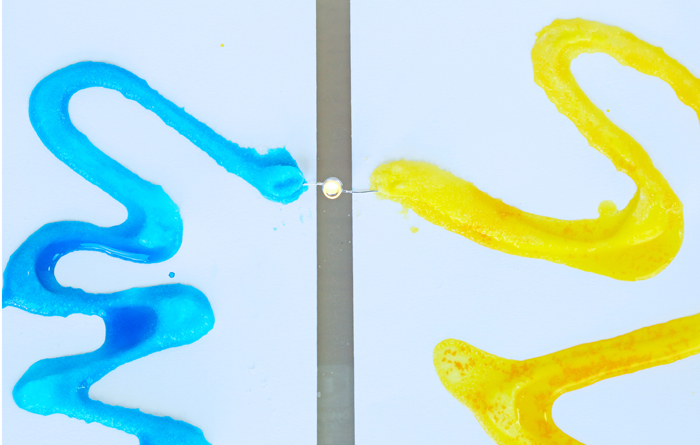
Turn it into a circuit:
- Step 1 Bend the legs of the LED out.
- Step 2 Touch the long leg (positive side) of the LED to the glue/salt line attached to the red wire.
- Step 3 Touch the other leg to the glue/salt line attached to the black wire. It should light up!
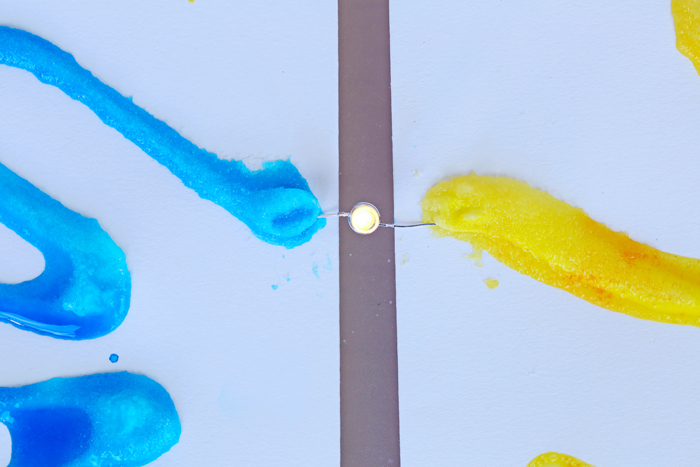
Hint: The light coming from the LED will be fainter than when attached directly to the battery pack wires.
Tips
- This works best when the salt is moist and wet.
- It’s a good idea to test your LED before making the circuit. Hold the long leg (positive side) of the LED to the exposed end of the red wire coming out of the battery pack. Hold the other LED leg to the exposed end of the black wire. The LED should light up.
Let’s Talk STEAM
The Science: Electricity is the flow of electrical power from a source (a battery) to something that needs power (a motor or a light). The flow of electricity is called a current and in a DC circuit it flows in one direction. That’s why it’s important that the positive end of the LED is connected to the positive (red) wire.
The Technology: Many different materials can carry an electrical current. The most common one is metal. Salt and water are also good electrical conductors and can carry a current.
The Art: Many artists use lines to draw shapes and create space. In this project we are using glue to draw lines. They are hard to see because the glue is white and so is the paper. When you add paint on top of the lines they “pop” out and can be seen.
Extension ideas for your simple circuit project
- Playdough and salt dough are made using a lot of salt which makes them good electrical conductors. Try connecting your battery pack to two balls of salt dough and placing the LED between them. Does it light up?
- What other metals can you think of that might conduct electricity? Consider wire, pipe cleaners, copper tape, nails and more. Connect your battery pack leads to these materials and see if they can conduct electricity!
- Try making a graphite circuit! That’s right, pencil lead can conduct electricity! See this post for how to do it.
Salty Circuits in the Classroom
How to do this simple circuit project in a group setting
We did this project at Camp STEAM last year and the children loved it! The caveat being that half of the circuits did not work. This project does require a fair amount of supervision for the final circuit to work successfully. The biggest hurdles we saw were with elaborate glue designs that were difficult and/or impossible for electricity to flow through.
The flip side of this issue of non-working circuits is a real understanding of why and how electricity flows. We used the different success rates as a talking point to illustrate why some of the circuits worked well (usually the very simple and direct designs) and why others would not power a light (the designs overlapped or the water flowed around the designs so much that the circuit could not be completed.)
Teacher Prep
- Fold card stock in half and add a paper clip to the bottom of each folded sheet. Each student will need two folded sheets.
- Assemble trays, 1 per student if available. Alternatively students may use a box lid or any box with sides that can contain the salt.
- Make the watercolors and place in small jars or cups. Vey little paint is needed.
Create the circuits
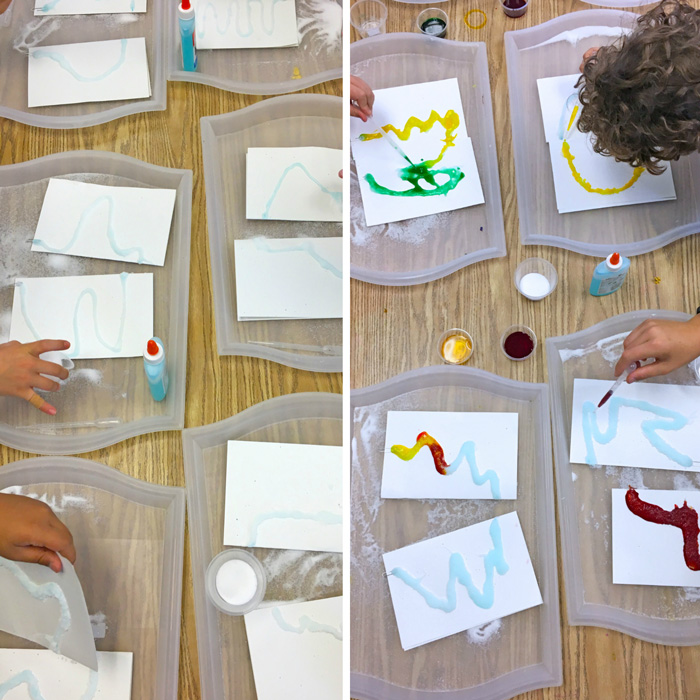
- Step 1 Start by asking students to “draw “a design using glue on each of the two halves of card stock. The designs should start at the paper clip and end towards the folded edge on the upper half of each paper. Emphasize that the more elaborate the design the more difficulty the electrons may have following the circuit.
- Step 2 Once the glue designs are complete, students should sprinkle salt over the drawings, then gently tilt the paper onto the tray to remove excess salt.
- Step 3 Students should use pipettes to add color to their glue designs.
Test the circuits
In order to keep expenses in check we had the students bring us their completed designs on the tray and we tested out their circuits to see if they worked. This allowed us to use only one battery pack and one LED per teacher.
- Step 1 In lieu of taping the wires to the paper clips, the teacher should use alligator clips to connect the battery pack to each of the paper clip leads on the student piece.
- Step 2 Students should place the LED legs in the correct direction on each side of their circuit to test it.
- Step 3 Does the LED light up? If not, ask the student can locate where the electrons may stop flowing. Tip: You can clip alligator clips to the LED legs and test out various places along the circuit to see if the electricity is flowing by dipping the open ends of the alligator clips in the salt/glue/water circuit.
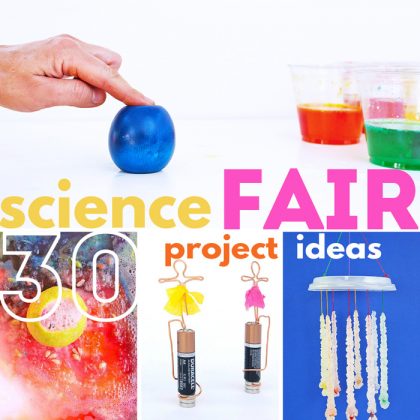
Salty Circuits would be a fun science fair project! For more Science Fair Ideas check out this list
Want more STEAM?
If you’d like to see more projects from my book hop over here.
You can also follow along on Instagram using the #steamplayandlearn. If you try any posts from the book be sure to tag them #steamplayandlearn!
Are you passionate about raising creative kids?
Join over 22,179 parents and educators who want connect with kids and nurture their creative process through magical, easy projects you can do TOGETHER.
Subscribe to our email list to receive project ideas as well as offers for some our creative products.
If you want to read our privacy policy before subscribing, hop over here.
This is a wonderful lesson. Thank you so much for sharing this activity. This will be a fun way to review electric circuits before state testing.
Thank so much! May I ask what ages your students are?
We did this before too!! I will try to teach this to my nephew! This is a great activity! Thanks for sharinggg