Magnetism has carried me away…..I love exploring magnetic projects because it always feels like we are working with magic. Think about it, this invisible force that attracts metals together…..you already know I’m a little nuts for them after we made Magnetic Sculptures, today we are using them to make Heavy Metal Art Boxes. While doing this project I also dreamed up a second scientific art project featuring iron filings and magnetism…so look or Heavy Metal Art Part 2 later this week!
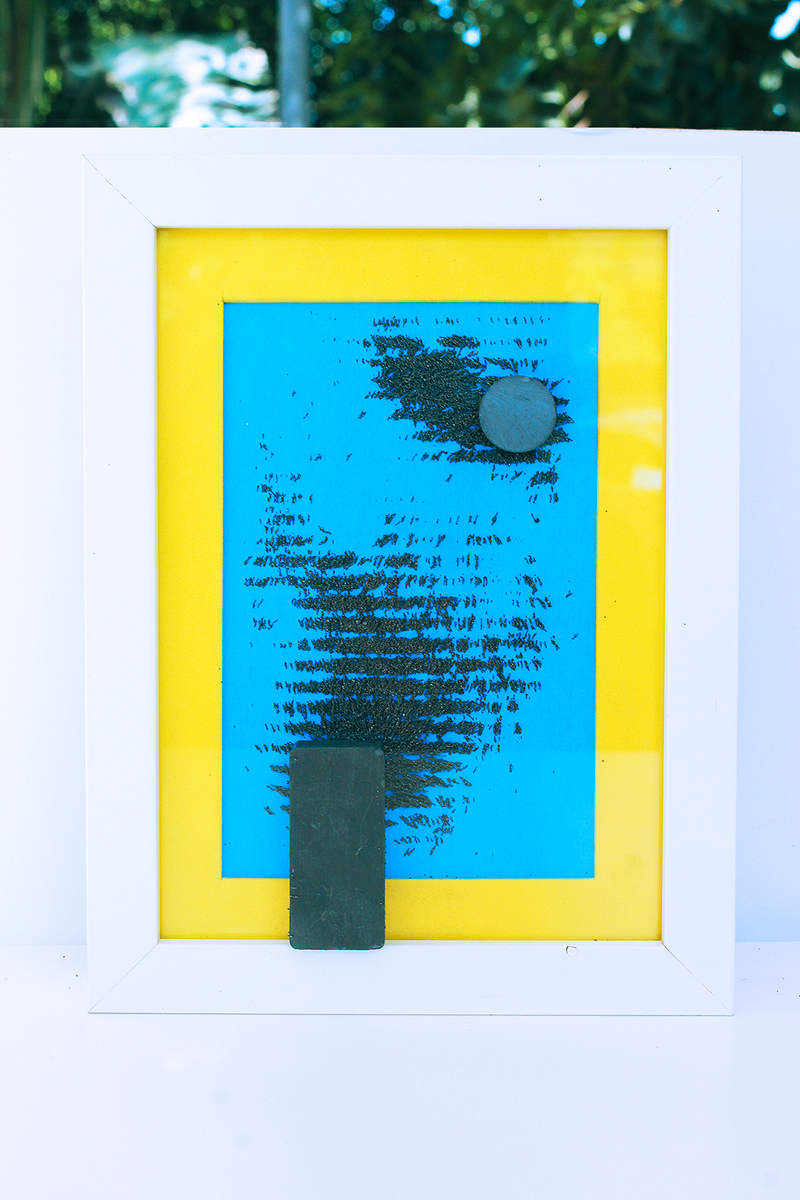
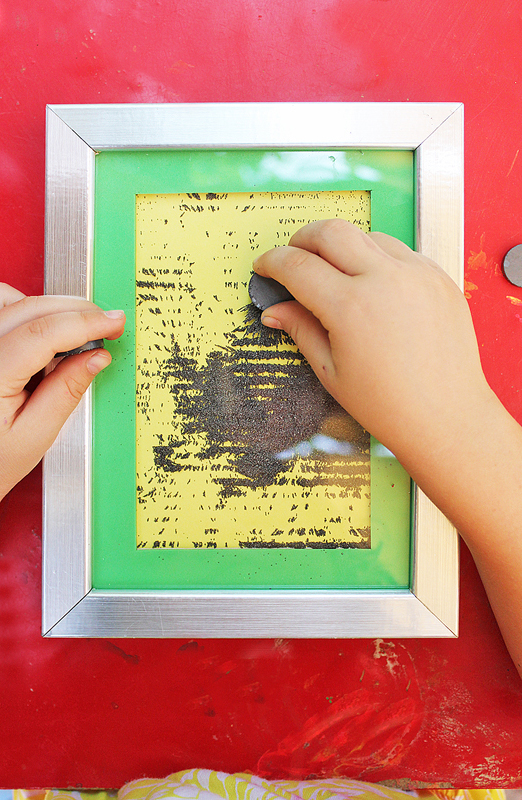
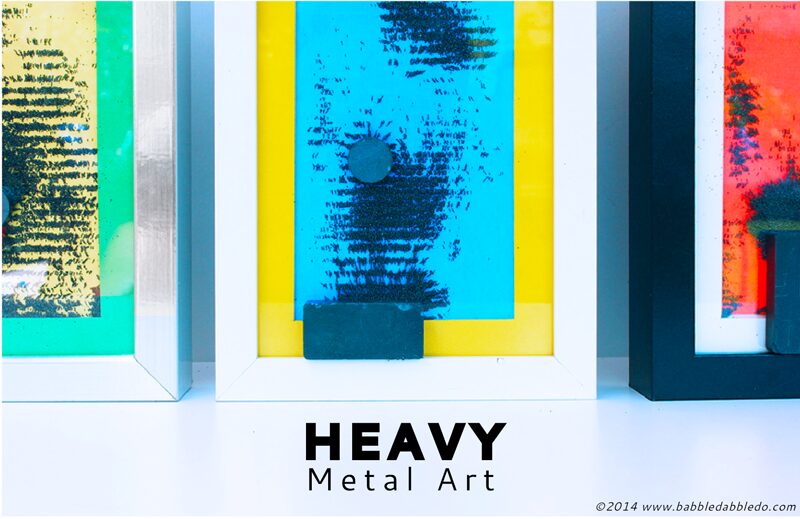 Did you play with Wooly Willy as a kid? You know, the dime store toy where you use iron filings as facial hair for a goofy looking illustrated guy named Willy? Well I thought the concept behind this classic toy this might make a fun abstract art project so I came up with these Heavy Metal Art Boxes. Basically they are frames with iron filings sandwiched between a magnetic sheet and glass. Place a few strong ceramic magnets on the face of the glass and you can move the filings around to create abstract images. My mother-in-law watched as I made these and started telling me that she saw in each of the shapes. Ha! I immediately thought of inkblot psychiatry!
SAFETY: MAGNETS ARE A CHOKING HAZARD AND WORSE! A word of caution, magnets should never ever be ingested. Magnets are one of the few items that when swallowed may need surgical removal. If you have a child who even stands the remote chance of putting a magnet in their mouth please supervise this activity at all times. When working with magnets and small children ere on the side of caution and use big honking magnets that are not choking hazards please!
This post contains affiliate links to products I love and recommend to my readers, plus it keeps this little blog o’mine afloat! Thank you!
Magnetism for Kids: Heavy Metal Art
Materials
- Magnetic Sheets
- Frames like these
with glass/plastic and mat
- Iron Filings
- Ceramic Magnets like these
- Fun Foam
- Colorful Paper
- Scissors/Exacto Blade
- Painter’s tape or Duct Tape
Instructions
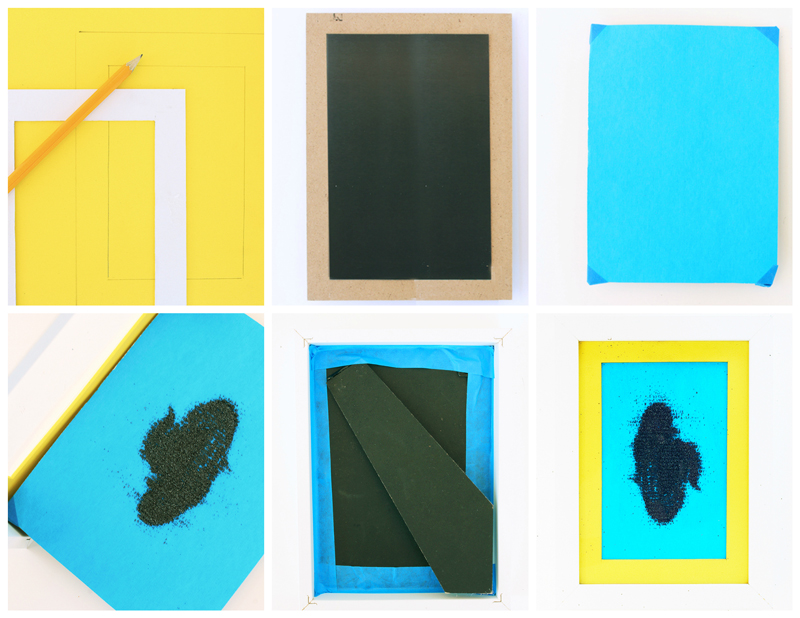
- Step One Open up your frame from the back. Trim a piece of colorful paper the size of the frame.
- Step Two Place the mat on a piece of fun foam and trace it. Remove the mat and cut a copy of the mat out of fun foam. You will be replacing the mat that came with the frame with the fun foam. Why? The foam will elevate the glass a little higher off the frame allowing the iron filings more movement. Place the foam back into the frame.
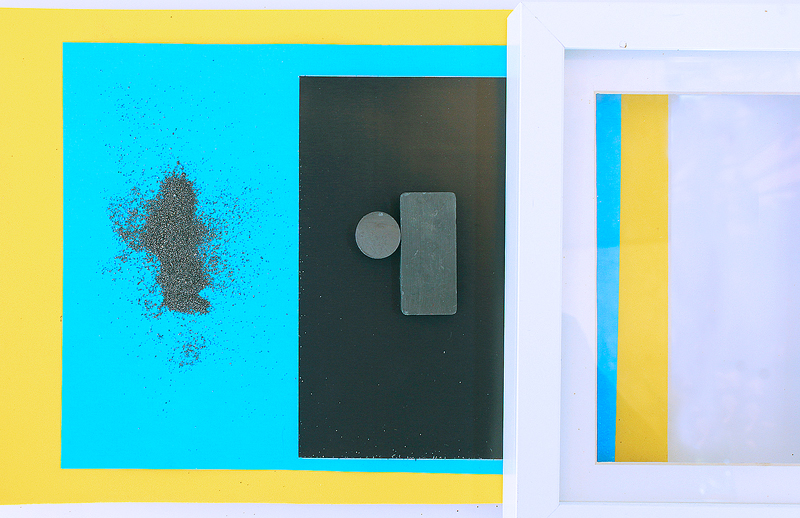
- Step Three (if necessary) Trim your magnetic sheet to match the frame size. If your magnetic sheet isn’t large enough to cover the frame/trimmed paper trim a second sheet to fill in the missing portion. Our magnetic sheets were the same size as the exposed part of the frame back (this makes sense because magnetic sheets are typically made for photos as are frames, of course)
- Step Four Remove the adhesive backing on your magnetic sheet and stick the sheet to the frame backing. The non-adhesive side of the sheet should be facing out.
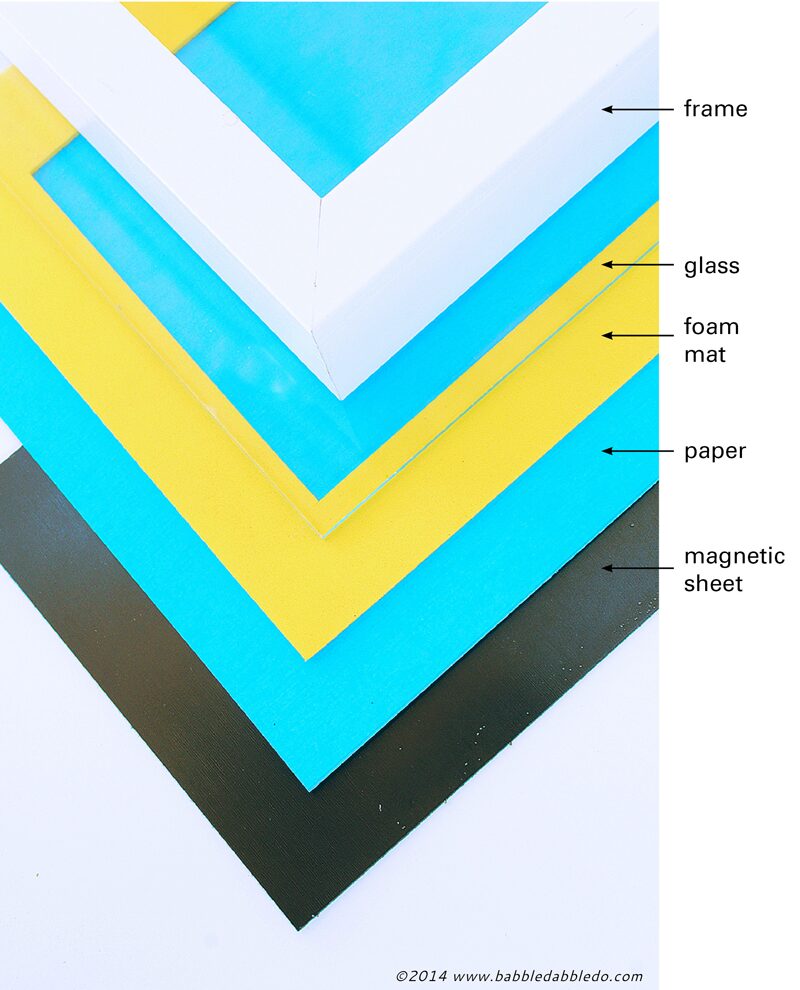
- Step Five Place the colorful paper on top of the magnetic sheet; tape it down to the frame back if desired. Here is the order of the layers. The iron filings will go in-between the paper and glass layers with the fun foam mat surrounding them.
- Step Six Sprinkle some iron filings on top of the paper/magnetic sheet combo. Spread them out so they are not in one lump.
- Step Seven Carefully place the filings/magnetic sheet face down on the glass and foam mat and replace the frame back. Bend tabs to secure it
- Step Eight Place painter’s tape or duct tape around the openings on the frame back. This will prevent iron filings from falling out. Don’t skip this step! Those iron filings are tricky like that!
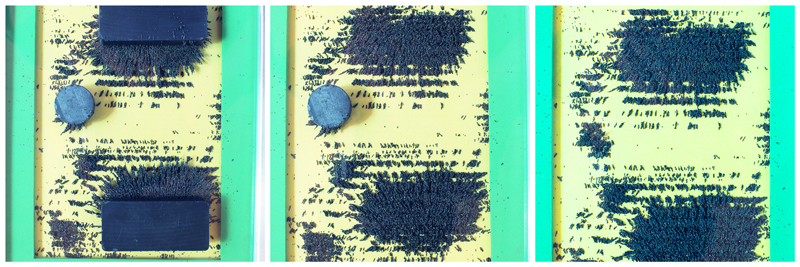
- Step Nine Turn it over and place a few ceramic magnets on top
- Step Ten Manipulate the magnets to move the iron filings around the paper and make abstract shapes/images.
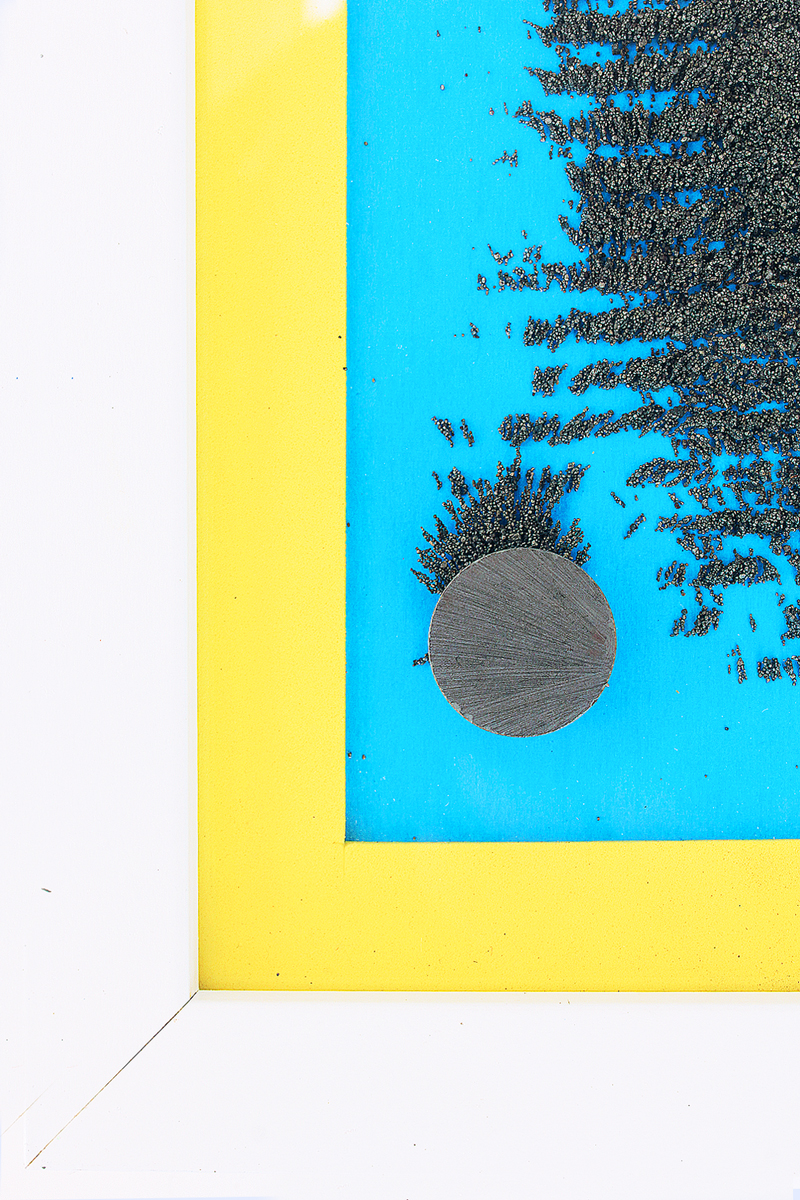
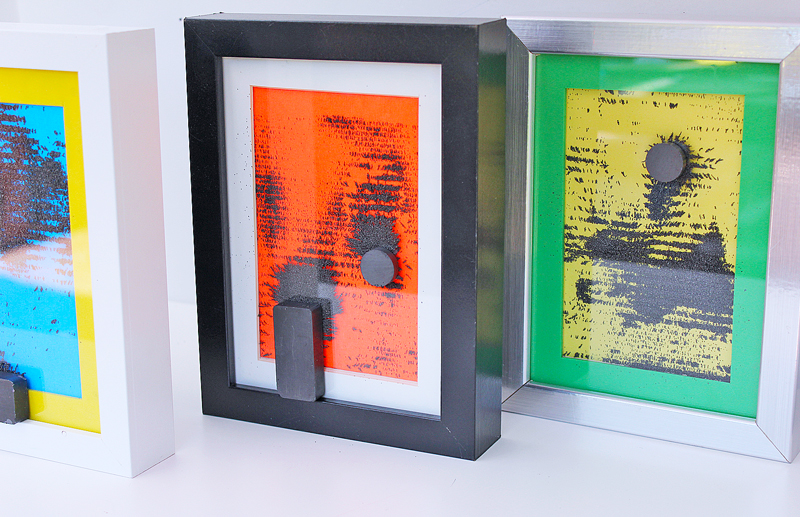
You’re done! You can hang these on the wall and they can be an ever-evolving piece of art!
Tips
- If you have little ones around the house I recommend using magnets that are large to prevent them from going on the mouth. See my full safety disclosure at the beginning of this post.
- You can do the project without using fun foam mat but the iron filings will be slightly more compressed and harder to move.
- The reason behind using the magnetic sheet is to hold the iron filings in place when the frame is in a vertical position.
- It’s best to make your abstract art on a horizontal surface then hang it on the wall.
- For a simple and fun twist use a photo of a face in lieu of colorful paper. You’ll have your very own DIY Wooly Willy.
Looks Like
Dominic Le-Hair. One of the reasons I love writing a “Looks Like” section on each blog post is the opportunity to discover amazingly talented creators I might not otherwise know of. Take Dominic Le-Hair for instance, Mr. Le-Hair is a UK based graphic designer who has done a number of off-the-charts cool typography projects. Make font out of pickled beetroot? Check. How about a font on fire, literally. Check. I found him by googling “art iron filings”. His iron filings type is not to be missed. And considering I just wrote about kids designing their own font on Kids Stuff World I knew the cosmos had somehow engineered this here discovery of Mr. Le-Hair‘s work…Now you must think I’m a total California hippie right?
Conclusion
I could probably do an entire months worth of projects about magnetism. Stay tuned for Heavy Metal Art Part 2 later this week. It’s an easy art project suitable for school age children.
More fun magnetic art/scientific projects to try are our Magnetic Sculptures or Bouncing Magnets Project.
And don’t miss out on more scientific art here on Babble Dabble Do! Your child’s inner Dominic LeHair thanks you! Subscribe below or follow us on FB!
I am CONSTANTLY amazed at the gorgeous and inventive art activities you create! With this, I love how you combined science and art. Love, love, love!
Ana, you are rocking it with this magnetic projects. I can not wait to look at this because we received one of those vintage “move the hair around the face” games — you know which I mean, I’m sure. We’ve received so many through the years, grow tired of them and then, full in full fascination again! Figuring out a way to simulate these was something on top of my list one we returned — so huge thanks for sharing this and giving us the chance to jump right into the fun! Love it! So much fun AND beautiful done.
Gina,
I love vintage toys like Wooly Willy and I’m so glad you liked this project. I would love to see you do a magnetic project too!
Thank you so much Mary Catherine! I love cross disciplinary projects!
Cool the works the different boxes