Is it possible to have fun with math? It’s definitely possible when it’s math art…
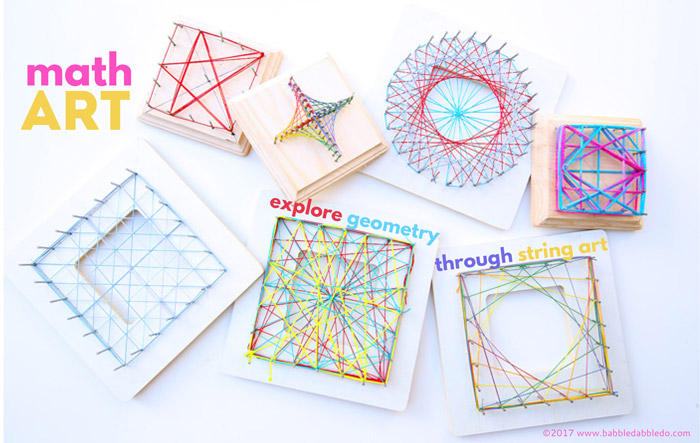

Today let’s put aside the worksheets and try a fun way to help kids learn math: through art and design. A hands-on art project that incorporates mathematical concepts is great way to introduce kids to ideas like geometry and fractions. In today’s project we’ll be using string art to explore Geometry.

Today’s post is part of a wonderful series called STEM A-Z curated by Little Bins for Little Hands. The goal of the series is to give parents and educators the information you need to feel comfortable with doing STEM projects at home or in the classroom. You can start with the basics HERE. Our post covers G for Geometry, my second favorite math subject in school (believe it or not I LOVED calculus- I know what a nerd…)
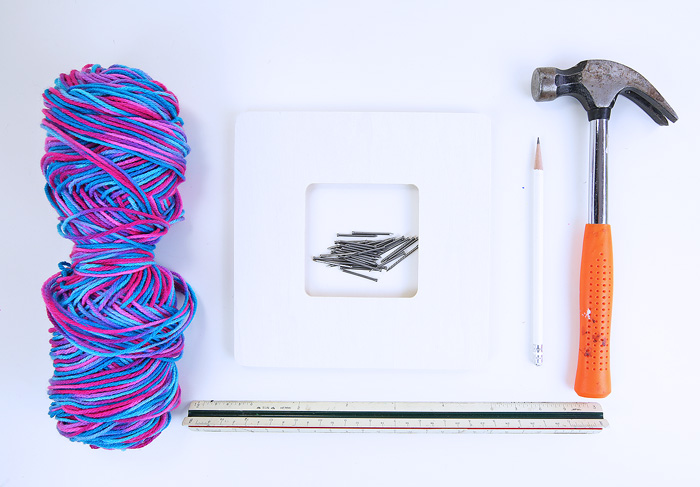
For this project you will need to create some simple string art frames using cheap wood craft frames/plaques and nails. For an even more hands-on approach, have your child or students layout the nail holes and do the nailing themselves. In fact my son enjoyed making the frame more than creating the art!
This post contains affiliate links to products I love and recommend to my readers.
Math Art: String Art Geometry
Materials
PRINT TEMPLATE HERE
- Square wood craft frame or unfinished wood plaques (available for $1 at Michaels)
- Finishing nails
- Hammer
- Pencil
- Ruler
- String or yarn We love this crochet thread- it’s inexpensive and comes in great colors!
- Template
Hint: Finishing nails do not have a head so you can easily slip off the string after you create different compositions and start again.
Instructions

- Step One Lay out the nail holes. Determine the center of the frame or plaque by drawing a diagonal line from corner to corner.
- Step Two If using a frame measure in halfway between the frame edges and opening and draw a square.
- Step Three Using your center point mark the center on each side of the square. Divide each half of the square into three equal sections. Repeat until you have equally spaced marks along the entire square. These will be where your nails go.
- Step Four Hammer in a nail at each mark.
- Step Five Cut a long length of string and tie it around a nail at the corner of your frame. Make some string art!
Tips
- Show your child how to pull the string taught while wrapping the nails. It takes some practice to be able to pull the string a tightly and wrap the nails at the same time.
- Don’t cut too long a piece of string as it may get tangled in the nails and/or you may inadvertently tangle it into a knot.
- If you want to make more permanent string art use nails with a head.
- Be sure to make a frame for yourself- I mean let’s be honest what adult can resist the lure of creating string art?
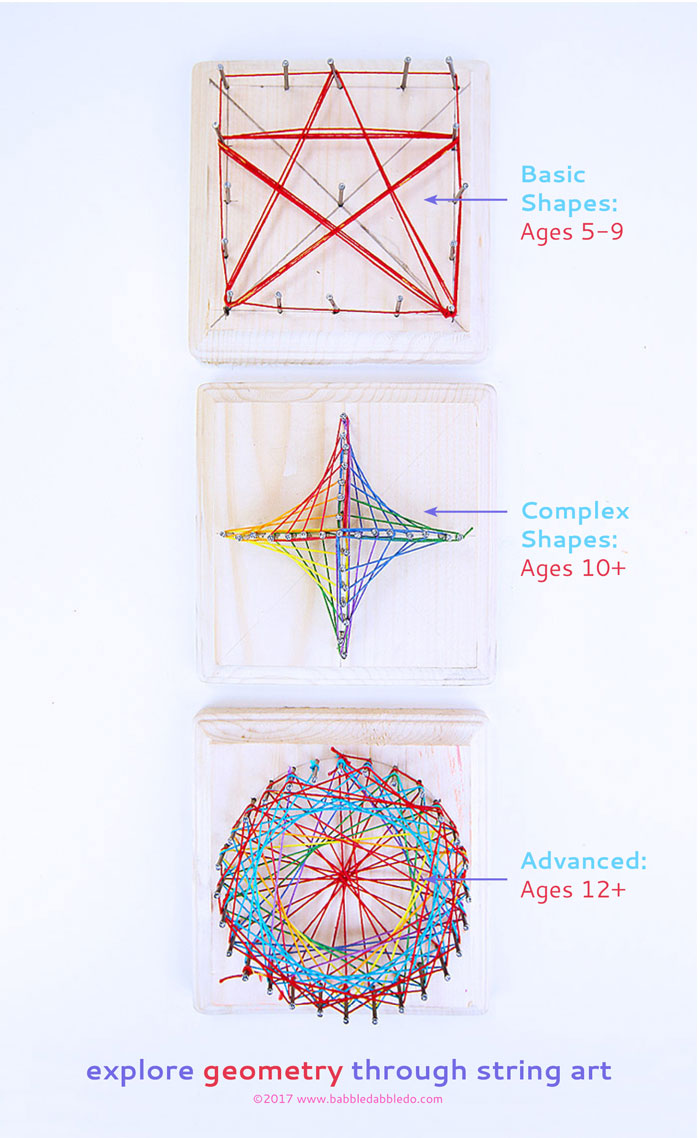
Ideas for Exploring Geometry Through String Art
Ages 5-9
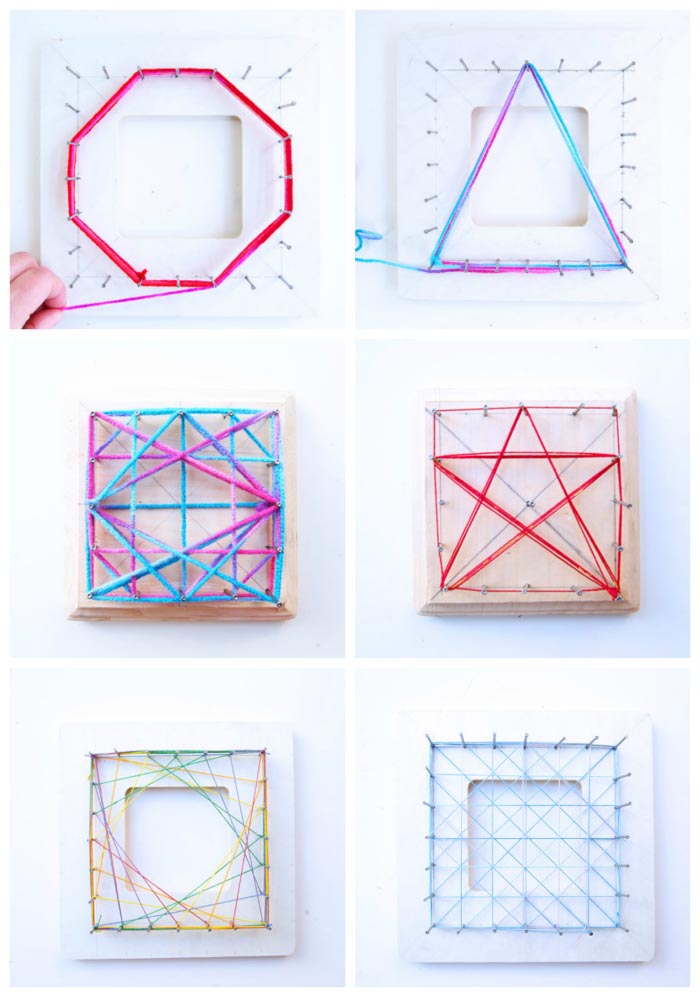
- Have your child replicate basic geometric shapes in string, like a square, rectangle hexagon, etc. You may use our template for reference.
- Ask your child to replicate the shapes in order of the number of sides each shape has using the same string. Start with a triangle and move up to an octagon.
- Explore fractions and the division of shapes. Start with a square and ask your child to divide into equal portions using the string. What shapes are created when they divide it? This is also a great opportunity to show them how fractions work. They can visually see ½ of a square 1/4 etc.
Ages 10+
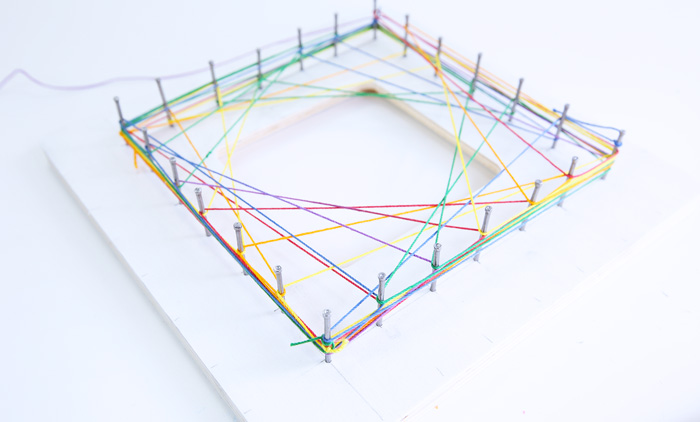
- Incorporate more complicated geometric shapes into the string art. Parabolic Curves are a great one to begin with. See our template for curves to replicate.
- Create different boards to create more complicated shapes. The more nails you have the more complex the forms can be. A triangular board and cross board can be used to replicate gorgeous curves.
- Explore grids. Have your child create square and diagonal grids in the frames. Layer the grids for a cool visual effect.
- Be sure to also let kids make free form designs. In fact it’s nearly impossible to resist making some random patterns and designs using string. While you may not be necessarily exploring exact geometry this free form exploration will undoubtedly uncover some amazing linear designs.
Advanced
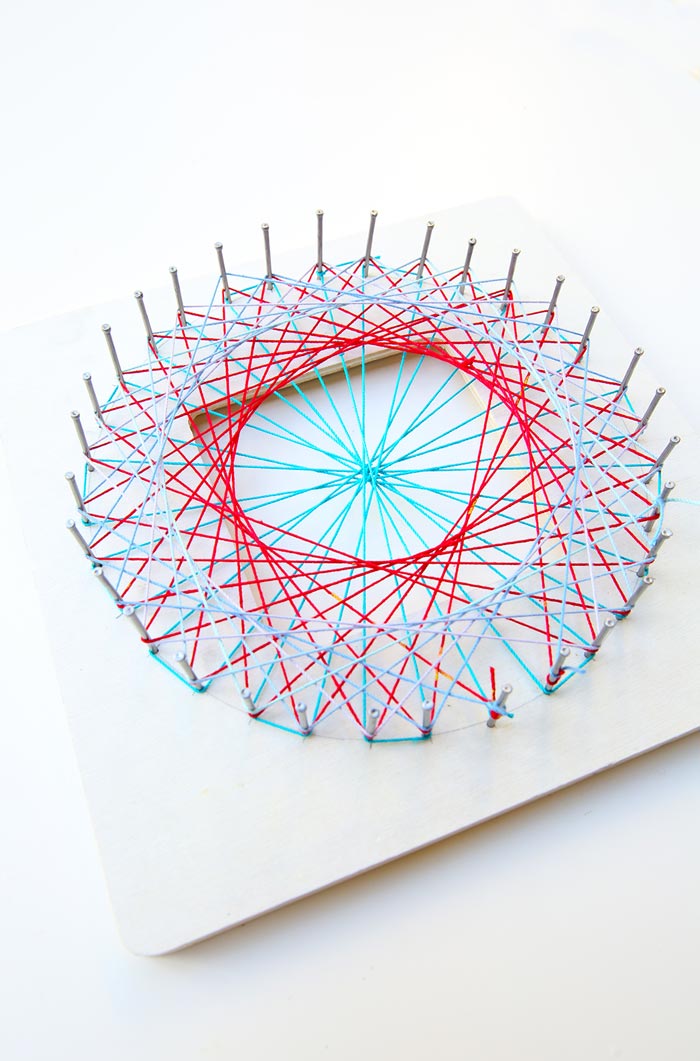
Adults and high school aged kids can explore radial designs. These make the most beautiful designs but get complicated fast so they are not for the faint of heart!
How to make radial frame:
- Step One Tracing a bowl or cup on one of your frames.
- Step Two Measure the circumference. You can do this visually by laying a piece of string around the circle, trim it, and then measure the length of string with a ruler. You can also use the formula C = 2 π r Circumference = 2 times π times the radius
- Step Three Divide the frame into an odd number of sections to get an odd numer of nail holes You can divide it evenly but your patterns will not quite be centered (I learned this from experience!)
- Step Four Use a ruler to roughly mark each length along the circle.
- Step Five Add a nail at each mark along the circle.
- Step Six Refer to our template for how to create some radial patterns.
NOTE: The radial frame shown below used an even number of nails.
Are you thinking that exploring math with string art can not only be fun but also beautiful? This hands-on lesson is a great way to illustrate the power of STEAM projects. By combining two disciplines Math with Art kids can gain experience creating the basics shapes and even more elaborate geometry in one memorable project
Now it’s time to explore more STEAM ideas! Hop over here and explore additional projects in the STEM A-Z Series.

Are you passionate about raising creative kids?
Join over 14,890 parents and educators who want connect with kids and nurture their creative process through magical, easy projects you can do TOGETHER.
Send me awesome creative project ideas!

Awesome String art. I will definitely use these for teaching my students. Thank you so much.
Can you please explain to me how math is used to do string art? What is the formula? I am a little confused on how to tie in the math part.
You can tie it into geometry. For younger children you can use it to help them learn basic shapes by asking them to replicate the shapes using string on the board. For older children it’s a great opportunity to explore patterns ( they have to count and plan the patterns made with the string) and even fractions through a visual display of how a shape can be equally divided. For high school plus you can use it to as a hands on method of exploring complex geometry like parabolic curves.
For middle school students, I recently had them to create similar line designs within a coordinate plane using the desmos.com calculator. They have to see the patterns in the slopes and y-intercepts to create the designs. I have done these designs for years using string and poster boards (the nails and wood are intimidating to me); however, this is the first year that I actually connected the designs with the geometry and algebra they have done during the school year.
This looks amazing! Can you provide the steps used to create the parabolic curve? I would love to try this with my students (aged 9 years – 12 years).
I used string art to teach mid-point theorem to my high school school geometry class. I asked them to make a design with straight sides on a co-ordinary grid. Then they had to find the mid-points using the formula. The mid-points are where nails would go. They transfered the art on to a tracing paper and onto a cork board.
Degrees, fractions, fractals, measurement
Is it possible to get printable instructions. I want to incorporate this into my next school year.
Wow!! Nice..
Waldorf method to learn or practice Table Times. You can look for “tables time with straight lines” the ending result is so nice!
plotting lines on a coordinate plane
I was looking for some good blogs related to maths hopefully your article will help to solve my children problems in this subject.Thanks for sharing.
o solve maths problems easily pracktice Online Abacus & vedic math Visit our website