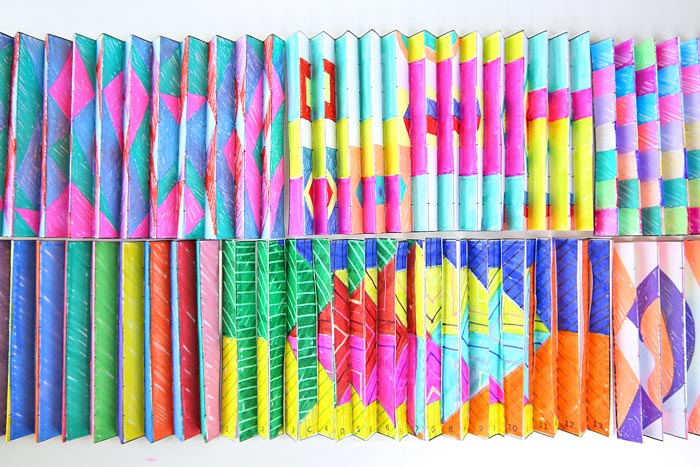
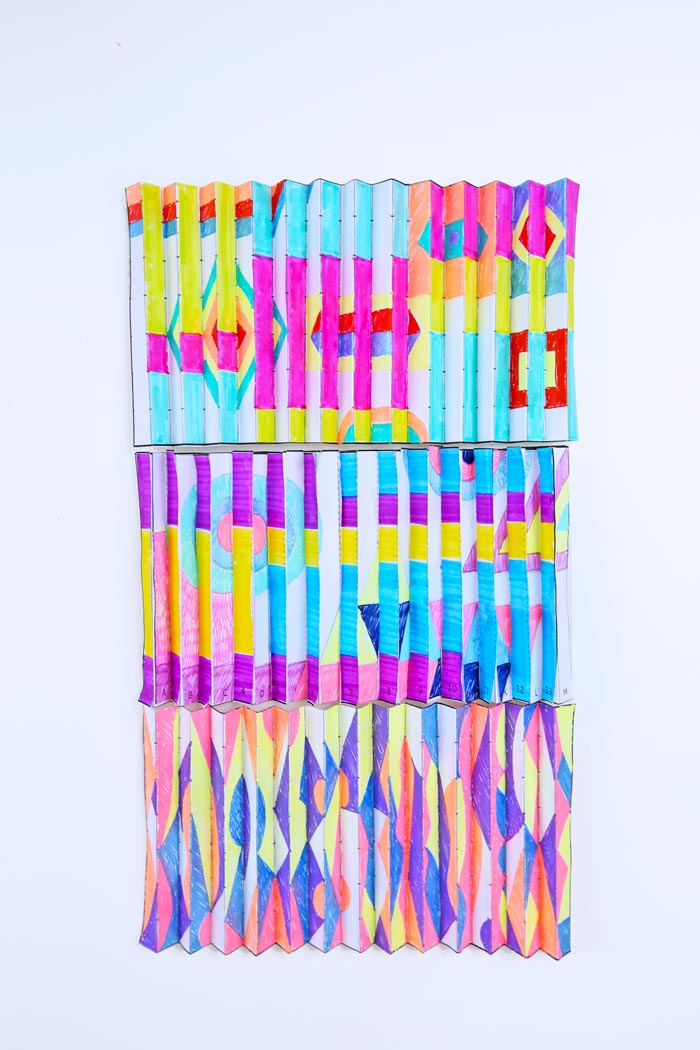
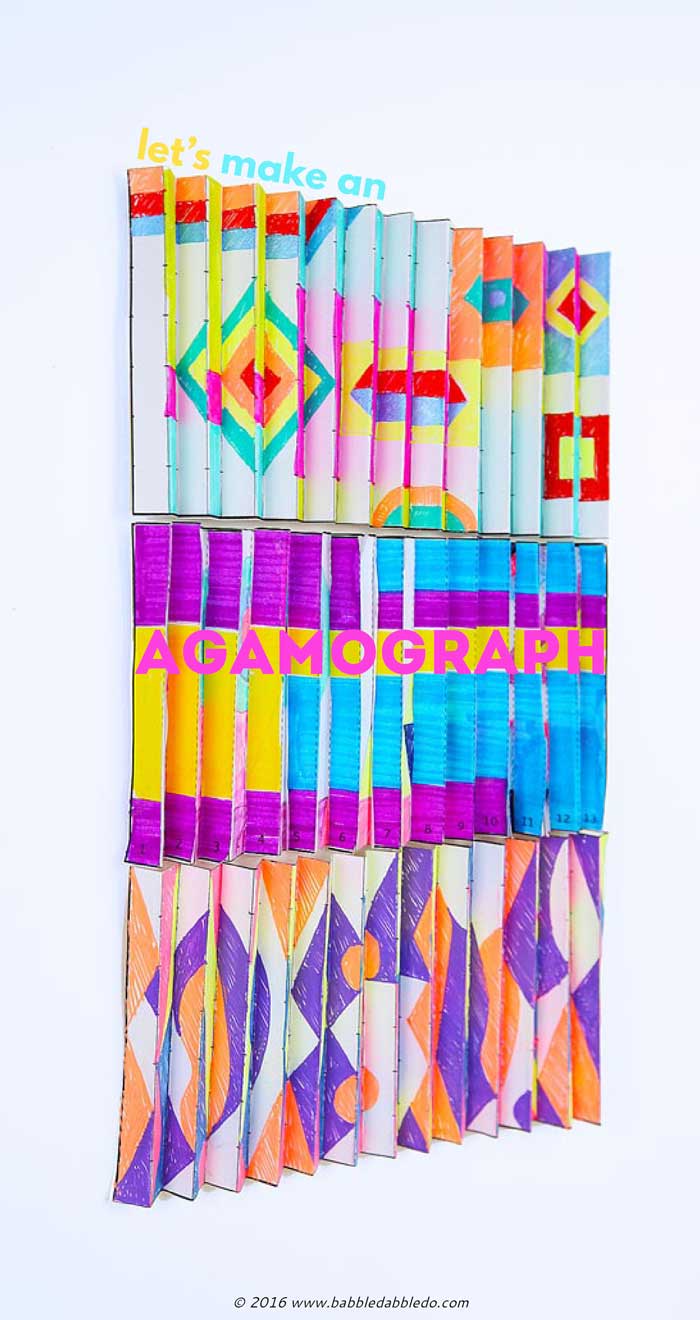
Have you ever heard the term Agamograph? No? Well how about Lenticular? Still scratching your head? Even if you haven’t heard these technical terms before I’m 100% sure you have been amazed by them at some point in your life!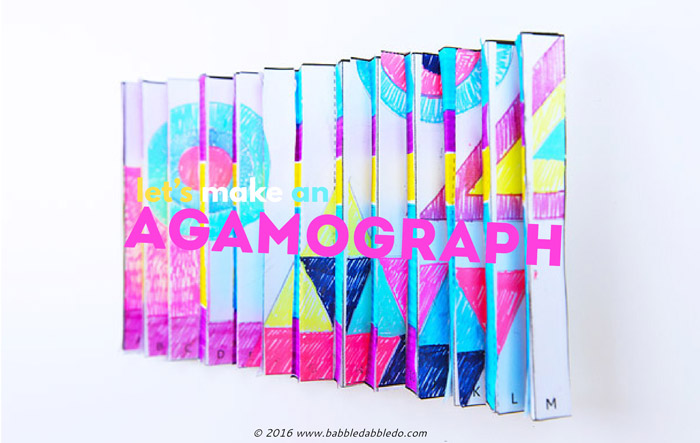 Lenticulars are those amazing plastic covered images you see that morph as you pass by them. They are often sold as postcard or posters in novelty shops. Well today we are making our own DIY version, no lenses involved, just some drawing and simple paper folds and you’ve got yourself a simple lenticular style art piece!
 So now that you have an idea of what a lenticular is what’s an agamograph? Agamographs are the 3D style drawing projects we are making today, named after Israeli artist Yaakov Agam who makes giant scale version of these. His morphing designs are beautiful and incredible and I can’t wait for you to learn more about him in our “Looks Like” section below…..
Sakura of America sponsored today’s post. They compensated me for my time and effort in creating this tutorial for you but all opinions are entirely my own. And my opinion is that their products are nothing short of amazing! If you like to draw or paint with watercolors, they are your new best friend….you can see all their products here on their website.
A note before we start:
I created different templates for this project and here’s why.
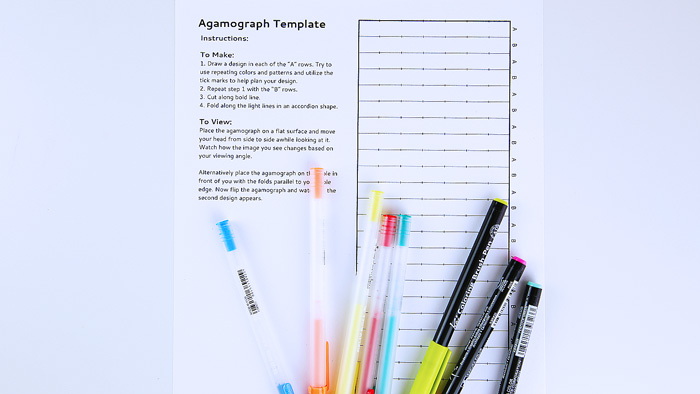
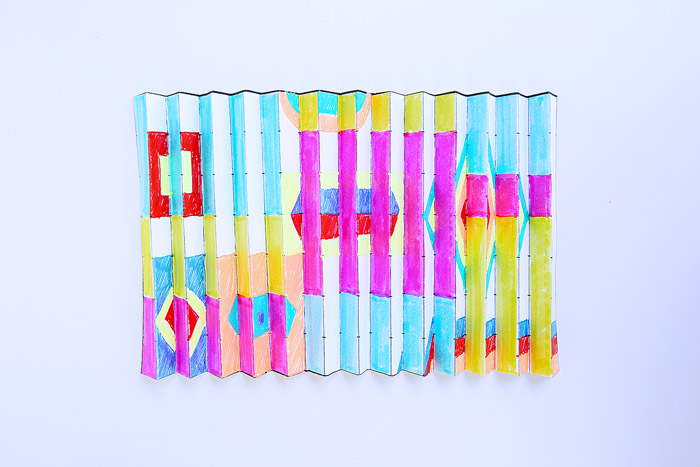
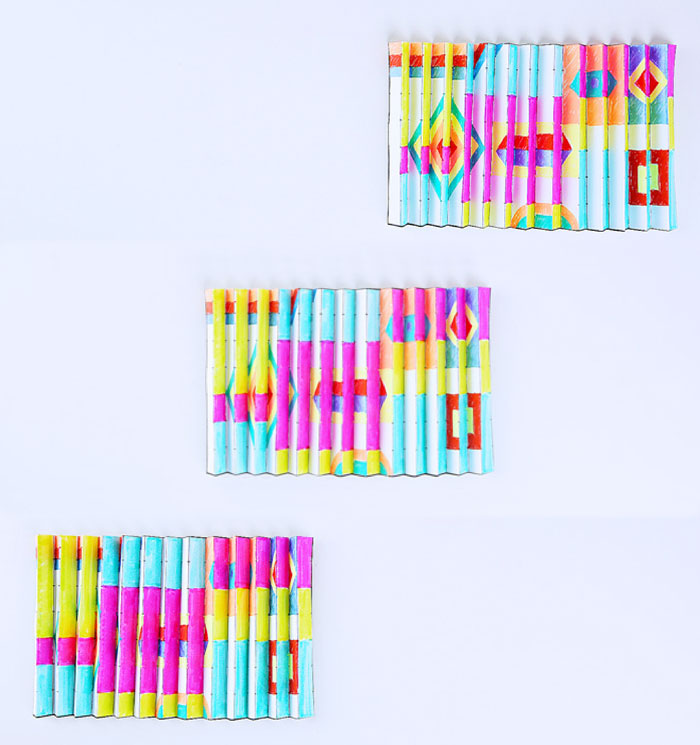
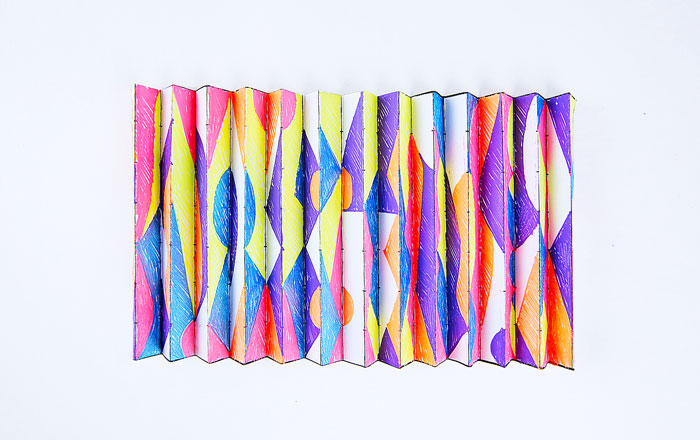
TEMPLATE 1, 3 & 4 are the easiest to make. You draw directly on the folded template. It’s also a little more challenging to envision since you are drawing two different pictures separated into “slices.” I recommend this template for designs that are not image driven, i.e. it’s great for patterns and abstract drawings but not representational drawings. Use the tick marks to help you match points in the designs. Template 3 & 4 are larger and easier for younger kids to fold.
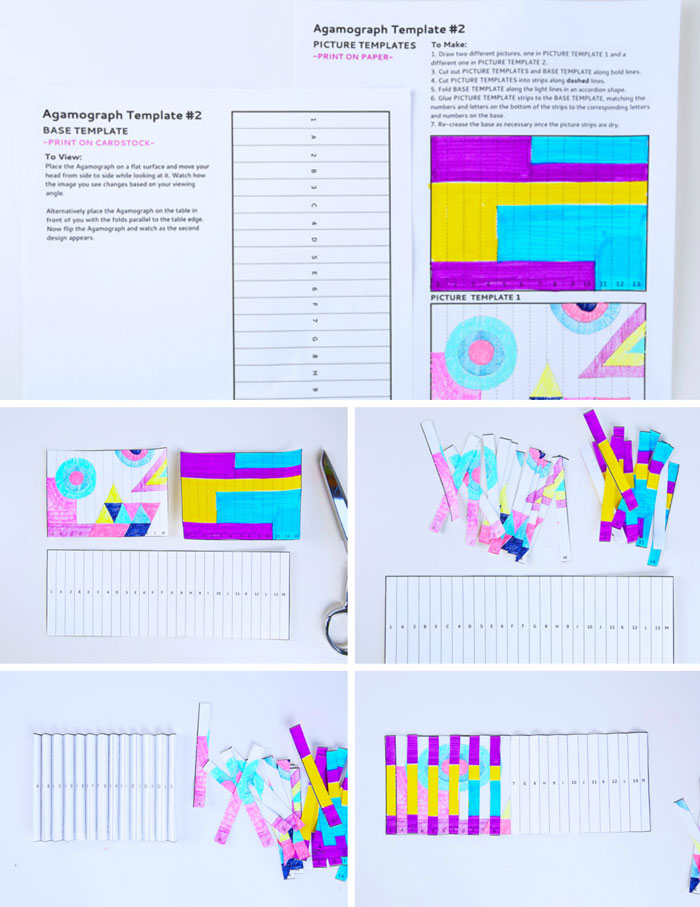
TEMPLATE 2 If you want to experiment with representational drawings OR a lenticular that morphs, for instance a smiley face that changes to a sad face use TEMPLATE 2. You will first be creating drawings then cutting them into strips and gluing them to the folded base. It does require some extra steps in the making process but is easier to visualize. It’s important to note that you should print the picture template page on regular paper. It will be easier to fold once glued to the base if the paper is not rigid.
This post contains affiliate links to products I love and recommend to my readers.
Make an Agamograph
 Materials
 Materials
 PRINT TEMPLATES HERE
NOTE: Younger kids should use Templates 3 &4
- Template
- Cardstock/Paper
- Pens I recommend Gelly Roll Pens for this project
- Glue Stick (Method 2 only)
Instructions
TEMPLATES 1, 3 & 4
To Make:
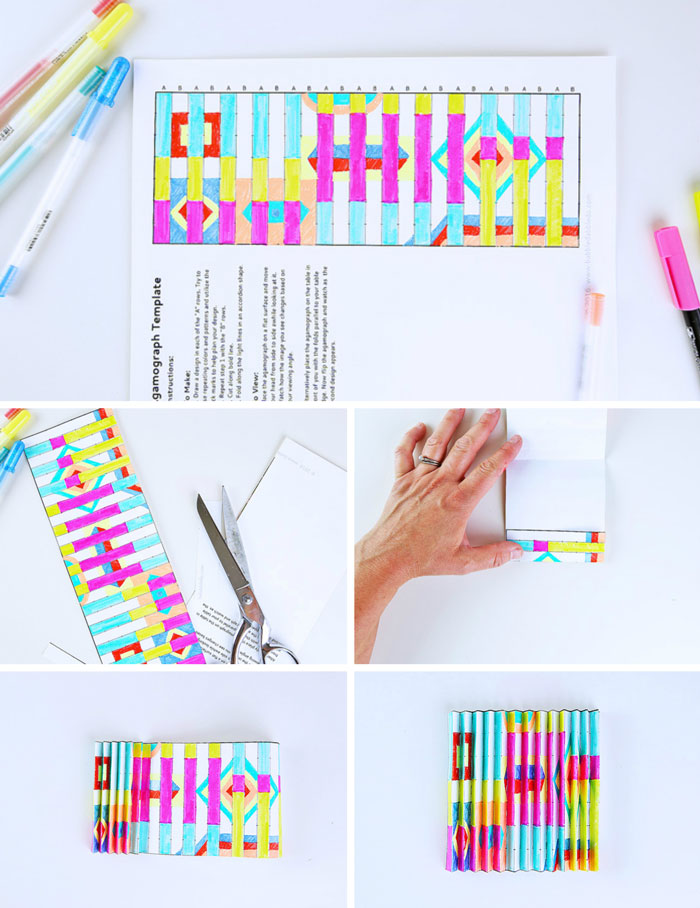
- Step One Draw a design in each of the “A” rows. Try to use repeating colors and patterns and utilize the tick marks to help plan your design.
- Step Two Repeat step 1 with the “B” rows.
- Step Three Cut along bold line.
- Step Four Fold along the light lines in an accordion shape.
TEMPLATE 2
- Step One Draw two different pictures, one in PICTURE TEMPLATE 1 and a different one in PICTURE TEMPLATE 2.
- Step Two Cut out PICTURE TEMPLATES and BASE TEMPLATE along bold lines.
- Step Three Cut PICTURE TEMPLATES into strips along dashed lines.
- Step Four Fold BASE TEMPLATE along the light lines in an accordion shape.
- Step Five Glue PICTURE TEMPLATE strips to the BASE TEMPLATE, matching the numbers and letters on the bottom of the strips to the corresponding letters and numbers on the base.
- Step Six Re-crease the base as necessary once the picture strips are dry.

To View:
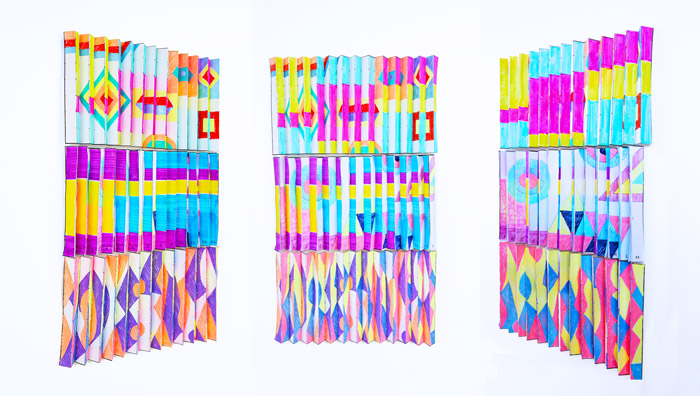
- Place the agamograph on a flat surface and move your head from side to side while looking at it. Watch how the image you see changes based on your viewing angle.
- Alternatively place the Agamograph on the table in front of you with the folds parallel to the table edge. Now flip the Agamograph and watch as the second design appears.
TIPS
- Use the tick marks on template 1 to help you plan out your designs.
- Print the base on cardstock. It will be more durable and rigid.
- To fold the base crease along each light line then go back and reverse every other fold to create the accordion shape. This will ensure you are folding along the right lines.
- Have fun with different patterns and color palettes.
A word about pens
I particularly loved using Gelly Roll Pens for this project because they have very fine tips, making it easy to stay within the lines of the template, and are very colorful. If you mix in some of the metallic or glitter pens (called Stardust Meteor Pens) your agamograph will sparkle and shine. It gives the patterns extra detail and dimension. We also used our Koi Brush Pens on this project for large areas of color.
Looks Like
Yaacov Agam If you like bold and colorful graphic style art then prepare to fall madly in love with Yaacov Agam. Agam’s main focus is kinetic art in which the viewer’s experience of the piece changes as they move around it. He has made quite a few large-scale lenticular type pieces, which is why the term agamograph was coined in his honor. How many artists can say they have an art term named after them? His work has been featured in retrospectives at Paris’ Musée National d’Art Moderne and the Guggenheim Museum in New York and he is still alive and creating today at age 86. In 2014 he created a work called Faith- Visual Pray that was presented to the pope. You can see some samples of his brilliant work here.
Conclusion
Ready to make your own Agamograph? This is a wonderful math art project that introduces the concepts of angles and perspective.
If you enjoyed this post hop, over and see some other projects we did using Sakura of America’s art supplies:
Decotropes
Instant Scratch Art
Art on the Go
And Sakura of America has their own amazing website with loads of project ideas for kids. You can see more of them here.
![]()
Spread Creativity like wildfire: PIN THIS!
thank you so much for your time and delightful presentation.
Wow, this looks like a lot of fun, thank you for your time and effort and the template. Great idea.
I have done these soooo many times with sooo many of our neighbourhood kiddos! I keep meaning to tag you in Instagram to show you the projects I’ve tried of yours. Thank you again Ana for all your amazing creative free shares! They’re lessons, fun & connection for the kiddos is honestly priceless ❤️🇨🇦From Long time Canadian subby 🙂
Awww thanks Jeanine!!! I hope you guys are doing well. I was so happy to read this from you 😘