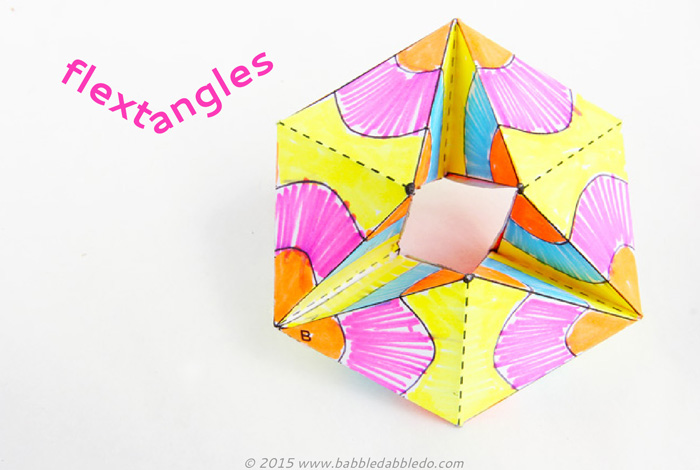
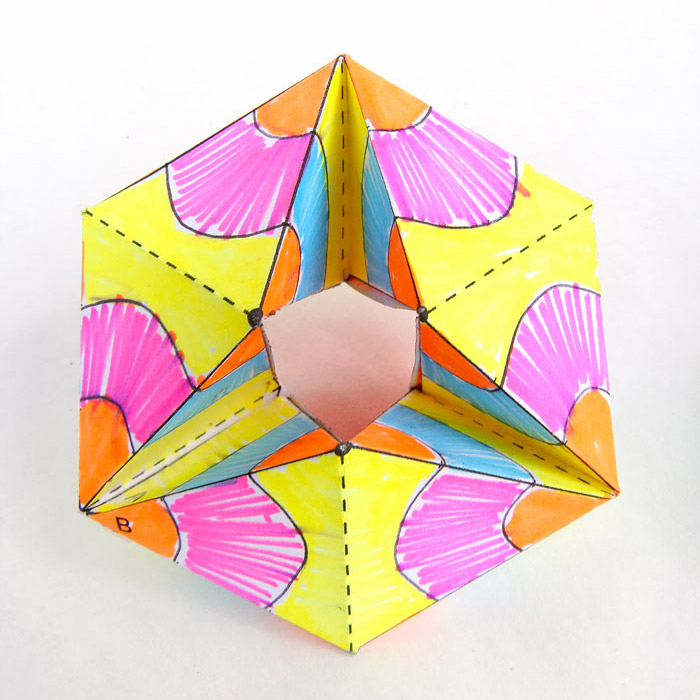
Today’s paper toy, Flextangles, is seriously the coolest paper puzzle we have ever made and judging by how many times you guys have downloaded our template you agree! Flextangles are part of our collaborative series STEAM POWER: Empowering kids to explore the world through creative projects. The theme for this installment is COMPUTE!
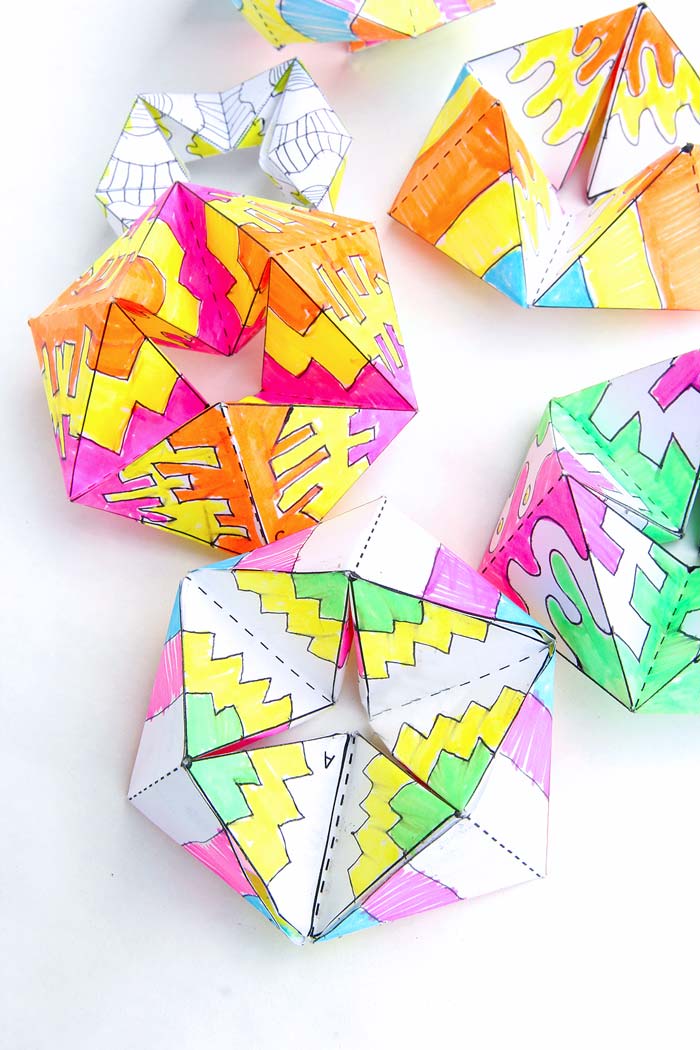
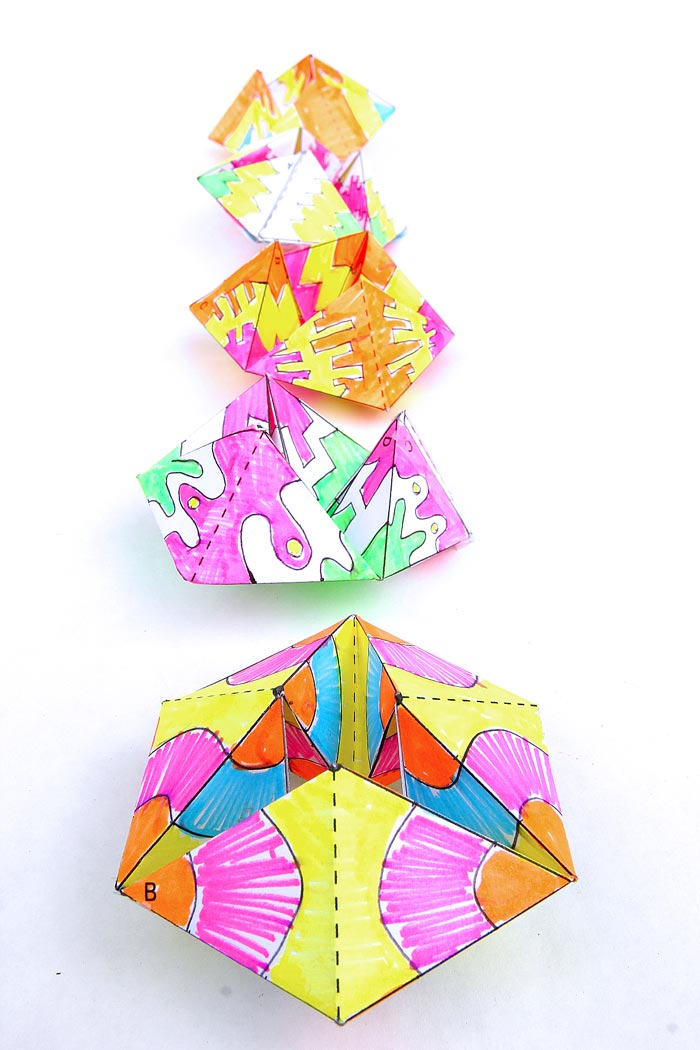
I’ve been itching to try making a flexagon ever since my friend Erica introduced me to them, so I decided it was high time we made one. If you aren’t familiar with flexagons scroll down to find out more. I also decided to incorporate drawing into the project to add a level of manual “computation.” Decorating these and then seeing how the patterns and colors translate once folded is a wonderful exercise in geometric planning.
This post contains affiliate links to products I love and recommend to my readers.
Paper Toy: Flextangles

Materials
- Cardstock This is the BEST DEAL you will find on CARDSTOCK!
- Template (Subscribe below to get the template FREE)
- Pen
- Markers (I’m nuts for these colors
)
- Scissors
- Glue we used this glue because it’s tacky and sets up quickly
- Tape (optional)
Instructions
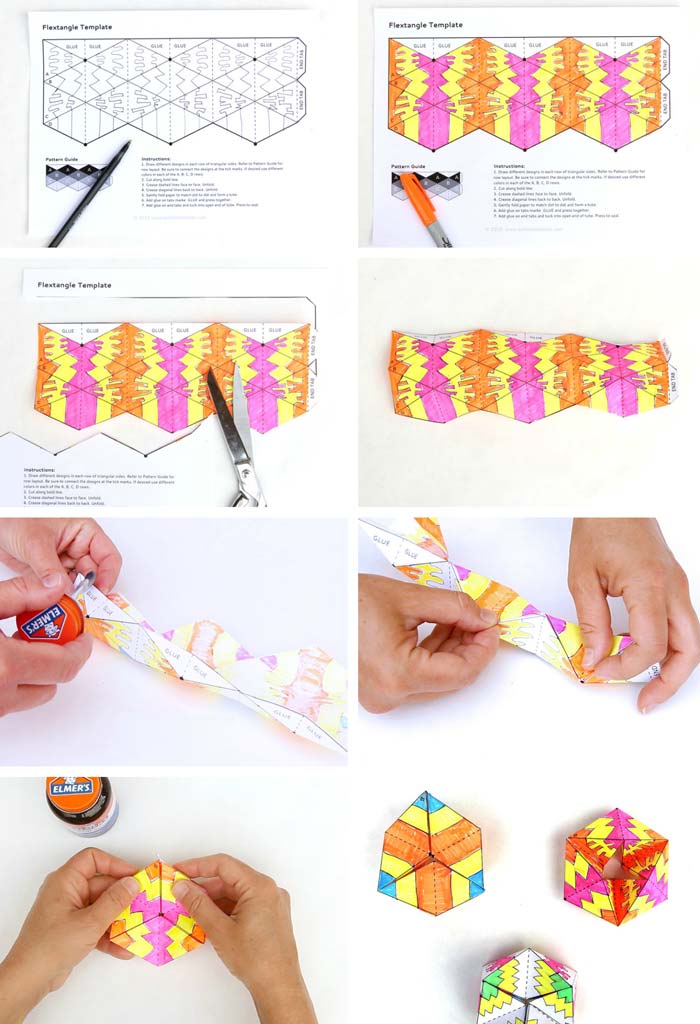
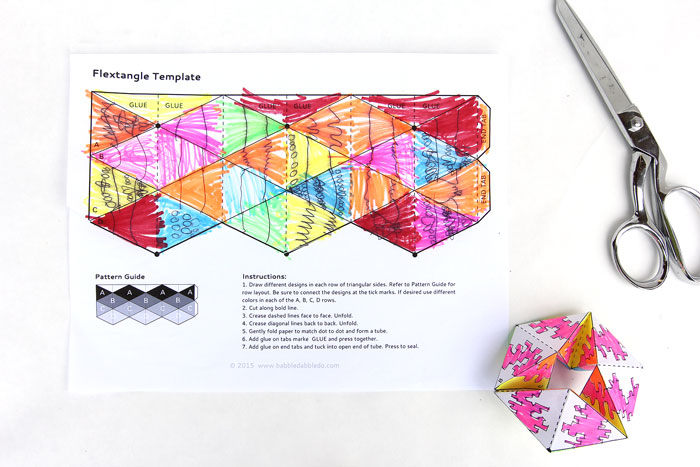
- Step One Download and print the template
- Step Two Draw different designs in each row of triangular sides. Refer to the Pattern Guide on our template for the row layout. Be sure to connect the designs at the tick marks.
- Step Three Cut along bold line.
- Step Four Crease dashed lines face to face. Unfold.
- Step Five Crease diagonal lines back to back. Unfold.
- Step Six Gently fold paper to match dot to dot and form a tube.
- Step Seven Add glue on tabs marked GLUE and press together.
- Step Eight Add glue on end tabs and tuck into open end of tube. Press to seal. Let dry.
Troubleshooting
A few people have written to me to express some challenges with this project. Here are my suggestions for troubleshooting.
- If you find the end tabs keep popping out, add a small piece of tape on both sides of the joint.
- Use tacky glue
and be sure it is dry before rotating your Flextangle! The glued joints are under stress so they need to be secure.
- Be sure to prime the Flextangle by rotating it slowly and popping out any unwanted bumps. The paper needs to flex a few times slowly before it rotates easily.
- Make sure the folds are creased well. I burnish the fold with the back of my thumb. When using card stock you may want to burnish the folds using your fingernail.
Tips
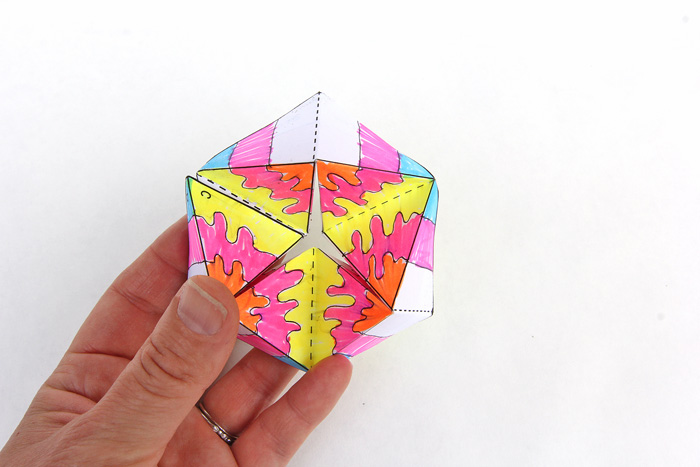
- Prime your flexagon by rotating it gently at first and pushing out any unwanted folds. Once it’s been rotated a few times it will loosen up.
- Standard printer paper makes the easiest to fold flexagons but they are not the most durable. Cardstock
makes for more durable flexagons but you will need to really crease the fold lines or the model will be stiff.
- Younger children don’t have to pay attention to the tick marks, they will just enjoy coloring the template like my daughter did!
About Flexagons and Zentangle
Flexagons are paper models that can be flexed to reveal hidden faces. They were originally created by Princeton graduate student Arthur Stone in 1939 and became a huge fad when Martin Gardner published them in The Scientific American years later. There are an incredible number of flexagon types. To try some other versions go here.
The model we have made here today is nicknamed a Kaleidocyle and because it’s not flat I’m not entirely sure it can be classified as a flexagon, but it certainly is loads of fun!
Zentangle is a trademarked method of drawing patterns in a deliberate, meditative manner. Zentangle is based on a square so our Flextangles are really only inspired by this method and not a true example of this drawing technique. If you want to now more about drawing Zentangle hop over and check out their site!
Looks Like
Martin Gardner. Martin Gardner was an author who wrote a column for The Scientific American. His first article for the magazine was about Flexagons and was published in 1956. It was a huge hit and the magazine asked him to write an ongoing column called Mathematical Games, which he continued until 1981. Besides being a columnist and author he was an expert on Lewis Carroll and held some strong beliefs about pseudoscience and more. You can read all about his ideas here
If FLEXTANGLES gets you hooked on paper toys, we’ve got more……
Check out our PAPER TOYS PLAY PACK HERE

More from the STEAM Series:
- Backyard Coding Game – Left Brain Craft Brain
- PVC Pipe Xylophone – Frugal Fun For Boys
- Superhero Secret Code Activity – What Do We Do All Day
- Easy Math Tricks – All for the Boys
- Patterned Multiplication Circles – Lemon Lime Adventures
- Spring Garden Glyph – Meri Cherry
Wonderful! We are making these now. The folds are a little tricky, but once we mastered the folds, it worked so well! Thanks.
So happy to hear it!
it is so easy to do i did it
Awesome!
Finding it really difficult to do the last glueing step with printer paper. Printed it to cardstock was a bit easier for us.
Tacky thick glue works best. You can also tape the ends together 🙂
This is hard! The video looks so easy and we had a hard time getting it folded and glued. We had fun trying!
Hi Candis,
I’m sorry to hear that! Did you check out our tips? I have some troubleshooting ideas in there. If the glue isn’t adhering you can use clear tape. I also rotate the flextangles slowly a couple of times to prime the paper and loosen it up a bit. After that they can be rotated more quickly. I’d love to hear if this makes a difference!
Ana
It would have been easier if you could stop and rewind the video. given that was not an option and the pictures were not clear at all it makes it very difficult. Very fun idea though!
You can watch it on You Tube and it allows a rewind and pause. Here is the link: https://www.youtube.com/watch?v=pta1R7g05Xg
Its really easy to do
Thanks!
Thanks for the great idea. I loved doing the flextangle.
The instruction is perfect and so is the template. I used a foolding tool to prepare the paper before starting to fold. So it was easy to do and the flextangle has nice ridges.
Ooooh! I need to get a folding tool!
I used a ruler to flatten out the card-stack, worked great! 🙂
I am a teacher, and had a go at these to pique the interest of my students. My first one didn’t work out, but then I was off and running. I made heaps and they are awesome…I can’t wait to do it with my class! Thank you
Yay Belinda! A test run always helps work out the kinks. Glad you liked it!
These are just fabulous!! Thank you so much for creating & sharing.
Thanks Rubina!
It looks really fun. Gonna try it with my grandma. I am going to have to draw the template because we both do not have a printer. Ana can you do a video on how to draw the template for this video?
Lindsey this video has great tutorial on making them without a template: https://www.youtube.com/watch?v=HjPo862KFWA
i really need something to do with my Grand babies i cant hold them any longer !! and this will help alot !!
Awesome! I hope they like them!
I can’t wait to try these, they look like so much fun. I belong to a craft group and am going to suggest we make them for our christmas gift boxes for needy children.
Great idea!
How about calling it a flexahedron? Since polyhedrons are 3-D figures and polygons are 2-D figures. I plan on making hexa-flexagons with my Algebra class this week (since we have PARCC this week), but this would be great for any students that end up in my Geometry class next year when we do the same thing. Thanks!
Great suggestion! I actually made the name up as a combo of Flexagon and Zentangle since they combine the flexagon patterns with deliberate doodling 🙂
This was awesome and easier to make than I expected! Thank you for the template & video. My very first one turned out great and didn’t take very long to make. I like it a lot! Made a little video of it here: https://www.facebook.com/video.php?v=10206512471920118
– Janis
I LOVE IT! I just shared your video on our page! It looks amazing!
Thanks!!! So excited to try this!
Yay!
These are seriously the coolest ever. Your template makes it so easy!
Thanks Mama!
thanks…..this looks like so much fun for my nieces, grand daughter…..okay, yeah, I’m gonna be playing with it too. Thanks!!!
ha!
Dang it you beat me! I’ve been planning to do a set of these for Smallful!
They’re so dang fascinating. Great job!
Great minds think alike Mari! Would love to see your version!
can’t get the pattern to print
Sorry you are having trouble. Here is the link to the template again JIC: https://babbledabbledo.com/wp-content/uploads/2015/03/Flextangles-Template-BABBLE-DABBLE-DO.pdf
Eu adorei isto. Muito bom!!!!
Thanks!
My kids loved making these today. I used sticky tape instead of glue. We used ordinary paper. Yes they are fairly fragile and won’t last month’s and months but they had so much fun they have already made two each. The tape helps strengthen the edges a little. Lining up the lines is crucial and folding on those lines. Thank you! 🙂
Thanks for sharing how yours turned out Tess! I’d love to see a pic! Post it on our FB page if you can 🙂
My girls and I are so excited to try these! So very cool!
Yay!
too cute. thank you
Thanks you so much for this wonderful idea. I have tried and the kids loved it. Some tip from my experience: after glueing the sides together, leave it aside over night without touching or pre-playing with it. The next day, it works perfectly. Thanks very much, again!
Thanks for the tip Grace!
It’s really good idea. Definitely will try!
Thank you for sharing. Keep exploring and inspiring others.
Thanks!
Can you make a step by step slow tutorial my daughter is stressing over this please
The written directions might help 🙂 I have a photo tutorial here https://babbledabbledo.com/paper-toys-flextangles/ I hope she can make them!
I’m not sure whether to say ‘thanks!’ or curse you! My girls made these this week (with simple printer paper and school glue) and took them off to school. They were such a hit that my six year old came home with an order for 8 more. We’ve been colouring and folding all evening! We also tried heavier stock paper and that worked fine as well. We just made sure to give them a good crease when folding. Such a fun craft and I’m sharing it in my newsletter as well.
Heather this made my day! So happy to hear it!
I’m planning on bringing these to a Kidsfest our community is holding tomorrow. But, when I try and print the pattern, the dotted lines don’t print! Am I doing something wrong?
Goodness I’m not sure….the dotted lines are fairly small, perhaps print them at a high res?
i tried to make flex tangle but failed thrice i was not understanding the 6th step please tell and for your answer what to do.
Have you watched the video? http://www.snopes.com/critters/crusader/birdrice.asp Maybe that will help?
I’m a big zentangler and can’t wait to try this incorporating the two. Looks like fun!
I LOVE YOUR Flextangle! Thanks for posting a video!
Parece que le has dedicado un gran esfuerzo a realizar este articulo y a mi me ha gustado mucho, por lo que me
he animado a escribir para felicitarte. 🙂
That’s creative.
and fun 🙂
I must be excessively stupid. I have read the directions, watched the video at least 6x, including pausing it, and I still cannot understand how to do this. I don’t understand “face to face” and “back to back.” The video is so fast that pausing isn’t helping me. This is incredibly frustrating. Oh, and I read all the troubleshooting hints several times. Has anyone made a slower video for YouTube?
I finally got it on about the 25th try. My problem was that I couldn’t understand the folds, because it appeared to me that the template had been colored on both sides, OR that somehow the folding was going on in a way that I couldn’t make mine resemble (because mine was only colored on one side).
And yet, the directions didn’t say to color both sides.
Finally I figured out that the markers used in the video had completely bled thru the paper, so it only looked as though it had been colored on both sides, but one side was not directly colored–it had colors that had bled through. Finally I understood the folding, and then the rest made sense.
If one isn’t using markers that bleed thru, this is very confusing. The dot-to-dot folding instructions are also tough to follow…a slower video would really help here.
But then, everyone else seems to have picked it up very quickly, so perhaps it’s just me.
So glad you finally figured it out! I am planning a slow version of the video soon.
I really tried, I swear I did but as a college educate adult I couldn’t make it work. Maybe if your video was pausable and I didn’t have to watch the whole thing to get the next step or analyze what I’m doing wrong it would be better.
I’m sorry you had trouble with it. I’m planning a slow version of the video soon so stay tuned 🙂
great content!! really simple concept but could be really fun for kids and parents to get involved with!
check out my online toy store http://www.kidplanezone.com/
Great stuff
Thanks!
I purchased this activity pack and have seen the transaction clear my financial institute, however, I have not received any confirmation or the ability to print this pack. Can we please resolve this issue?
Hi Darah,
I apologize for any inconvenience in receiving your Play Pack. I resent the PDF from this email address: anadziengel@gmail.com. Please check your email and SPAM folders and let me know that you got it!
Thanks!
Ana
Ana, I’ve just found your blog! It’s awesome. The kids and I made some flextangles this weekend and they were so much fun. Thank you!
Oh thank you!!!I’ve been follower of yours for awhile!!!
So much fun we used a glue gun for instant results
Children learnt about patterns and following instructions and used their creativity
It’s really awesome.., interesting things which are really simple but playful for kids.
Yay! Thanks for reading!
Years ago, I taught 5th grade and we made these. I used file folders instead of card stock. It was a great way to re-cycle old folders. I plan to make some this summer with my grandkids and your video with help get them started. Thanks for sharing.
Marsha,
That is a fantastic idea! Thanks for letting me know!
Ana
I used the card I normally use for making greetings cards, but made sure to score the folds lightly before I tried folding it. (Score on the OUTside of the intended fold to allow it to bend.)
I was a bit puzzled by some of the instructions but eventually worked it out! Now I’m going to try them out at our youth café 🙂
Awesome!
Those flextangles are AWESOME!! Thank you for sharing!! I am so mesmerized by it!!
woo hoo! They are loads of fun!