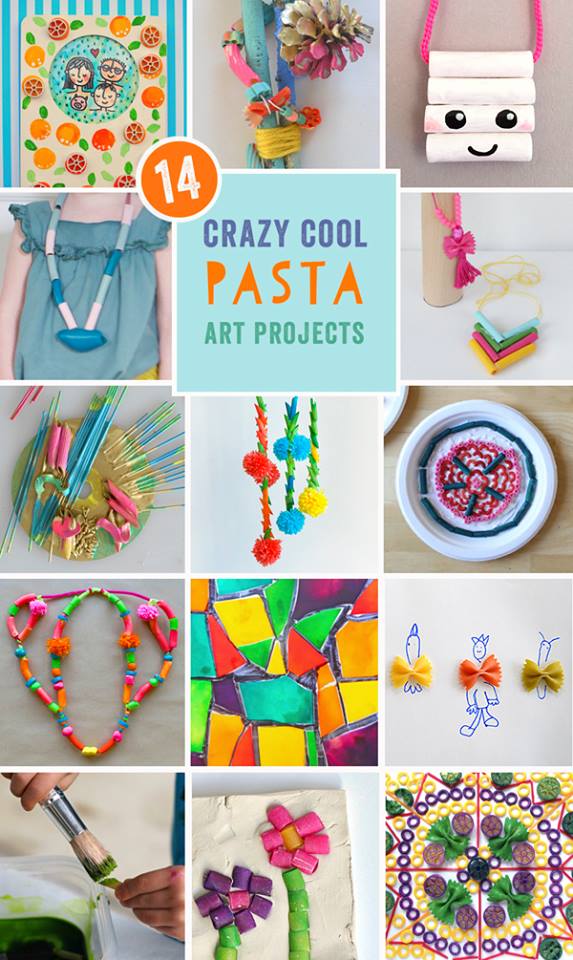
A classic art project for kids is the macaroni necklace and for good reason, pasta is a fun material to use in art because it’s inexpensive, the shapes are diverse and beautiful, and it’s so tactile. Recently the Rockin’ Art Moms challenged each other to come up with pasta crafts; we called it The Macaroni Challenge. Today we are unveiling the results and I have to day that these are some of the coolest pasta projects I’ve ever seen. And better yet, we want YOU to join us in this challenge by making your own pasta creation and sharing it with us! See below for details on The Macaroni Challenge.
To get this challenge started here is how we tackled it: Stained Glass Pasta
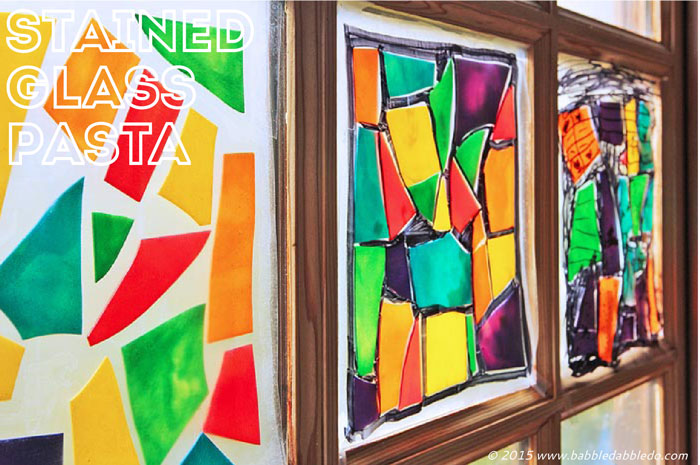
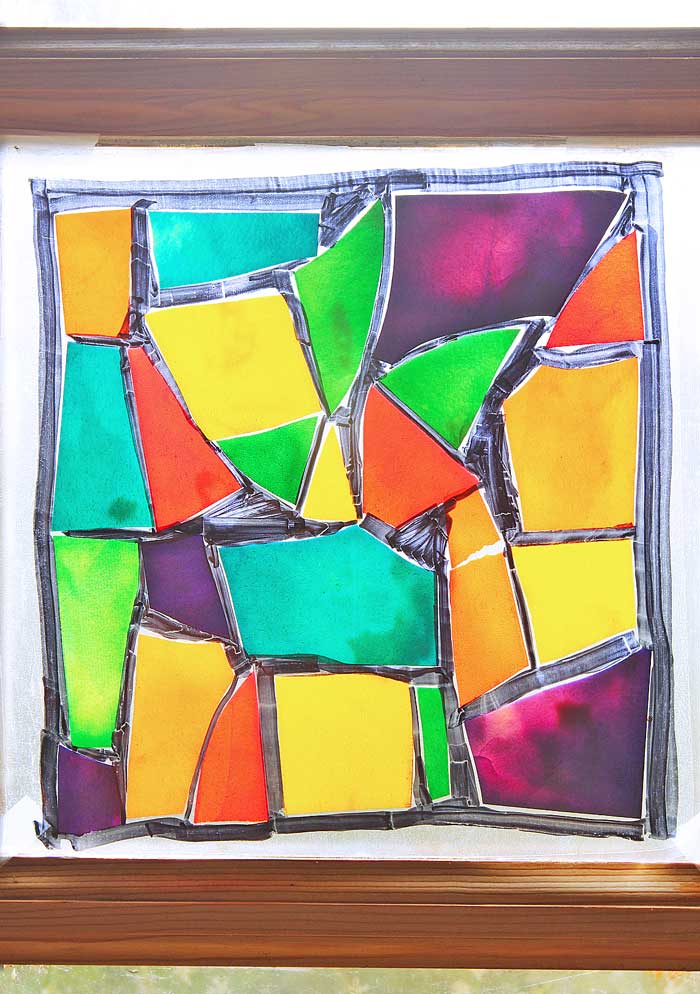
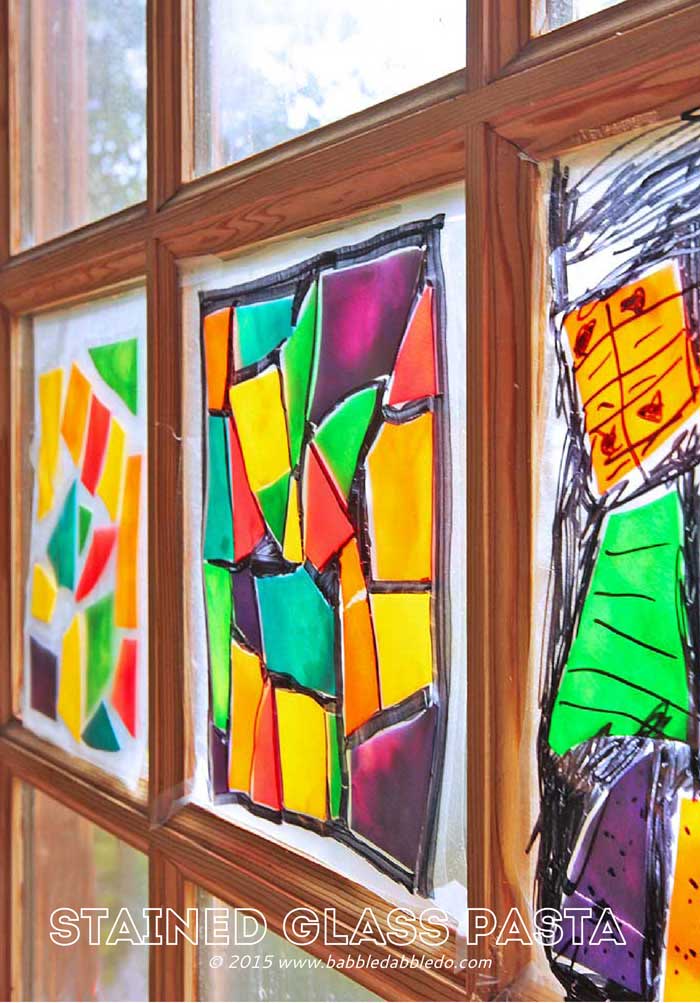
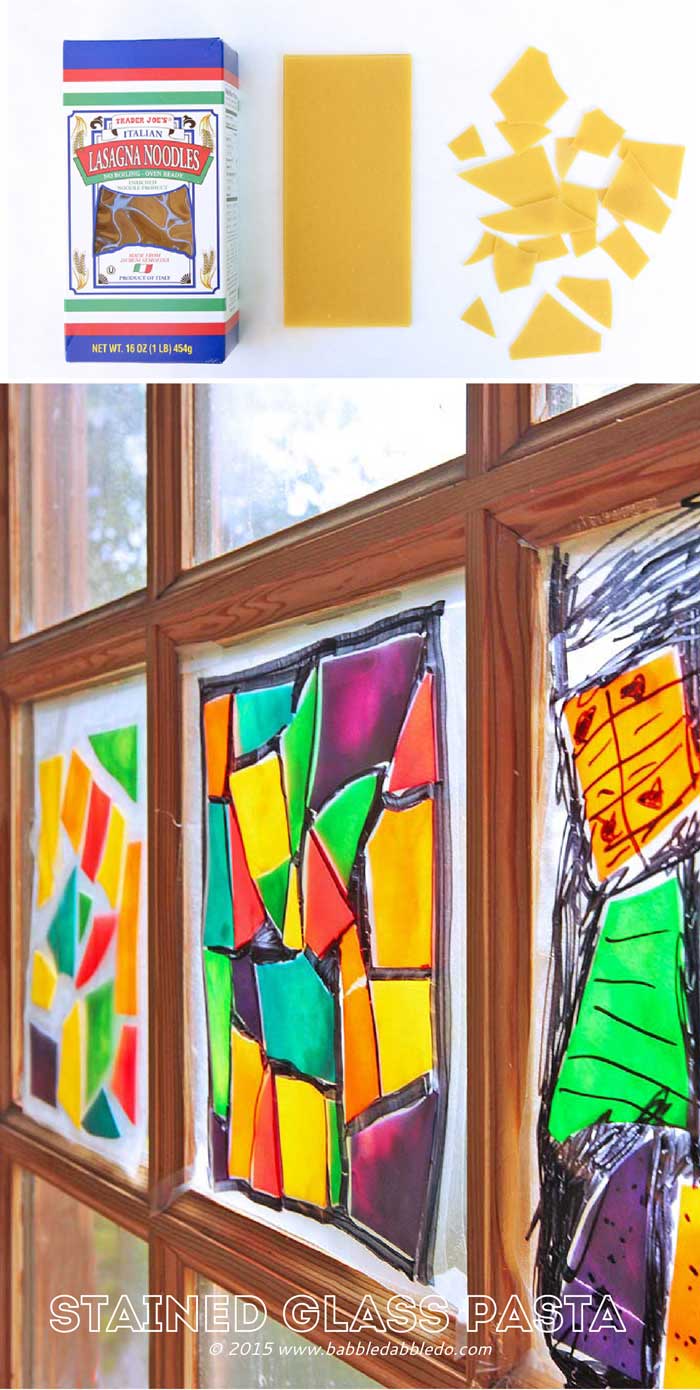
My first thought for the challenge was lasagna. It’s wide, flat, and I really haven’t seen many projects that take advantage of it. I tried quite a few projects before coming up with Stained Glass Pasta. One of my issues was the fact that my wide noodles were prone to breaking until I stopped fighting that fact and used it to my advantage in the project. We used colored flat lasagna pieces to create faux stained glass. Hang these in a sunny window and they look really lovely!
This post contains affiliate links.
Pasta Crafts: Stained Glass Pasta

Materials
- Flat Pasta Lasagne
– I found ours at Trader Joes.
For coloring the noodles:
- Liquid Watercolors
or Food Coloring
- Rubbing Alcohol
- Ziploc Baggies
For the project:
- Clear Contact Paper
OR two sheets of stickyback paper per “window”
- Scissors
- Painter’s Tape
- Black Sharpies- This type of tip works best
Before You Start
You will need to have dyed pasta for this project. Watch our tutorial to learn to to easily dye pasta using food coloring or liquid watercolors. I recommend breaking the lasagna into pieces before dying it.
Project Instructions

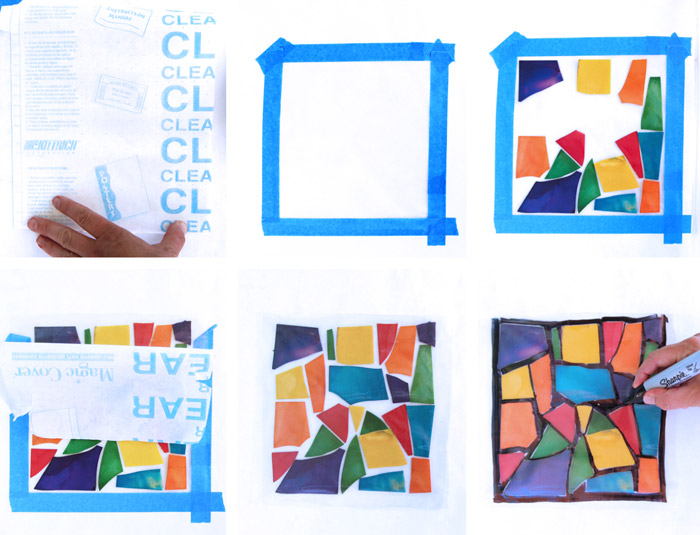
- Step One Break your lasagna noodles into pieces. There should be a variety of sizes.
- Step Two Color your pasta according to the tutorial above.
- Step Three Cut out two matching sizes of clear contact paper, ours were roughly 10” x 10”.
- Step Four Remove the backing from one piece of contact paper and tape it your work surface using painter’s tae. The sticky side should be facing UP.
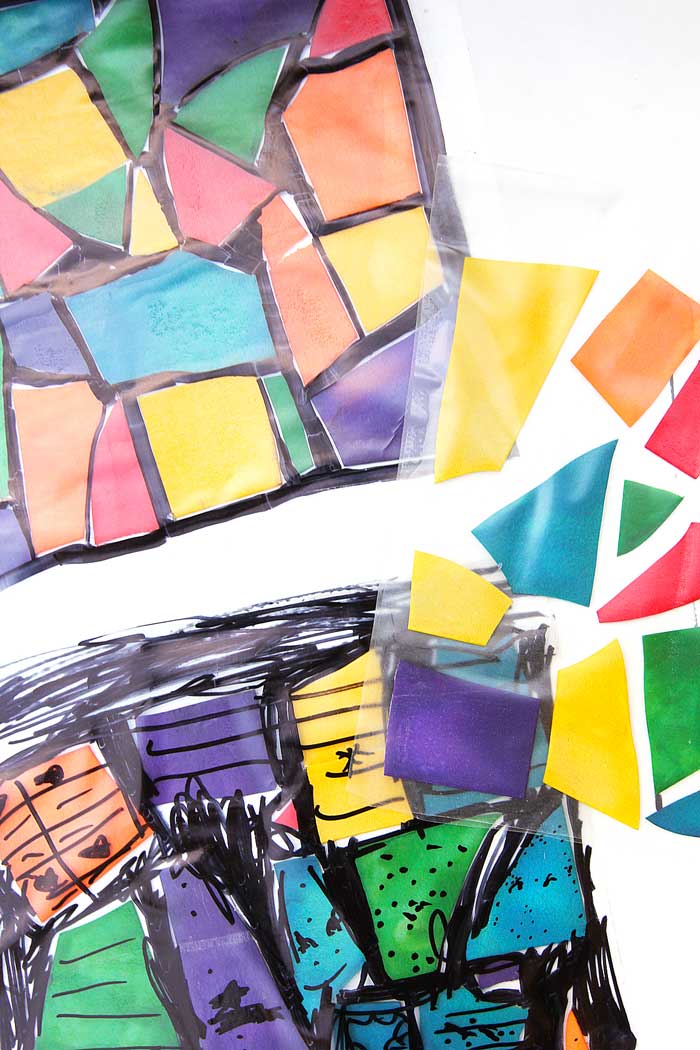
- Step Five Have your child place pieces of the colored lasagna on the contact paper. They can custom break pieces as necessary. Leave at least 1/4″ gaps between the pieces. You may want to show them some examples of stained glass to illustrate why.
- Step Six Remove the backing from the second piece of contact paper and gently place it on top of the finished layout. Gently burnish the gaps with your fingertips to seal.
- Step Seven Using a wide tip Sharpie, have your child fill in the gap between the colored pieces with black for a stained glass effect.
You’re done! Hang it in a sunny window and display!
Tips:
- The pasta will not cling to the contact paper but rather be gently held in place by it. This is good because you can move the shares around as you design. the flip side is your child may say” It’s not sticking!” That’s okay. sealing it with the top sheet of contact paper will trap the pics in place.
- Adults/older children should handle placing the contact paper on top of the finished piece. It’s a little tricky to do and keep the pieces in place.
- If you are worried about the pieces staying in place you can spray a layer of spray adhesive on the bottom piece of contact paper and again before you add the top piece. ADULTS ONLY should spray it as it’s an art material that need proper ventilation otherwise it’s pretty toxic.

Looks Like
Charles Rennie Mackintosh Charles Rennie Mackintosh was a Scottish architect, artist, and graphic designer who became synonymous with the Art Nouveau movement in the United Kingdom in the late 1800s. His masterpiece is considered the Glasgow School of Art, for which he not only designed the building but also the stained glass windows, furniture, and even the graphics. He was one of the first designers to create abstract and modern designs in stained glass, a departure from their traditional use in churches and cathedrals, and this is why I thought of him with this project. Another reason I love Charles Rennie Macintosh is because of the collaborative nature of his work. He was part of the Glasgow Four made up of himself, his wife Margaret MacDonald, her sister Frances MacDonald, and friend Herbert MacNair. The four colleagues collaborated on a number of exhibitions in Europe and helped define the “Glasgow Style.” One of my favorite quotes from Charles about his wife is, “Margaret has genius, I have only talent.” See more of his work here.
Conclusion
More colorful art projects with PASTA:
If you liked this project then the Rockin art Moms have 14 more for you to check out! Here they are:
Art Bar |Art Assemblage with Pinecones and Pasta
Buggy & Buddy | Mosaic Art Project for Kids Using Dyed Pasta
Handmakery | Modern Macaroni Masterpiece
Pink Stripey Socks | Pasta Noodle Macaroni Frames
Molly Moo | Painted Macaroni Necklaces
Tiny Rotten Peanuts | Macaroni Mosaics
Learn Play Imagine | Painted Pasta Art
Meri Cherry | Pasta Sculptures for Preschoolers
Willowday |Macaroni Pompom Flower Necklaces
Pysselbolaget | Pretty Pasta Pendants
Artful Parent | Pasta Art Activities For Kids
Picklebums | Pasta Drawing Prompts
Mer Mag | Re-think The Macaroni Necklace
Tinkerlab | Spaghetti Tower Marshmallow Cha
Babble Dabble Do | Stained Glass Pasta
Spread Creativity like wildfire: Pin this!
Oh how clever to use lasagne sheets!! love it, doing xx
Yes!
You rocked this Ana!! What a fresh, cool idea! I love it and can really imagine kids loving these!!!
Thank you Gina! BTW your video is amazing! More video from Willowday please!
I am like a broken record, stalking you on all social media. But this are brilliant Ana!! Very out-of-the-box (ha!) creative thinking here. You are just so clever. xo bar
You are MY hero Bar!
Awesome project!! So creative. I love your video too!
How on earth did you come up this this project! It’s fantastic! I need to try it – now!
You are too funny Karin! I guess it’s too many leftover lasagna noodles staring me in the face!
These are seriously so amazing. I keep coming back to stare at them. 🙂
Thanks Allison!
You are freaking clever woman!!
Just following in your footsteps……
Oh my goodness, I must be over-sensitive! You had me tear up during the video ! These are tooooo super creative!!! BIG LOVE TO ALL the Rockin Art Moms! Xo Jeanine
Love you!
An attractive display…if the finished art can live through the child’s frustration in dealing with the stickiness of the adhesive paper, the control it takes to fill in all the spaces between the pieces, and the fragility of the noodles! But considering it was entered as part of a pasta art contest…yes, it’s unique and a winner!
Thanks Joyce for the feedback! Our contact paper wasn’t too sticky so we didn’t face the same frustration but I appreciate hearing your experience!
I dyed the pasta pieces following instructions but as they dried they curled so would not lie flat. How did u get yours to stay flat?
Hmmmmmm….mine dried flat. I’m wondering if there might have had too much liquid and the pasta absorbed it?
I’m the Editorial Assistant for Fun Family Crafts and I wanted to let you know that we have featured your project! You can see it here:
http://funfamilycrafts.com/stained-glass-pasta/
If you have other kid-friendly crafts tutorials, please submit them! If you would like to display a featured button on your site, you can get one from the right side bar of your post above. Thanks for a creative and fun project idea!
I’m doing a similar project with my art club and if you use too much liquid to dye the noodles they will curl so be stingy with the food coloring! I’m finding the barilla no boil noodles aren’t translucent enough when colored, they stay really opaque, so I’m going to hit TJs today to see if I can find the ones you used as they look more like traditional pasta. I really don’t want to have to break the curly edge off of hundreds of noodles! We are using dollar store frames and modge podge-ing the noodles onto the glass and then using black puffy paint around the noodles after the modge lodge dries. 2 step project. Just leave the backs off the frames and hang in a window! They look really great and are a bit more finished and durable than the contact paper.
Thanks for the feedback Charlotte! Did you break them first or dye them first whole? I found that dying them whole and then breaking them made for the most flat pieces. They did curl up in spots when whole but breaking them up afterwards helps.
Oh, wow, this project turned out so amazing! I think it is so sweet that you got to do this fun little project with your kid and that it turned out so amazing! Thanks for sharing!