Physics projects are fun, wait, what? Yes, I really did just say that. As someone who struggled with physics in college when reading about it in a book, I am a true believer that hands-on physics projects are the best way to grasp scientific concepts like energy, motion, inertia, gravity etc. It wasn’t until I began doing hands-on projects with structures and physics that any of these concepts really clicked in my head.
This post has been sponsored by Kidspace Children’s Museum.
The more we can get kids excited about physics at a young age we can avoid it becoming an intimidating branch of science that sounds extremely complicated. In fact I would argue that physics projects can be the most fun science you’ll ever do! Today’s project is a great example of that, a classic demonstration of the transfer of energy all wrapped up in one magical DIY toy.
Today’s post is sponsored by Kidspsace Children’s Museum in Pasadena, CA. It’s a magical place tucked by the Rose Bowl and the Arroyo Seco and has a fabulous ongoing exhibit exploring…drumroll… Physics! If you are located in the Los Angeles area Kidspace is a must visit museum, though I don’t think of it as your typical museum because it is made up of fun engaging activities and experiences for kids exploring science, art, making and more. Later in this post I’m sharing a short video I made on a recent visit to Kidspace and their Physics Forest where we got to meet with a science specialist who showed us some of her fave exhibits at the “forest.”
Now let’s get back to our Rollback Can. If your kids like to trick their friends, they must do this project! My daughter, the prankster in our family, took a Rollback Can to school and told me she had a whole group of friends standing around trying to figure out how it kept rolling back to her. I’m sure she did a display of “superpowers” and pretended to coax it back… This is the type project that will fool and amaze lots of folks, a little science magic.
This post contains affiliate links to products
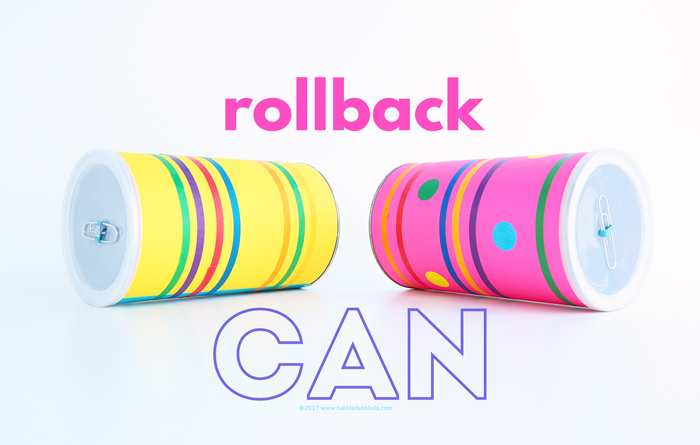
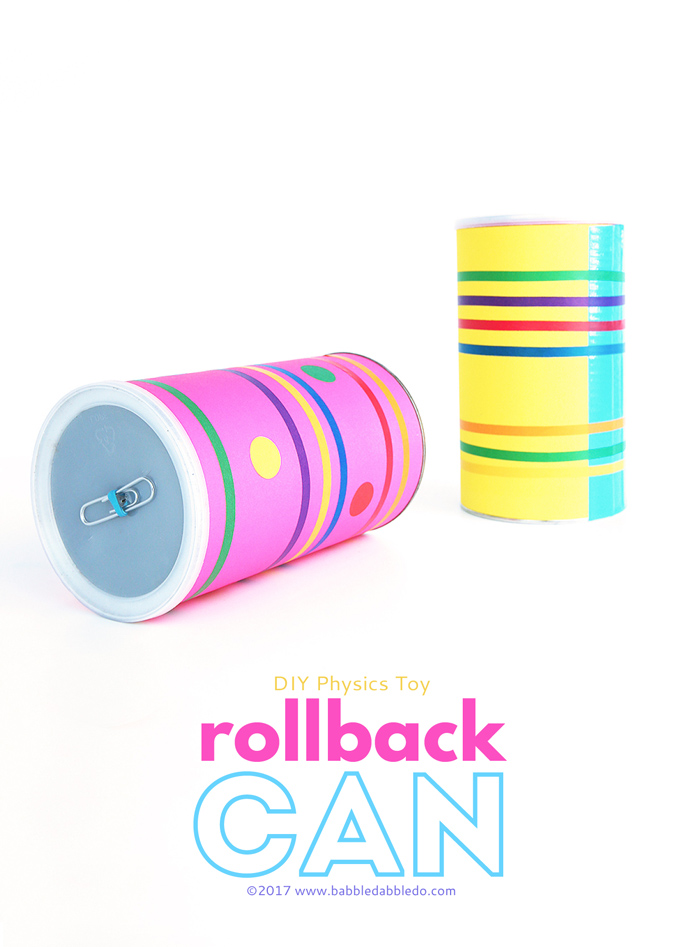
Physics Project Idea: Rollback Can
Materials
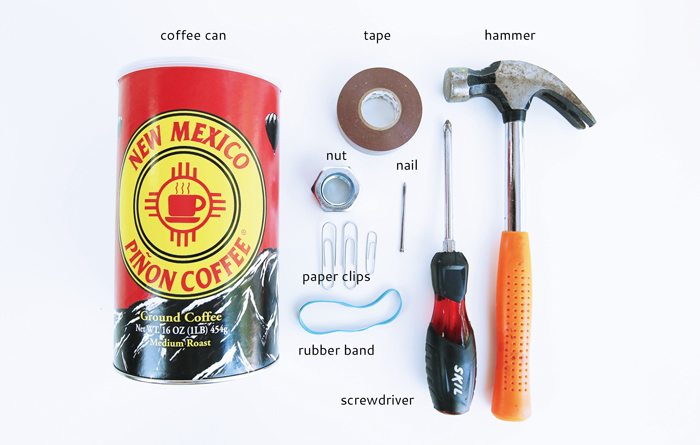
- Coffee or Oats Can (empty please)
- Thick Rubber Band (choose the thickest ones in a pack like this)
- Large Nut (pick one up at the hardware store for about 50 cents)
- Paper Clips
- Nail Hammer
- Screwdriver
- Tape
- Pencil
- Colored paper & tape for decoration
Instructions
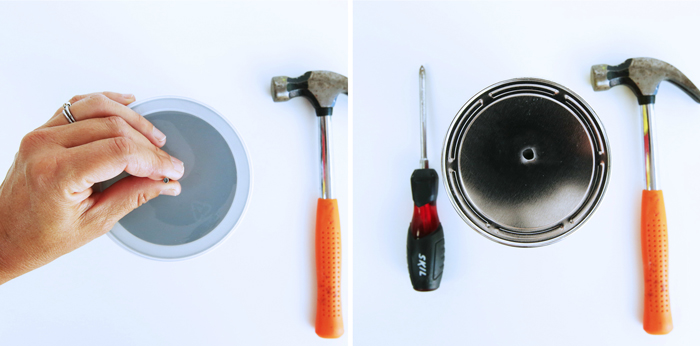
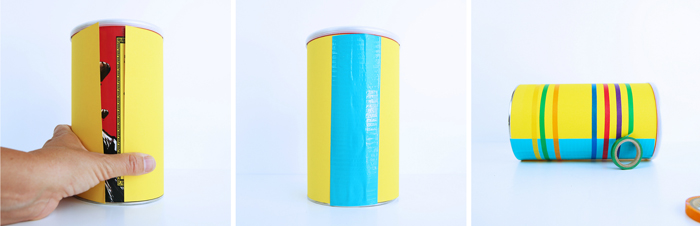
- Step One Poke a hole in the center of the coffee can top and bottom using a hammer and nail.
- Step Two Enlarge the hole by tapping a screwdriver through the hole with a hammer.
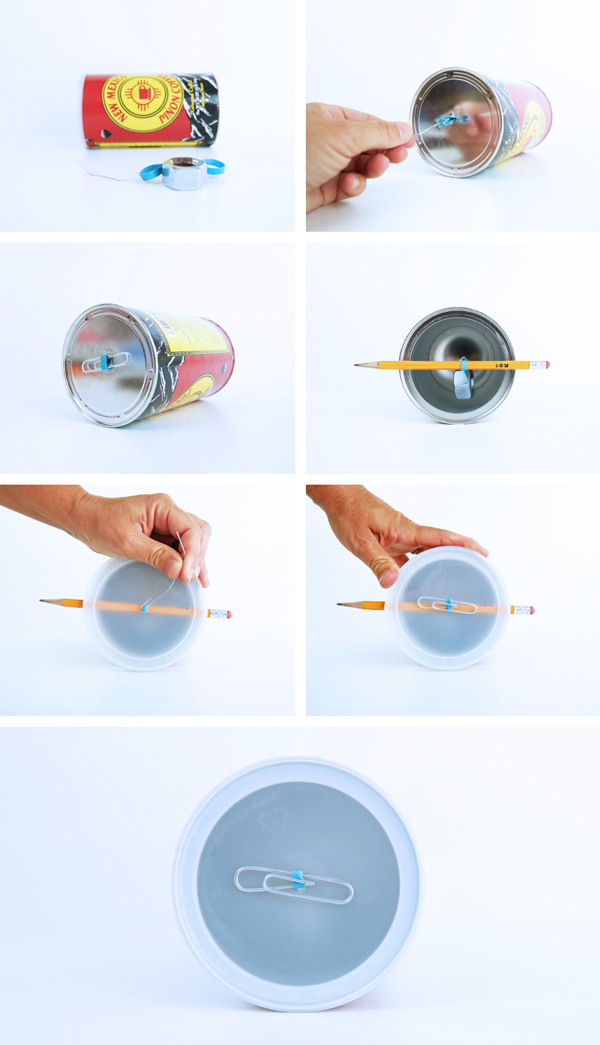
- Step Three Tape your rubber band to the top of the large nut. Make sure it is very secure.
- Step Four Open up a small paper clip and thread it through one loop of the rubber band. This will be your “needle”

- Step Five From the inside of the can, very carefully thread the paper clip with the rubber band attached through the hole in the bottom of the can. There may be sharp edges so be very careful! Slip a large paper clip through the rubber band loop to secure it in place. Remove the paper clip “needle.”
- Step Six Place the paper clip “needle” through the remaining loop of the rubber band and carefully pull it though the hole in the coffee can lid. Place pencil between the lid and can to temporarily hold everything in place. If the nut has moved closer to one side of the rubber band, move it back so that it hangs on the center of the can when stretched.
- Step Seven Slip another large paper clip through the rubber band loop to secure it in place. Remove the paper clip “needle” and the pencil. Make sure the lid is securely attached to the can.
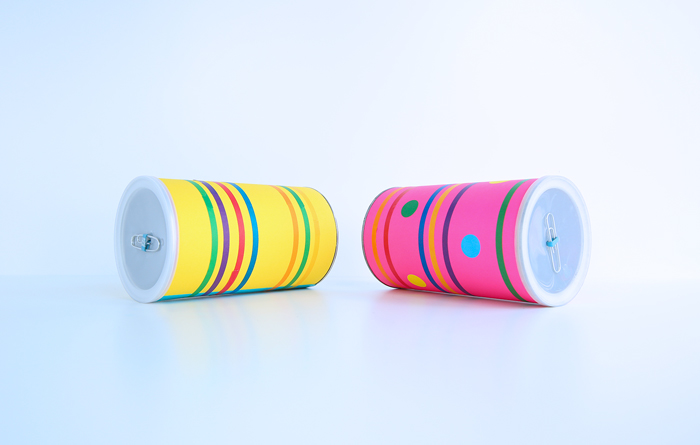
- Step Eight If desired decorate your can with tape and colored paper.
Go test it! On a flat surface gently roll your can away from you. It should roll away, stop, and then roll back! If it doesn’t check out our troubleshooting tips below. This project will require some fine tuning so don’t despair if it doesn’t work at first. See if you can troubleshoot what’s going on.
Troubleshooting
- Use a thick rubber band. Smaller rubber bands will not be able to store enough energy.
- The nut/weight should not be touching the side of the can. If you hear it touching, use a shorter rubber band or knot your rubber band to make it shorter.
- The nut or any other weight you choose to use MUST be offset. Do not tape rubber band to the center of the nut; tape it to the top.
- Make sure you are rolling the can on a flat, smooth surface.
- If the rubber band is not stretched enough you can thread a smaller nut on either end of the paper clip and can to stretch it a little more.
The Physics of a Rollback Can
The Rollback Can physics project displays the concept of transfer of energy. One type of energy is called kinetic energy– that is energy in motion. Another type of energy is called potential energy, that is energy that is stored up and ready to be released. When you roll the can, the kinetic energy of the rolling is transferred to the rubber band, which twists tightly and is prevented from turning along with the can by the offset weight. As the rubber band twists, the energy becomes potential (stored energy). As soon as the can stops, the potential energy stored in the rubber band is released and the can begins to unwind and roll back in the direction from which it came, once again becoming kinetic energy.

Kidspace Physics Forest
Now that your kids see how much fun that physics is, you should take them to the Kidpsace Physics Forest. Seriously, my kids loved all the hands-on activities and probably didn’t even realize their were exploring science, they just wanted to tug of war and shoot air cannons! And if you aren’t a SoCal resident put it on your bucket list for your big LA trip…because I know you want to come to Cali!
So is physics really fun?
YES! A resounding yes! The rollback can is a simple physics project that will amaze kids and a great demonstration of potential and kinetic energy. And psst…it also doubles as a great party trick!
We did this today and it was awesome. He played with it for hours perfecting the timing of performing the magic of calling the can back. Thank you for the easy to follow instructions and simple science concepts.
This makes me so happy to hear 🙂