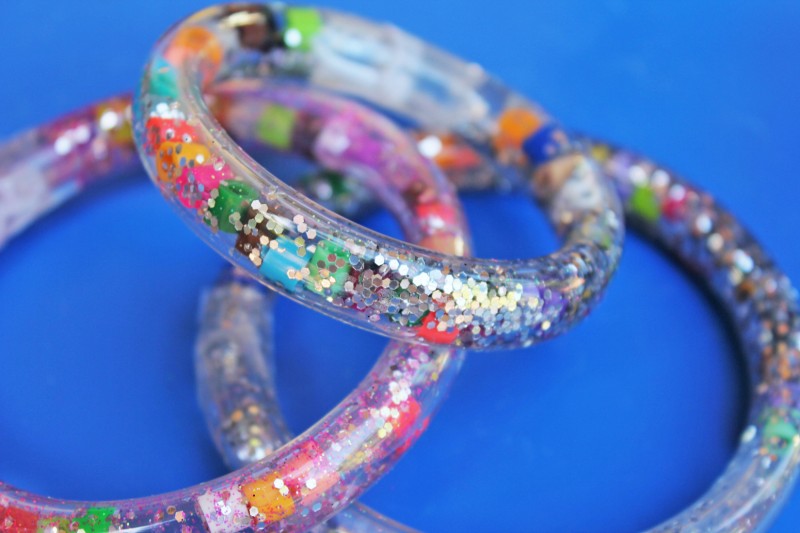
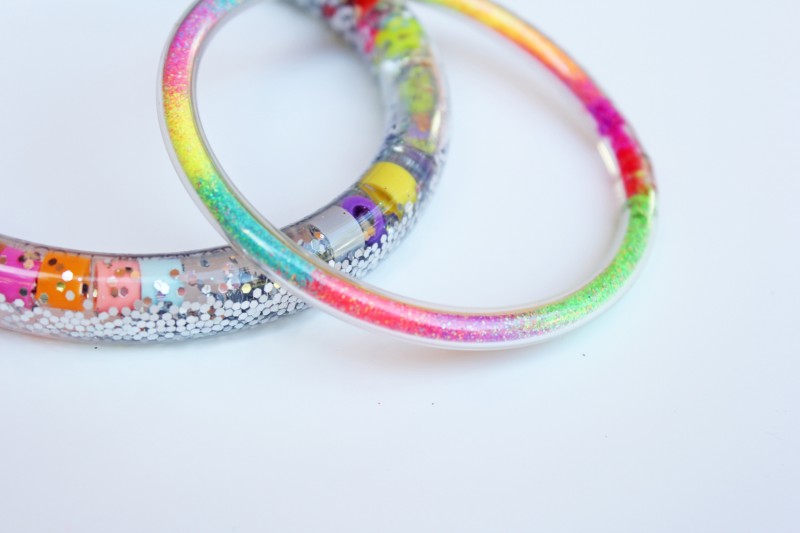
Science meets fashion in these DIY glitter bracelets for kids! Yes, you read that correctly, science meets fashion! Did you ever think those two concepts could be combined in one kid’s craft project? Neither did I, but when I found a lovely idea for making glitter tubes in one of my craft books, I decided they would also make great jewelry for kids!
An environmental word about glitter:
This post was originally published in 2013 when the dangers of microplastics were still vastly unknown to many folks. Since then there has been increased public awareness about the dangers of micro plastics like glitter. Glitter is a microplastic and because it is so tiny and sticks to hands most people end up washing it off. Where does that glitter go? Once it makes its way through the sewage system it usually ends up in the ocean. And that’s terrible for marine life!
Microplastics are polluting our oceans and harming aquatic animals who end up ingesting them. Because of their size micro plastics are nearly impossible to filter out of waste water, so the best way to avoid them getting into the ocean is to stop using them entirely and/or avoid washing them into our water systems.
So what’s a maker to do? Glitter makes so many projects irresistible and kids and adults love it! Here are some things you can do to use glitter responsibly:
- Limit it: In my own maker space I have vastly limited the amount of glitter we use. I used to throw it into everything: crafts, slime, art projects you name it. Now I think twice about whether or not I really need to add glitter or if there is an alternative product I can use. My goal is to completely stop using glitter by year’s end.
- Clean-it up properly If you do use glitter DO NOT wash it down the drain! Use lint rollers or a wad of play dough to pick up bits and pieces of glitter on tables and work surfaces. Throw all glitter in the trash.
- Use eco-glitter I have not tried this myself but there are bio-glitters on the market made from plant cellulose derived from eucalyptus trees. As of this writing it is quite expensive and made more for the cosmetics industry.
- Find alternatives We’ll be trying these bracelets at camp this summer using colored sand in lieu of the fine glitter. Glass seed beads and glass microbeads are other possible alternatives to look into.
In a nutshell before you use glitter think about wether there is a good alternative material. If there isn’t, be sure that you properly clean up glitter so that it doesn’t inadvertently end up in the ocean.
Now, in all fairness we made two versions of this project, one with a science twist and one that’s just stinkin’ cute. And since I often get carried away with variations I had to share both versions here with you!
This post contains affiliate links.
STEAM Glitter Bracelets
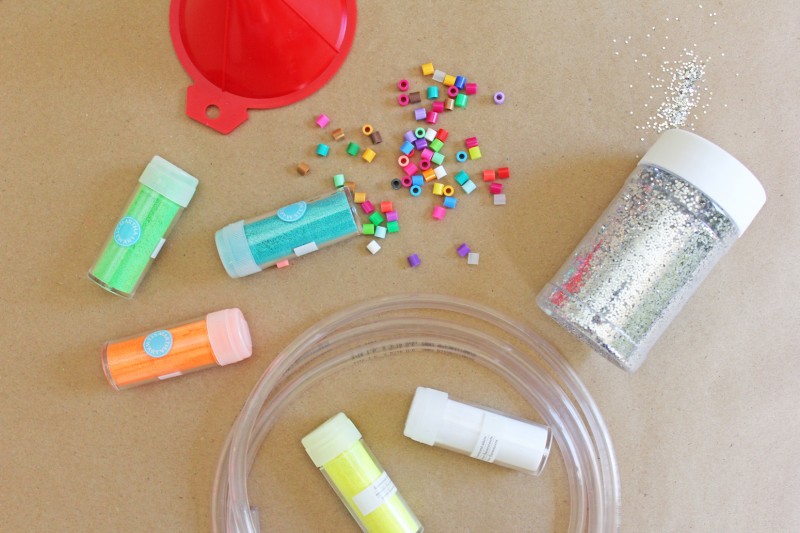
Materials
- Plastic Tubing:
- 4 to 5 feet of 7/16″ Outer Diameter (OD) recommended. Plastic tubing is available at your local hardware store.
- 1 foot of tubing whose OD matches the Inner Diameter of the 7/16″ tubing- this will be the “plug” for the bracelet. It needs to be very snug. If you can’t find matching tubes see the plug alternative below*
- Large Glitter (your typical glitter, avoid using fine glitter)
- Small Beads or Objects to fit within the tube (I used Perler beads)
- Cooking Oil
- Painters Tape
- Clear Tape (optional)
- Funnel
- Water
- Paper Towels
Instructions
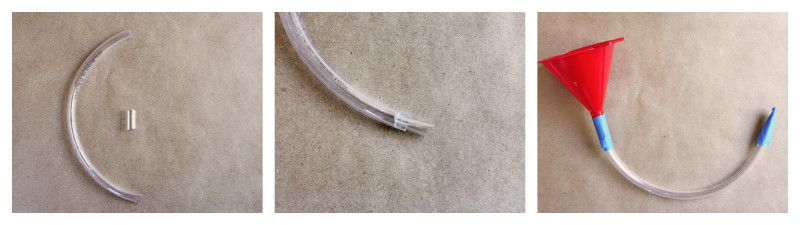
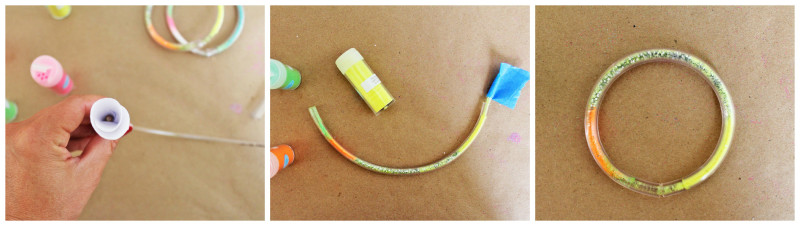
- Step One Cut your larger tubing: 8″ long for little folks’ wrists and about 9-1/2″ long for adults.
- Step Two Cut about an inch of smaller tubing for the plug. If you couldn’t find tubing with the right diameter for the plug see below for an alternative*.
- Step Three Fit the smaller tubing into one end of the larger tube. If you’re having trouble, take some cooking oil and dab it on the end of the small tube. It should slide in the larger tube more easily.
- Step Four Put a piece of painter’s tape on the end of the plug.
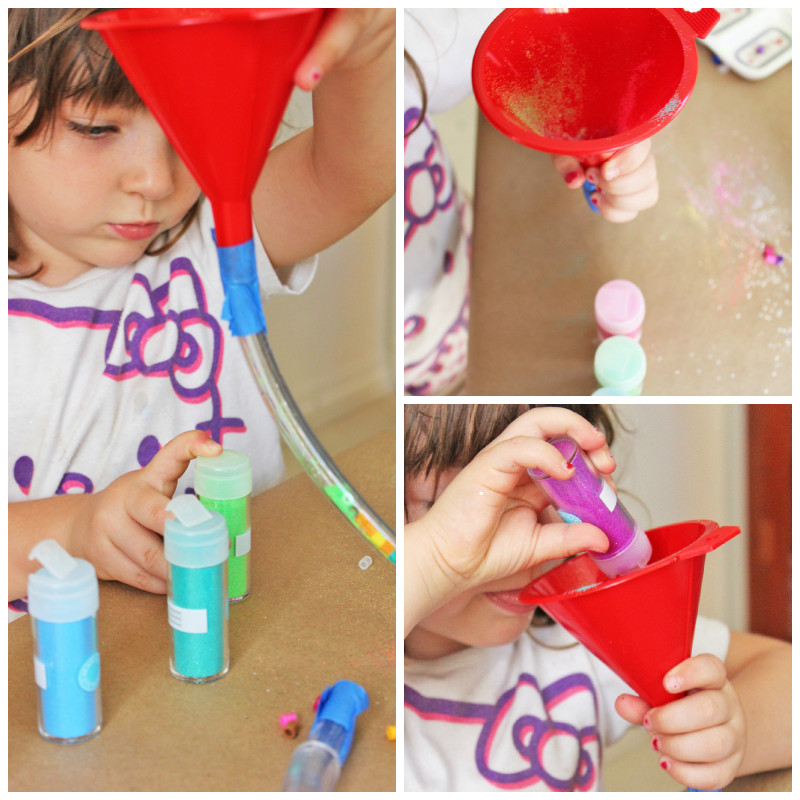
- Step Five Place the funnel on the other end of the large tube and tape around the connection point.
- Step Six Fill it! The beads should be added one at a time so as not to get stuck in the end of the funnel. This is a great fine motor skills activity. Glitter can be shaken into the funnel. When the tube is half or three quarters full, stop.
- Step Seven Remove the funnel and tape at both ends of the tubing. Make sure you are holding the tube in a “U” shape so the filling doesn’t come spilling out.

- Step Eight Add water! You’ll want to place the large end of the tubing under a faucet and fill ever so slightly. Leave some air within the tube so the water can float around freely.
- Step Nine Take the plug end of the tubing and wrap it around to meet the other end of the bracelet. Insert the plug. Use oil again if you are having a hard time.
- Step Ten Dry off any excess water on the bracelet. You can place some clear tape around the connection point to prevent leakage. If you can get away without using tape the bracelet will look prettier, so get that connection snug! A reader also suggested using a dab of E5000 glue at the connection point to ensure a good seal. Thanks for the suggestion, Julia!

*Plug Alternative Cut a small piece (1/2″ to 1″) of the same sized tubing you are using for the bracelet to act as the plug. Now cut a slit down the length of this piece. Curl the tubing in on itself until it fits within the longer section of tubing. If it still doesn’t fit, cut about an 1/8″ off the entire length of the tubing, then curl it in and insert. IMPORTANT You want this to be super snug so that it doesn’t leak, so do you darnedest to squeeze it in there!
You’re done! When you rotate the bracelet, the glitter and beads will float around the tubing. For fun variations add soap and or food coloring to the tube before sealing.
Where’s the STEAM?
The Science
Our glitter tube bracelets are a simple way to illustrate density. The glitter floats freely around the tube because it is less dense and flat. It’s shape and density make it easy for the water to push it around the tube. The beads are denser and have a hole in the center so they are harder for the water to push through the tube. If the beads and glitter were the same size you’d have the perfect science illustration BUT this is good for starters
The Engineering
This project illustrates tolerances. When engineers design products, they consider tolerances i.e how precise a measurement must be in order for the product to work properly. Smaller products must be must be built very precisely.I n the case of these glitter bracelets, if your plug’s outer diameter does not match the bracelet tubing’s inner diameter precisely you will have a watery mess when out try to close the bracelets up!
Okay so now that you’ve tackled the STEAM version of this project, ready to tackle the fancy one?
Totally Tubular Glitter Bracelets
Materials
- Plastic Tubing: 4 to 5 feet of thin tubing- 3/16″ OD or more
- Fine Colored Glitter such as this neon set by Martha Stewart Or sue colored sand or colored salt.
- Cooking Oil
- Painters Tape
- Paper
The main difference between this version and the last is that you will not be adding water. The smaller tubing is hard to fill and it only takes a small amount of glitter to completely fill these tubes. So just make them pretty!
Instructions
- Step One Cut your tubing: 8″ for little folks and about 9 1/2″ long for adults.
- Step Two Cut about a 1/2″ of tubing for the plug and insert it into one end of the long piece of tubing. See “Plug Alternative” directions above for how to do this*. Dab cooking oil on the plug to make it easier to insert.
- Step Three Put a piece of painter’s tape on the end of the plug.
- Step Four Make a small funnel out of a paper scrap and tape it to the other end of the tube at the connection point.
- Step Five Fill it! Shake your fancy glitter into the funnel. It won’t take much to fill the small tube, a couple of shakes and you’re good to go. Add as many colors as you want to create a design.
- Step Six Make sure to gently shake the tube each time you add glitter so that it sinks to the bottom. Otherwise your colors will get mixed quickly.
- Step Seven Remove the funnel and tape at both ends of the tubing. Make sure you are holding the tube in a U shape so the filling doesn’t come spilling out.
- Step Eight Take the plug end and wrap it around to meet the other end of the tubing. Plug. Use oil again if you are having a hard time inserting the smaller tube.
You’re done! You don’t really need to tape around the connection point unless you feel the tubing is going to come apart. The tape detracts from the design so use it only when necessary.

These are really sweet! I bet they could also be made with colored sand or colored salt….I have to admit though, my daughter was more interested in dumping out glitter on the table and herself than into the funnel, though I did get a few good shots before the chaos ensued!
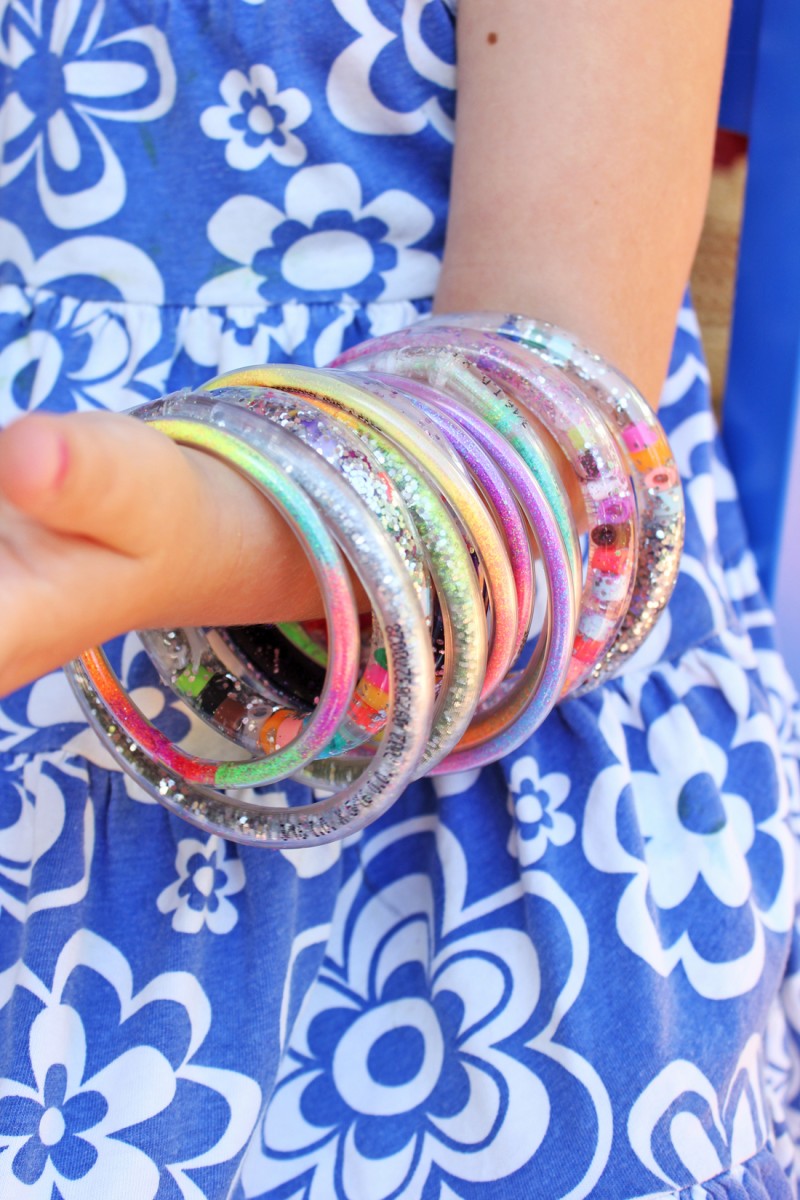
The good news is Miss Clara loved the results. She was seen wearing all the bracelets around our house at one point!
So there you have it, two versions of glitter tube bracelets, a fun craft and science project for kids. I’ve got a few more alternatives I want to try and will share here in the future!
I’ve only just discovered this website, and I am already stunned with the innovation, beauty, and simplicity of all of these projects! I’m going to start working on every project possible ASAP!!! THX!!
Thanks Katie for your kind words; let me know how the projects go!
I LOVE this project with a capital LOVE. SO cool!
Thanks Jeanette! Coming from you that’s a super special comment. I love Artchoo!
I made some of these with my fiance’s little sister who is 13, and I used a dab of E5000 glue to ensure a permanent seal because I was worried it would pull apart (It seemed pretty sturdy, but I’m just OCD). It’s a flexible, waterproof, clear adhesive. Better than using tape. Thought I would add my two cents. Great project!
Hi Julia,
Thanks for the tip! I’m going to share your tip with my readers!
Ana
Oh wow! Happy to help! <3
What a great project to do with my nieces this summer! I love it! Thanks for sharing!
Thanks for stopping by 🙂 Glad you liked the project! Hope it turns out well!
Ana
These are soo pretty! My little girl would love them. 🙂 I would love for you to come and share these on our Much Ado About Monday link party. As a bonus we are also having a giveaway. 🙂
http://www.huckleberrylove.com/2013/07/much-ado-about-monday-no-17-and-great.html
Hope to see you there,
Jamie
http://www.huckleberrylove.com
Thanks for visiting Jamie! I shared it on Much Ado About Monday! Glad to find your site and party!
Thanks fo the various project I just read this and thinking of trying it myself ….I love to do this in my spare time and also teach few kids to keep them busy and make something creative…thanks again….
Thanks Janak!Glad you stopped by!
Thank you for sharing this project! I found your site while looking for a way to make a visually stimulating toy (like a glitter wand) for the elementary school children I treat. This is my first year as a school-based speech-language pathologist, and I’m looking for fun ways to keep the kiddos’ attention. Thanks again for the inspiration. 🙂
Thanks for stopping by Laura! Our very good friend is a speech pathologist 🙂 I’m so happy you think this project would be good for your students!
OK!…. what says party more than glitter? These caught my eye and are so much fun! I love them. What a clever idea. I can’t wait to try them and thank you for sharing!
You CANNOT go wrong with glitter 😉 EVER!
These are amazing! My little girl would LOVE them x
Thanks so much Jess!
Help…I really want to make these for my daughter’s birthday.I bought the tubing but can’t figure out how to remove the writing that is on the tubing.
Hi Susan, You won’t be able to remove the writing but I either did not use portions of the tubing with writing on it OR turned the writing to the INSIDE of the bracelet. Once they are filled the writing sort of “fades” away from what you are looking at 🙂 Hope that helps! If you make these post a pic on our FB page!
Wow these look absolutely fantastic! Definitely a fun craft! Would be a fab idea for a girl’s birthday party too so each person can take home something that they have made!
It’s super fun! Thanks for stopping by!
i have done this craft a few times on a large scale and the kids loved it. We used sand and I did some prepping. I filled the smaller tube plug with hot glue and put them in ahead of time. That was quicker and easier. No need to tape the end.
Thanks for the tips!
Great ideas thanks
Thank YOU for reading Romana!