See the Halloween Version of this project HERE!
This is a wild science and art activity for kids to try- not only do you get to see how lovely it is to shoot streaks of color through gelatin- the second half of the project is a touchy feely sensory powerhouse!

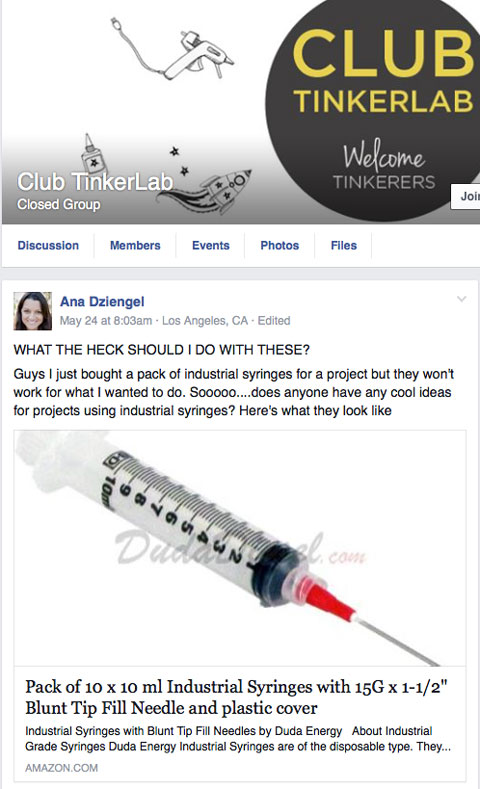
This project is part of the STEAM Summer Camp Series, a 5 week series with some of my favorite bloggers who all love STEAM: Science, Technology, Engineering, Art & Math. Last week’s topic was SEE and this week’s topic is FEEL. Because I wasn’t able to participate last week I decided to combine this weeks project into both SEE & FEEL! Before we start this post deserves a little back-story: A couple of months ago I purchased a bunch of industrial syringes for a project idea I had. Problem was the idea I had totally flopped. So what the heck was I going to do with a dozen syringes now? Enter Club Tinkerlab…. Rachelle Doorley of Tinkerlab has set up an amazing online Facebook group/community called Club Tinkerlab. It’s basically a few thousand tinkering nuts all gathering in one cozy little spot on the internet, all of geeking out at what other like minded creative folks are working on. I love it because it’s a combination of bloggers, parents, educators, and just plain folks who like to make cool stuff all exchanging ideas and supporting each other. So I posted my dilemma and within a few hours I had loads of creative things to do with syringes, from art to making hydraulics, to pretend play to today’s project, suggested by Rachelle herself! She has also done Jello Excavations which you can see here.
You can request to join Club Tinkerlab HERE
SAFTEY- The streaking part of this project is for older kids! The syringes have a blunt end but are still not appropriate for use by children who might poke themselves or others with them. This post contains affiliate links. For younger kids use long stem pipettes.
Science & Art Activity for Kids: Gelatin Streaking
Materials
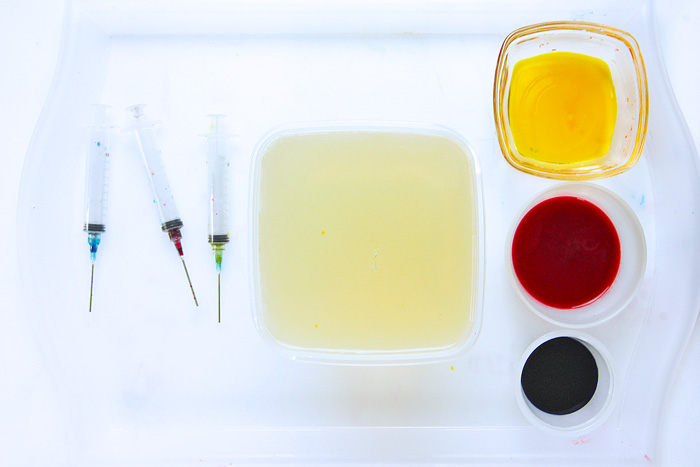
- Blunt Tip Industrial Syringes
OR Plastic Pipettes
- Clear Gelatin
- Water
- Liquid Watercolors
or Food coloring
- Small plastic containers for the paints
- Tupperware for the molds
- Tray and Paper towels
Instructions
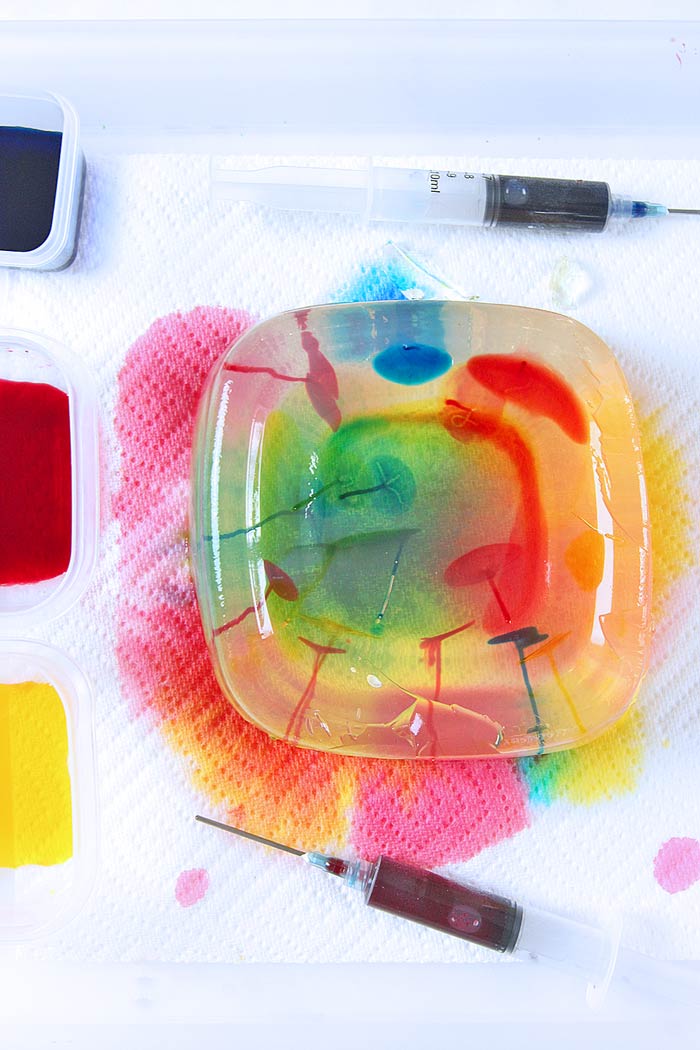
Part One: Gelatin Streaking
- Step One Make a lot of gelatin! Trust me the kids will love this and go through it fast. Make a few batches of gelatin according to the package directions and pour into large Tupperware containers. They should take a few hours to overnight to set.
- Step Two Place a few paper towels down on a tray.
- Step Three Run a butter knife around the edges of the gelatin to release it then flip over and let gravity release them from the molds.
- Step Four Place the gelatin on top of the paper towels.
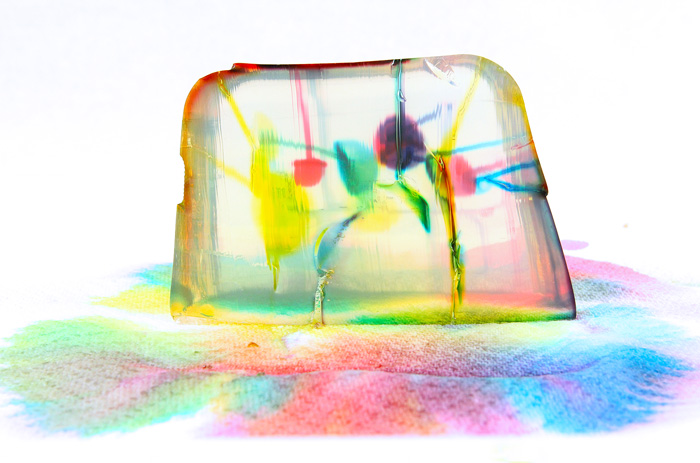
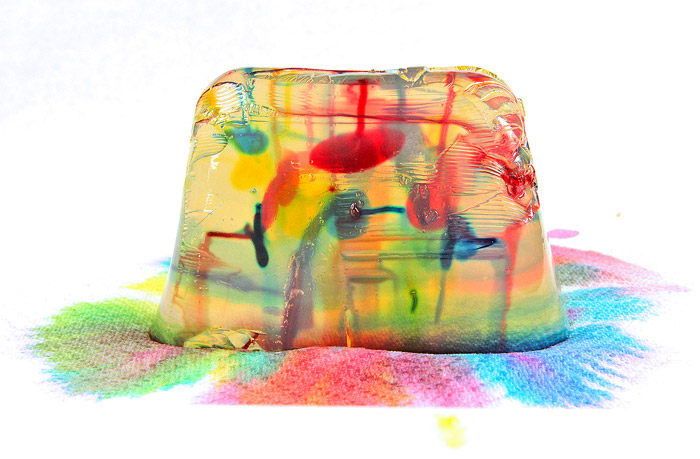
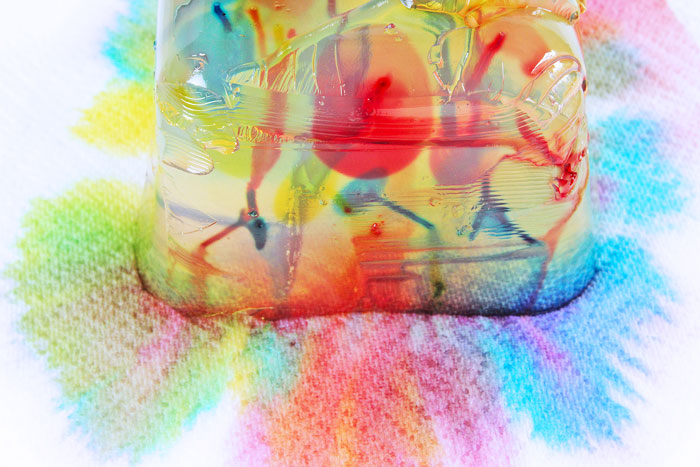
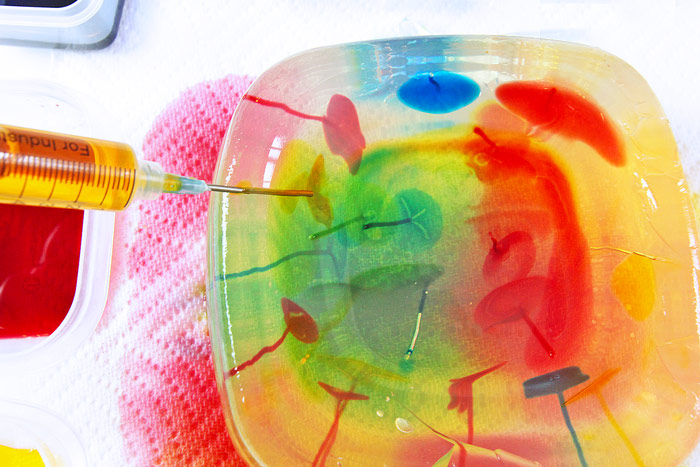
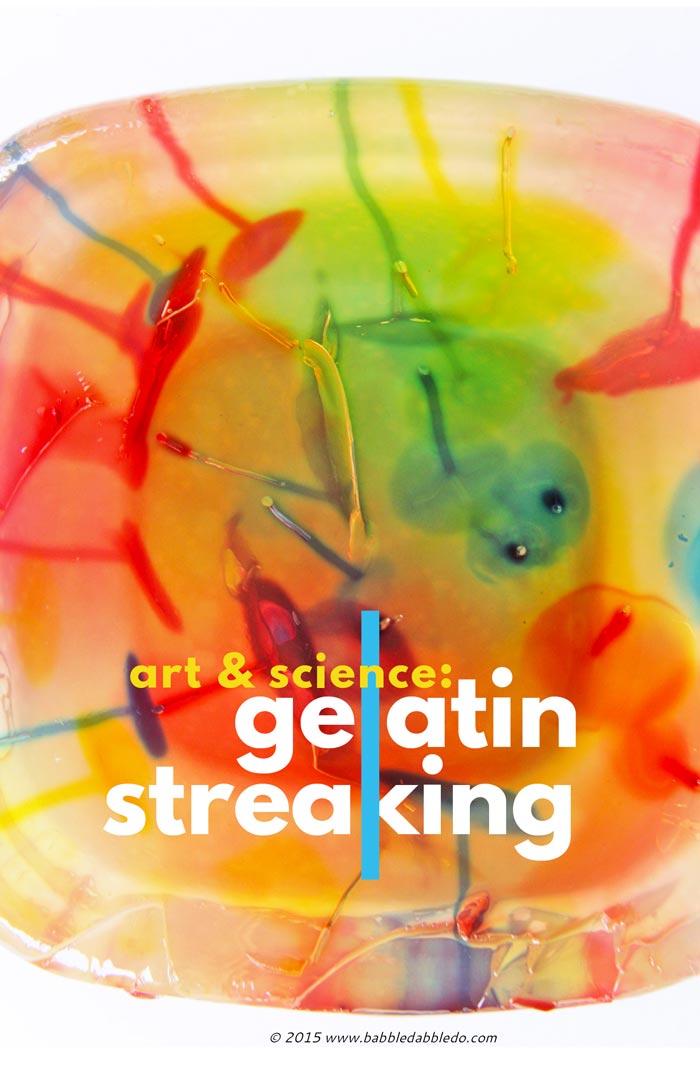
- Step Five Bust out the syringes and color! Place red, yellow, and blue liquid watercolor /food coloring in small plastic containers and add water. You want a strong but diluted mixture. Fill each syringe with a different color.
- Step Six Inject the gelatin with the color- Try and place the syringe as far as you can into the gelatin and press out the color SLOWLY. Resist the urge to press the color out fast- it will splatter and ooze if you do that. This is an exercise in delicacy!
Part Two: Sensory Play
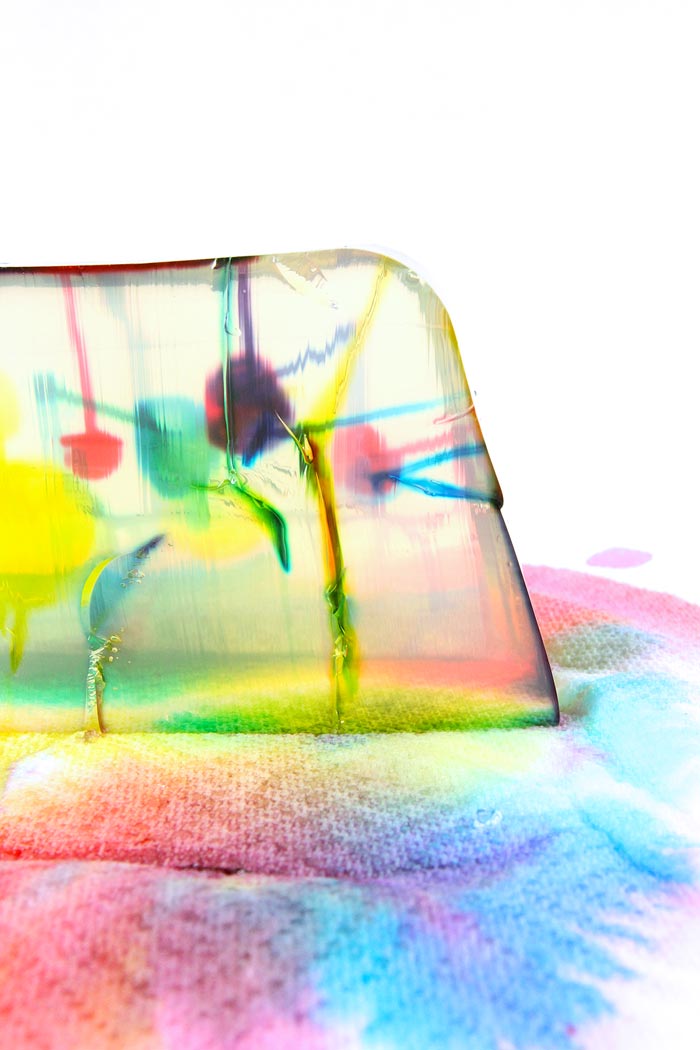
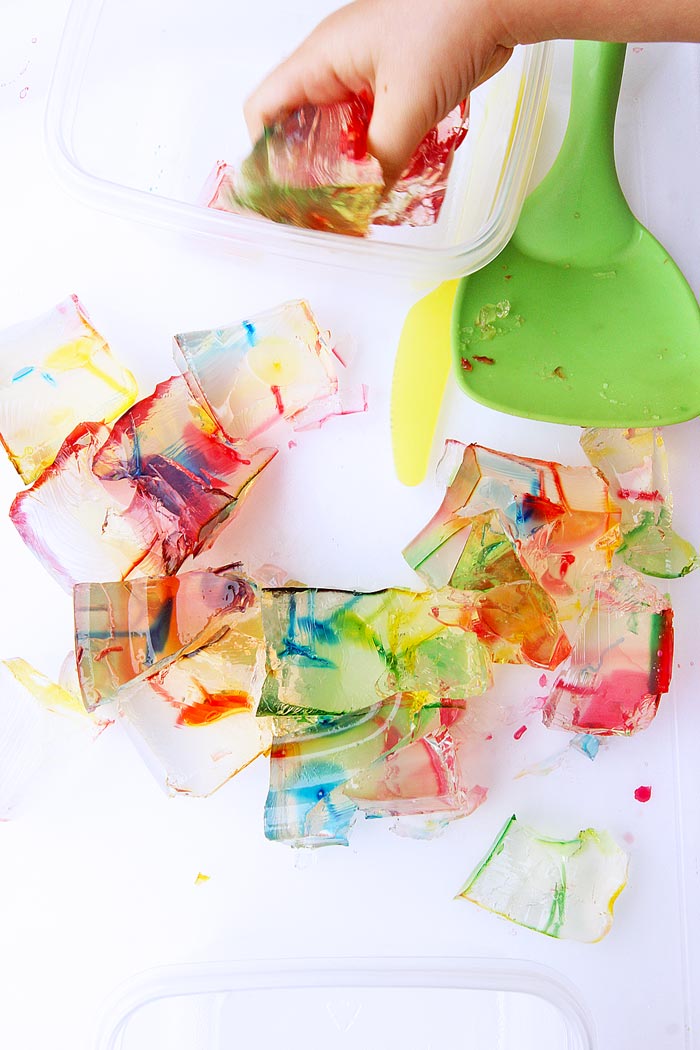
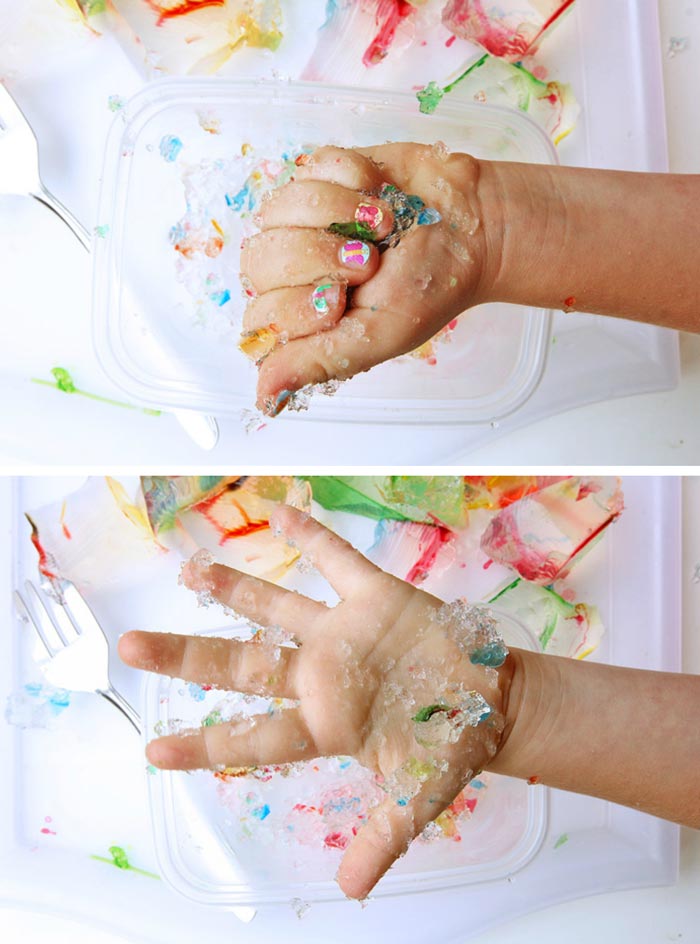

Once the gelatin is nice and colorful tell your kids to have fun with it as a sensory experience. I mean who can resist wobbly gelatin! Provide some plastics knives to cut it into bits. It’s really cool to slice this Ii half and look at the color streaks. After that all bets are off, let the kids slice, dice, and squish to their heart’s content. By the end it will probably look like this.
Halloween Version: Gelatin Brains
For a fantastic Halloween version of this activity use a brain mold! Check it out here:
The Science Behind Gelatin
So just what is this amazing clear jelly substance that is solid when cool and quickly turns into liquid when warmed or eaten? You might not want to know but gelatin is actually derived from animal byproducts, most often pig skin that has soaked in dilute acid for 24 hours. The skin is rich in collagen which is the main connective protein found in animals. The collagen is filtered out of the skin and then dried into granules which we use to thicken liquids.
Gelatin is also an example of what is know in chemistry as a colloid, a substance in which small particles of one substance are suspended throughout another substance but not chemically bonded. For more chemistry ideas be sure to check out this GIANT list of chemistry projects for kids!

Looks Like
Sam Bompas and Harry Parr It’s really hard to classify the work of Bompas and Parr. Are they chefs, culinary artists, designers, or all of the above? They first grabbed the public’s attention with their detailed designs of architecture done in gelatin AKA jellies, and have since expanded their repertoire to include amazing food projects and exhibitions including a gin and tonic vapor room and a 4-ton punch bowl you can row across! They also create unique food banquets for different companies. My favorite is the upside down banquet where they placed mirrors above the table so guests could see the entire meal from above. However you classify them, they are definitely creative individuals foraging a new field of design.
Conclusion
Are you ready for more amazing STEAM projects and our virtual STEAM Summer Camp?
SEE
Left Brain CraftBrain – How to Make a Magnetic Field Sensory Bottle
What Do We Do All Day – Thaumatrope
Little Bins for Little Hands – How To Make a Simple Kaleidoscope for Kids
One Time Through – How to Make a Magnifying Glass for Outdoor Exploration
Pink Stripey Socks Number Chart Art
Frugal Fun For Boys – Print and Color Tessellation Puzzles
FEEL
Frugal Fun For Boys – 4 Engineering Challenges for Kids with Craft Sticks, Cups, and Cubes
Lemon Lime Adventures – Slug Slime Races
Left Brain CraftBrain – Travel Geoboard
Pink Stripey Socks – Easy and Colorful Magnetic Sculpture
One Time Through Encourage Your Inventor with Creative Pool Noodle STEAM Fun
What Do We Do All Day – String and Bead Puzzle
Fill your child’s life with more art, design, and science:
Subscribe via email and check out our FB page where I share tons more creative ideas and resources from around the web.
Spread Creativity Like Wildfire: Pin This!
Awesome Ana! I had to check this post out. Gelatin streaking? So, so, cool!
This looks soooooo awesome!! I wonder if there is a way to do it without the syringes, though…? I don’t happen to have those on hand, but I do have a giant packet of gelatin I’ve been trying to use for play somehow! 🙂
Thanks for the idea for this cool project!
I tried using eye droppers but they weren’t quite as cool as the effect with the syringes. Still they could be a quick alternative.
This is a great idea! Children love the feel of the gelatin. I know this because I teach gelatin printing in my art camp. Have you ever tried it with your students? I make my own gelatin plates and melt them down when they start to fall apart. I never thought of injecting them with color first! Thank you!
What! I need to see these gelatin plates! Can you send or post a pic on our FB page: https://www.facebook.com/babbledabbledo?
i absolutely love this idea but i’m vegan. do you think it’ll work if i use agar-agar or some other vegan substitutes for gelatin?
I am not sure but did you try it? Did it work?
Wow, this sounds like a fun and creative way to get the brain working! I absolutely love the idea of having a neat little project to entertain the kids and keep their brains active! Thanks for sharing this awesome little project!
Thanks Larissa!
While the process of obtaining this particular gelatin is a bit intense, your final creative project is definitely attractive and interesting. The colors produced by the streaking are definitely appropriate for playful activity.