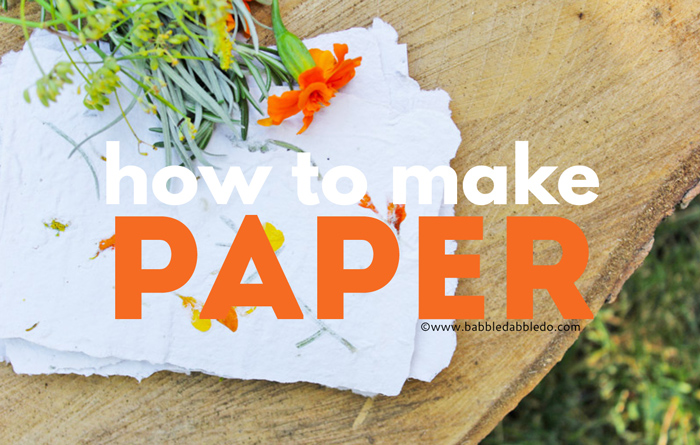
Learning how to make paper is the perfect way to blend our favorite three subjects for kids: science, art, and design. Today’s tutorial outlines a relatively simple process for making paper with kids using inexpensive and readily available materials.
Best of all this project can be customized to fit different aesthetics: Need to do something with the overabundance of herbs from your garden? Make some Harvest Herb Paper. Got a lot of pretty leftover paper scraps from another project? Try our “Scrap” Paper blend. Oh my goodness, this sounds a little like a coffee commercial!
I want to start by saying that paper making is not hard but it does involve a number of steps and materials. This is a project that needs some prep work! Once you have everything gathered though, you can save it all as a DIY Homemade Paper Making Kit!
Note: This post contains affiliate links.
How to Make Paper
Materials:
For the Frame:
- 2 Wood Frames OR 2 Embroidery Hoops
- Fiberglass Screen Material (available at hardware stores for about $1.00/ft)
- Stapler or Staple Gun & Staples
- Hammer and Nails
For the Paper Making:
- Used Paper
- Blender
- Warm Water
- Felt Squares
- Large Flat Tray
- Sponges
- Newspaper
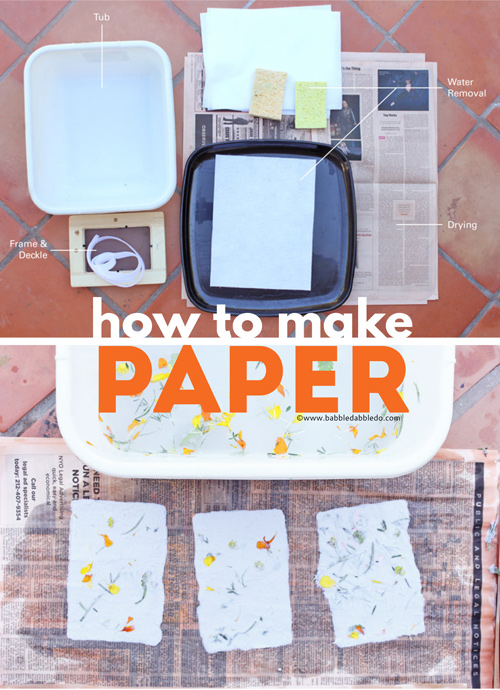
- Large Plastic Tub- It should be large enough to comfortably hold your frame and deckle when they are held horizontally plus your hands as they grasp the frame.
- Velcro One-Wrap
(optional)
Make the Frame and Deckle
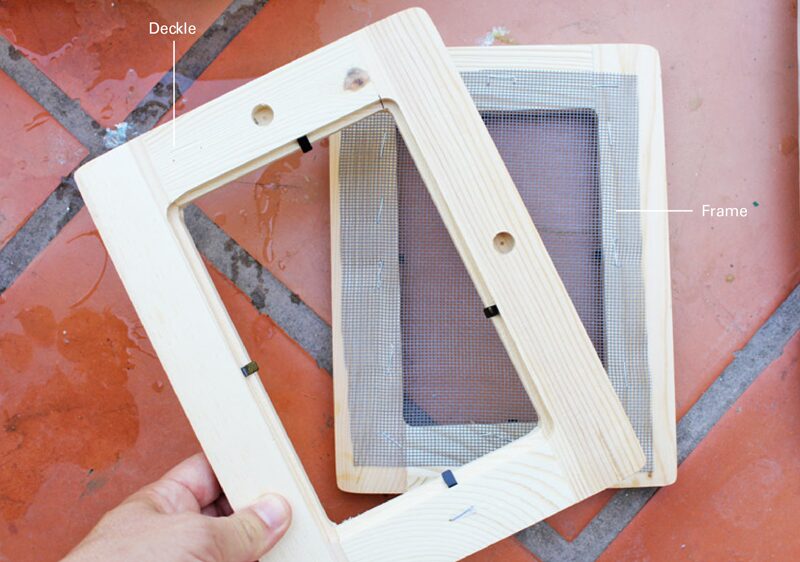
Okay so what the heck is a deckle? I thought I could get away without one at first but was quickly proven wrong! The deckle is the mold for the paper. The opening in the deckle will determine how big your finished piece of paper is. Think of it like making muffins, the batter will flow everywhere unless you contain it within the cups of a muffin pan. In the case of making paper, the pulp will sit on top of the screen/frame unconfined without a deckle. The deckle helps keep everything neatly in place! For my frame and deckle I purchased two simple wood frames from Jo-Ann fabric. They were in the wood crafting section and very inexpensive. Avoid using inexpensive frames that are laminated with paper. The paper layer will begin to peel off the frame after being submerged in water. Trust me, been there done that! To make your frame follow these directions:
- Remove the packaging and any glass or cardboard backing from your picture frames. Cut a piece of screen about a 1/2″ smaller than your full frame edge to edge.
- Using a stapler or staple gun (a regular stapler will work on soft wood) staple your screen to the frame. Make sure the screen is pulled tightly across the frame. Staple close to the opening edge so the screen doesn’t sag in the middle.
- Secure the frame joints together by hammering a long nail into each edge. Inexpensive frames are often only glued at the joints and will fall apart after repeated exposure to water.
- The deckle is simply the other frame without any backing.
Set Up a Paper Making Station
Before embarking on making paper it’s a good idea to set-up an assembly line of sorts to make it a smooth process. Here’s the set-up you need for a simple paper making station (since we did the blender portion in the kitchen the first stop is not pictured below):
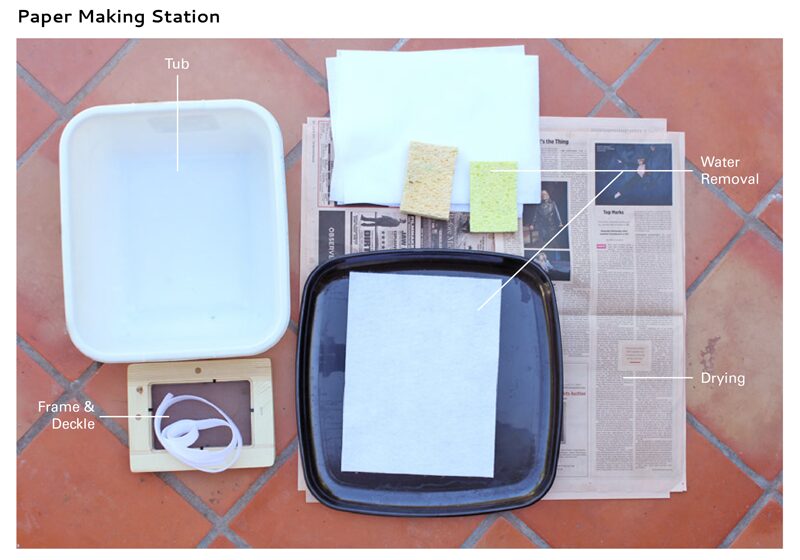
- First Stop: The Blender You’ll need warm water nearby at this station.
- Second Stop: The Tub Here you’ll need a tub filled with about 3 inches of warm water. You want your frame and deckle handy, as well as your Velcro wrap if you are using it.
- Third Stop: Water Removal Station You’ll need your felt, flat tray, and sponges at this location. Should be right next to the tub
- Fourth Stop: Drying Area Spread out some newspapers for drying at this location
Now you’re ready to make paper!
Basic Handmade Paper Recipe
Ingredients
- 8-10 sheets of used white paper
- Warm water
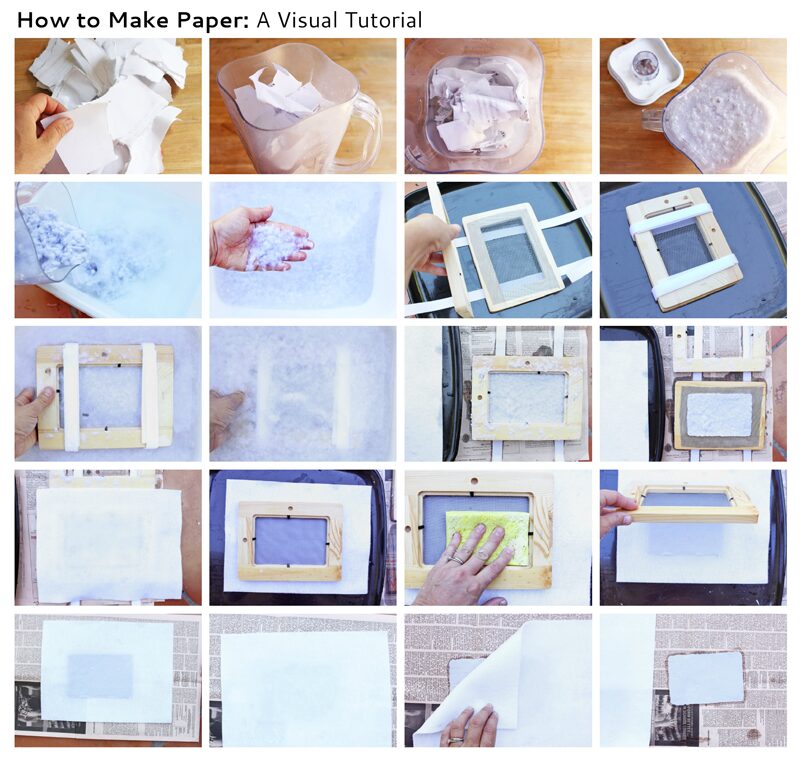
First Stop: The Blender
- Step One Tear your paper into smaller pieces by tearing in half, then in half again, and again.
- Step Two Put the paper scraps into the blender.
- Step Three Fill the blender with warm water to cover the scraps plus a little extra.
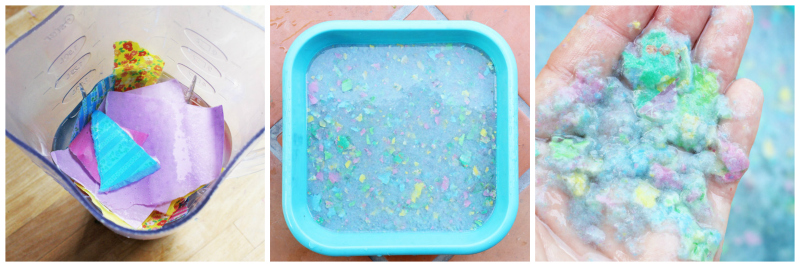
- Step Four Put the lid on the blender, hold the lid tightly in place, and pulse the paper a few times. The mixture may jump at first so be prepared. Once it is pulsed a few times, blend it for 30 seconds. You now have paper pulp!
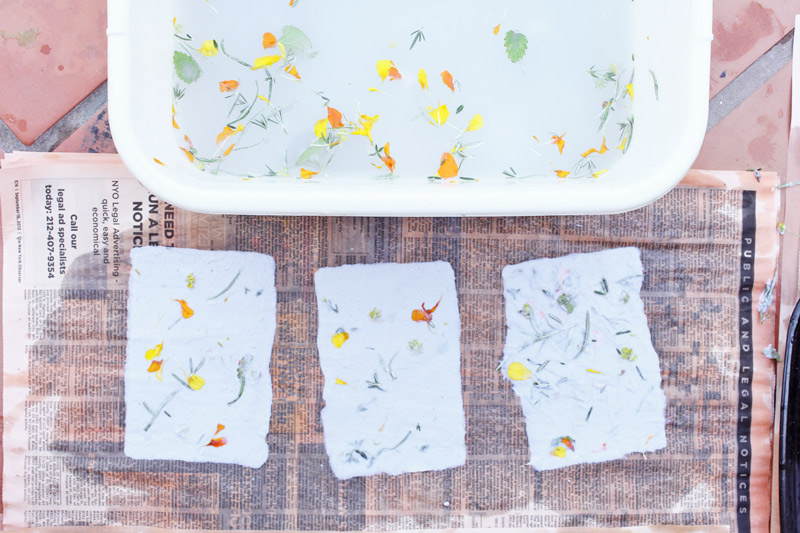
Second Stop: The Tub
- Step Five Move over to your tub. Pour in the pulp from the blender and gently stir the mixture with your hands to distribute the pulp.
- Step Six Take your frame, screen side up, and place the deckle on top. Wrap your Velcro around both the frame and deckle and secure in place. Alternatively you can hold the frame and deckle tightly together.
- Step Seven Lower the frame and deckle into the tub of pulp and water. Gently shake the frame and deckle to stir up the pulp. Your goal is to get an even layer of pulp to settle on top of the screen. Too much agitation will cause the pulp to settle unevenly or in clumps. If you don’t stir it enough your paper might be very thin. It will take some practice!
- Step Eight Once you have a layer of pulp on the frame/deckle lift it out of the tub gently and horizontally. Let the water drain for a second above the tub.
Third Stop: Water Removal Station
- Step Nine Take your frame to the water removal area. Remove the Velcro and deckle.
- Step Ten Place a piece of felt on top of the wet paper sheet. Now carefully flip the screen and paper over onto your flat tray. Use a sponge to soak up some of the water from the paper through the screen. Squeeze the water out of the sponge as it gets saturated.
- Step Eleven Now very carefully remove the screen. The thinner the paper, the more likely it will be to stick to the screen! If it sticks, lay the frame back down and try soaking up more water with your sponge.
Fourth Stop: Drying Area
- Step Twelve Your sheet of wet paper should now be lying on top of a piece of felt. Take the felt and paper over to the drying area.
- Step Thirteen Very carefully flip the piece of felt over onto a piece of newspaper. Your wet paper will now be underneath the felt. Gently lift one edge of the felt up and remove the entire felt sheet slowly. If the paper is sticking to the felt it means you didn’t remove enough water. Grab your sponge and dab the back of the felt to soak up excess water and try again.
- Step Fourteen Let your paper dry overnight. Alternatively you can ask an adult to iron it for you with another piece of newspaper on top.

Tips and Tricks for Paper Making
- Your first sheets of paper will probably be the thickest and as the pulp is used, your sheets will get thinner and thinner.
- The thinner the sheet, the more delicate you have to be when removing the frame and felt. Thin paper can easily tear.
- When doing this project with kids the thicker the pulp the better, save the delicate work for older hands.
- The paper will dry lighter than it looks when ground up into pulp so don’t be discouraged by the mass of gray pulp you blend up.
- To flatten out your dried paper, ask an adult to iron it for you! I used the cotton setting and a little steam but be careful with getting the paper too wet and or burning it by ironing it too much. And don’t iron any paper with plastic confetti or glitter in it!
- Don’t grind up paper that is not colorfast! If you use multiple colors of paper with ink that bleeds you will end up with gray paper.
- After making numerous sheets of paper your screen might start to sag. Remove a few staples, pull it taught and staple it again to the frame.
Now that you’ve mastered basic paper making it’s time to spice it up! Literally! Here are a couple of fun paper recipes:
Paper Recipes
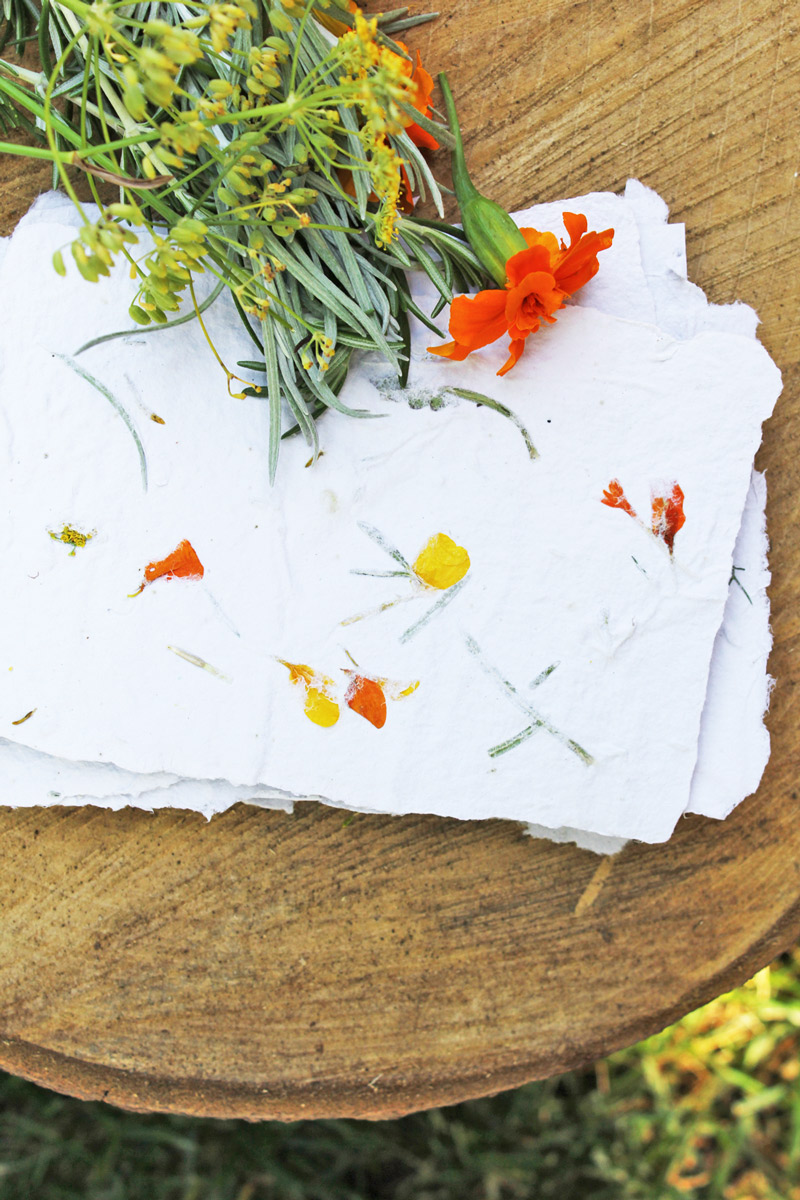
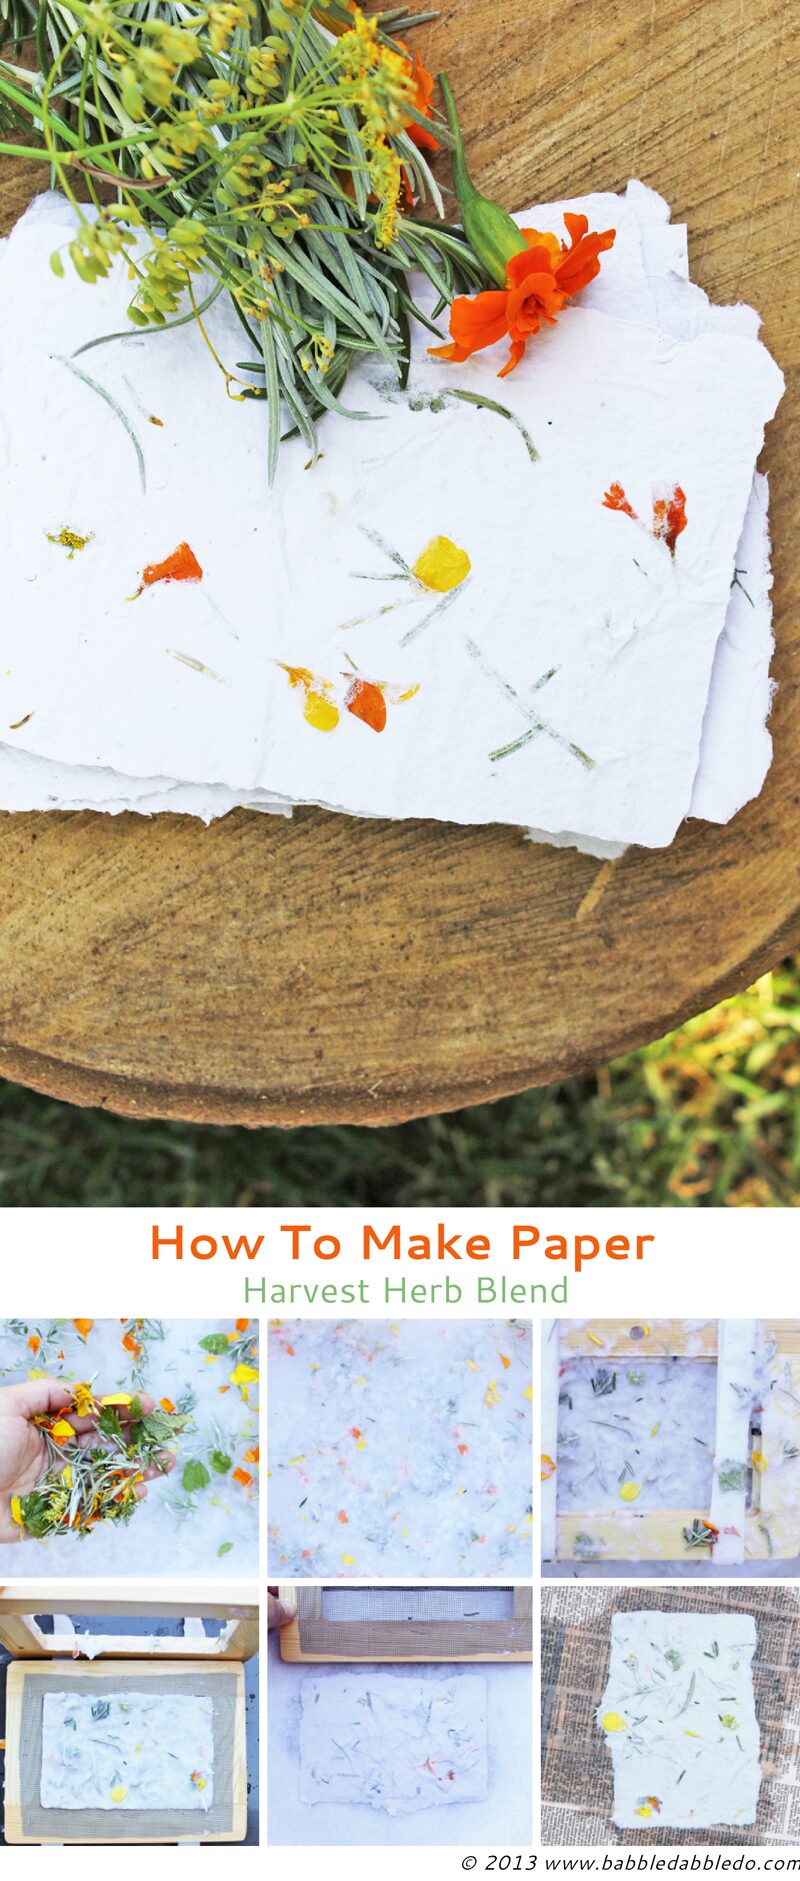
Harvest Herb Paper
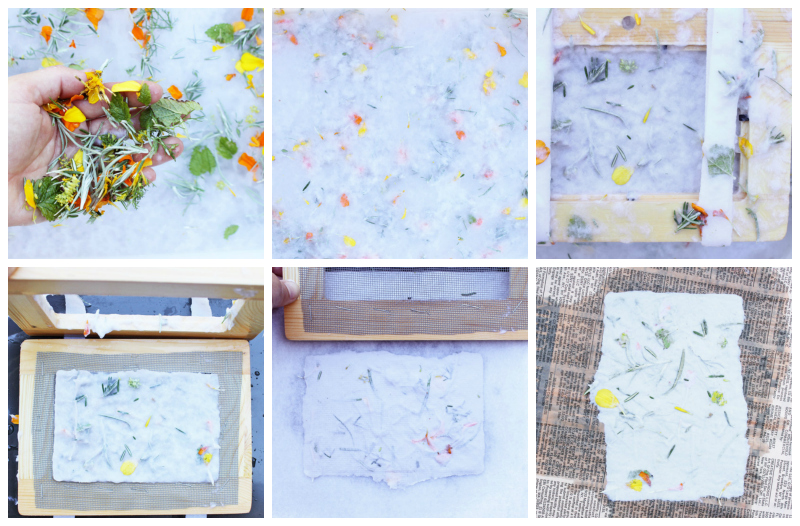
This one smells oh so good! Don’t know what to do with the enormous amount of herbs in your garden? Add them to your paper! Tiny flowers also add some colorful flair. I picked some fennel flowers, marigolds, curry, rosemary, oregano, and mint. To make Harvest Herb paper add about 1 cup of herbs and flowers to your pulp. Make sure to take tear the herbs into small pieces or leaves and separate all the flower petals.
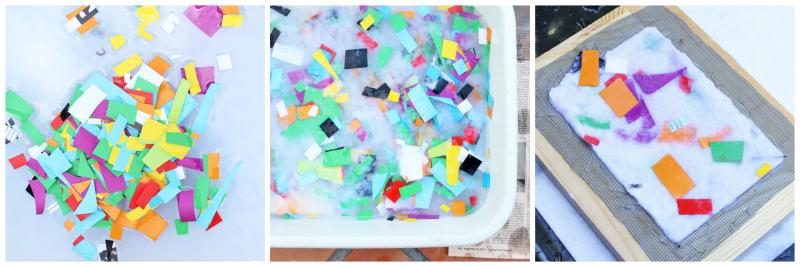
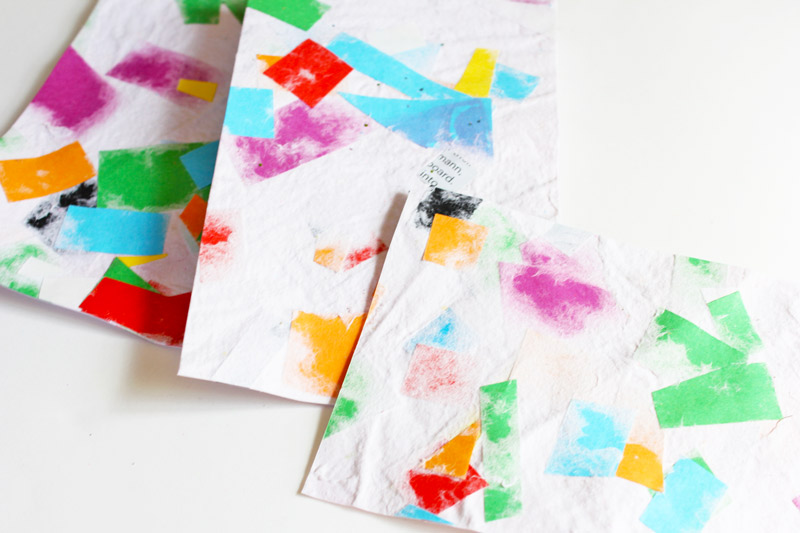
Confetti Paper
I hope you didn’t get rid of the origami paper scraps from your Kirigami Water Blossoms….now is the time to use them! Instead of using white paper to make your pulp, grind up your multicolor scraps to make paper with a peppered look. After blending most of your paper into pulp, add a few extra scraps and pulse a couple of times so you have some large chucks of paper in the mix.
“Scrap” Paper
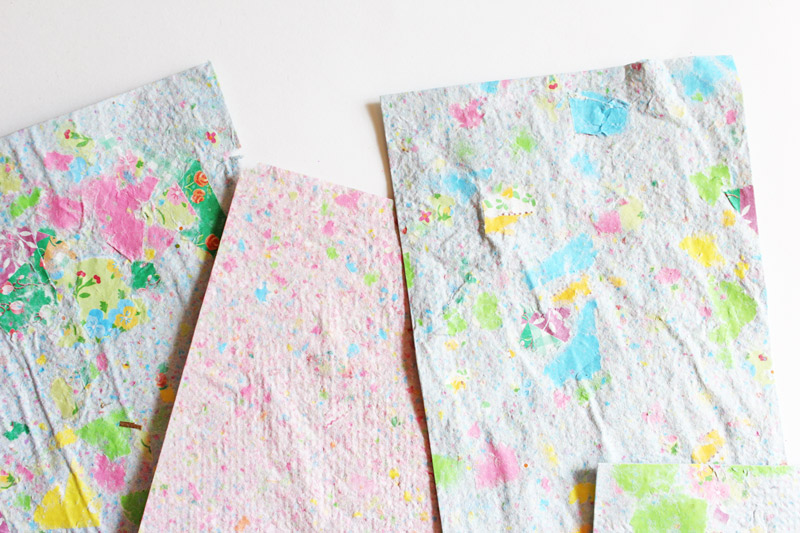
We also had a lot of leftovers from our Paper Weaving project so I cut them up and we added them to our basic paper recipe to create a patchwork style texture. Let the scraps soak for several minutes before making the paper. This can double as an art project!
Looks Like
Since we are reusing paper to make something new (okay yes we are using old paper to make new paper) I thought of Frank Gehry’s cardboard furniture. His cardboard chaises are serious design icons and he was the first designer to really exploit this material. Reusing cardboard/paper to make something new is the ultimate upcycling project. Next time you are ready to toss a cardboard box or a stack of used paper, consider making it into something else!
More
So now you know how to make paper! Fun, right? Yes there is some set-up involved, but once you have the tools assembled you can store everything for future paper making sessions. Try larger frames to make full sized sheets of paper (just make sure you have a tub large enough to hold it), glue your paper to simple folded card stock to make handmade cards, or try a sheet as a cover for a handmade journal. Kids won’t forget their paper making experience and it’s such a great lesson on how materials are made.
And if you’re hooked on making your own art materials be sure to check out this post with ideas for 40 different art materials you can make at home!
I completely love that scrap paper paper idea! Awesomeness.
Thanks Jeannette! That was my favorite version too!
We tried to make paper fairly recently but without a deckle it turned into a thick and uneven mess. I guess I need more tools and more patience before we try it again 🙂
I thought I could get away without that deckle too….but I agree it’s is necessary! Don’t be afraid to try, try again ;)!
Does the newspaper leave any ink residue on the “new” paper? Specifically, I have paper with a 98% whiteness that I am planning on self-recycling 😉 from work. Will the newspaper leave any greyish ink residue on this as it dries? You can buy a roll of brown paper gift wrap for a $1 at Dollar Tree, and I am wondering if this would be better to use than newspaper for the reason above? Thanks for sharing this! I plan on doing this with my 10-yo niece 🙂
Hi Faith, I don’t recall the newspaper leaving an imprint but we weren’t working with pure white paper. keep me posted on how it turns out!
What about adding dye to color the paper when recycling with white papers ?
Try it! We didn’t experiment with it but it sounds like a great idea!
Uau! Great ideas . Thank’s Ana!