See exploding bursts of color in the amazing magic milk experiment! We’ll show you some two ways to do the experiment and an extension idea for the project as well.
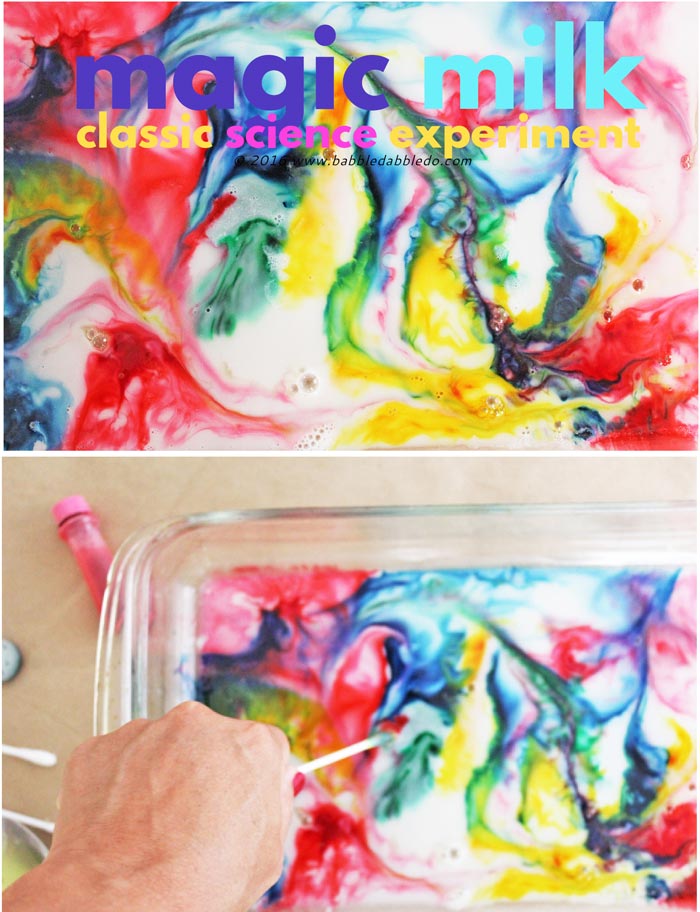
When you add a little bit of dish soap to milk and food coloring, the colors swirl around to form what I would deem very artistic and abstract paintings! For the science behind it scroll to the end of this post.
The magic milk science experiment is a simple science experiment you can do with everyday materials. I love showing kids how to do chemistry experiments using simple household supplies. In fact I would argue that some of the best at-home science experiments use kitchen ingredients!
We did this project in our after school classes and when our students asked to “take it home” I told them they could easily recreate it in their own kitchen.
Video Overview
Detailed Instructions for the Magic Milk Experiment:
How to do the Magic Milk Experiment
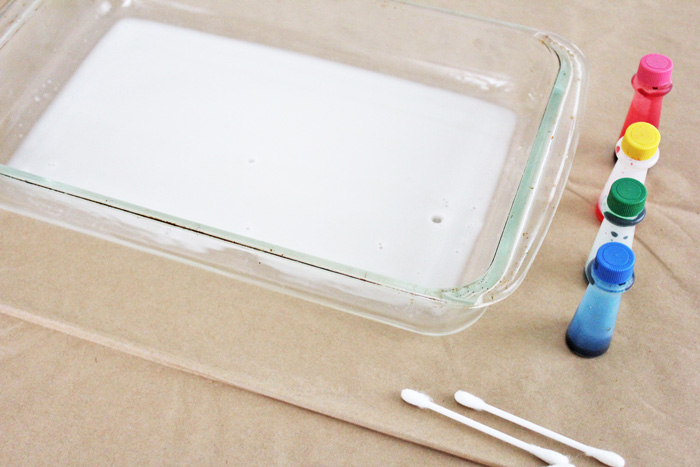
Magic Milk Experiment Materials
- Almond Milk or Cow’s Milk
- Dish soap
- Q-tips (Cotton Swab)
- Cotton Balls
- Food coloring
- Shallow plate or wide bowls
Magic Milk Instructions: Method #1
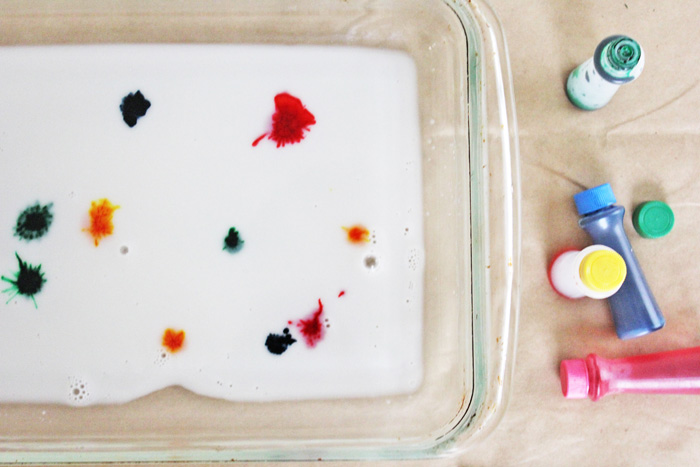
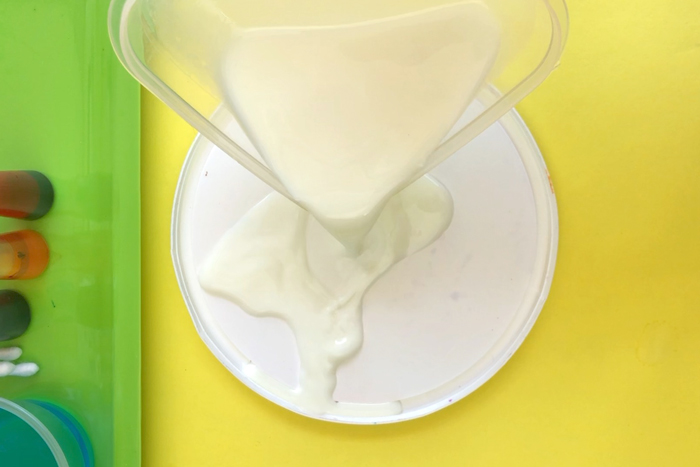
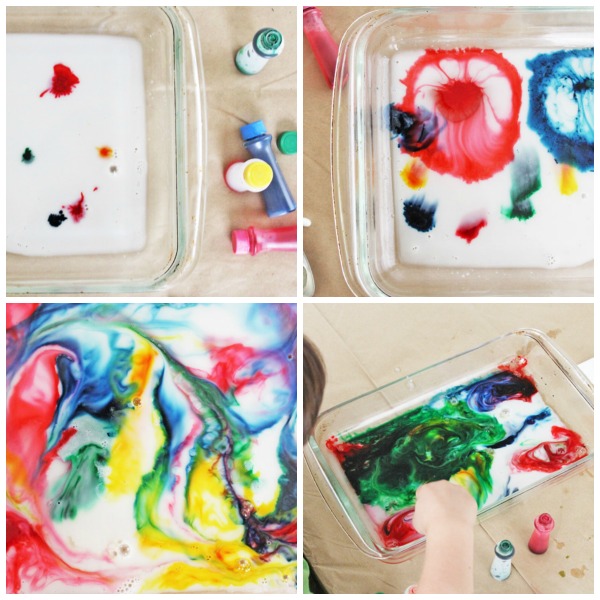
- Fill a plate or bowl with milk.

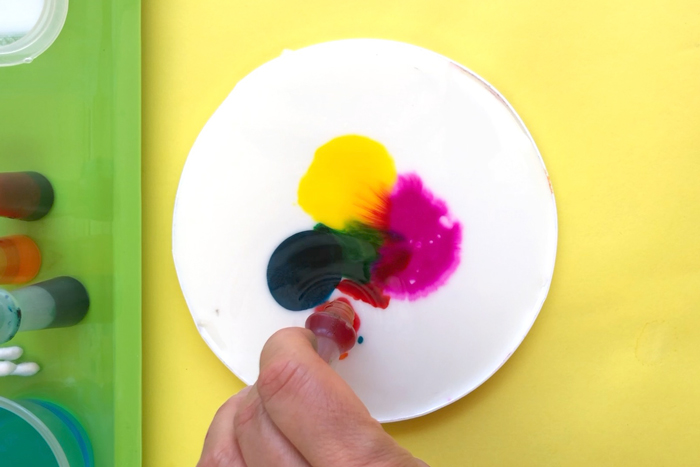
- Drop in at least 2 drops of each of four colors of food coloring. The more variety of colors the cooler the painting.
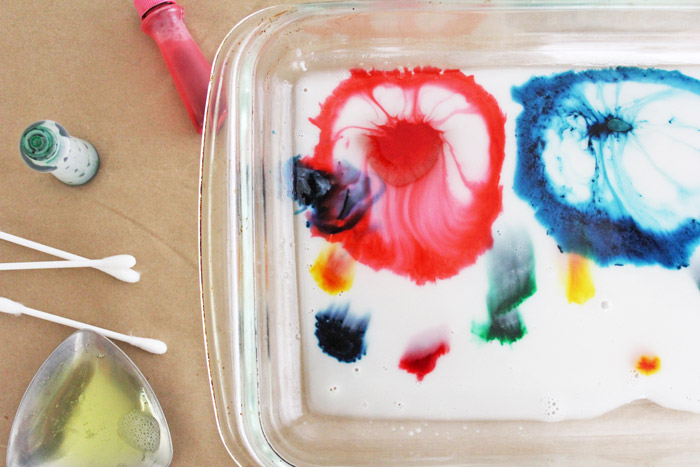
- Generously dip the end of a q-tip in dish soap.
- Now dip the q-tip (cotton swab) into the milk next to a drop of color.
- The first thing that will happen is the color will burst as soon as the dish soap hits it. It’s a great effect but very short lived. Once there is a little dishsoap in the milk it no longer “bursts”.
- Gently swirl the q-tip through the different colors and you’ll see little rivers of color start to form.
- Continue until the colors begin to mix and become brown. Empty your plate/bowl and repeat.

Magic Milk Experiment Instructions: Method #2
Time needed: 10 minutes.
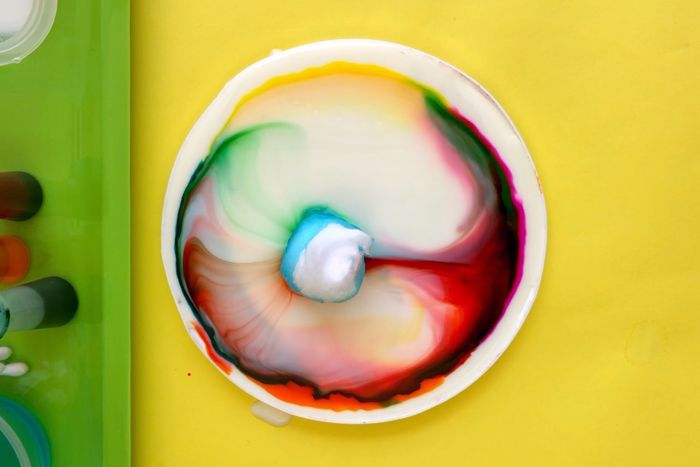
This version of the magic milk experiment lasts a long time, provided kids can restrain themselves from moving the cotton ball!
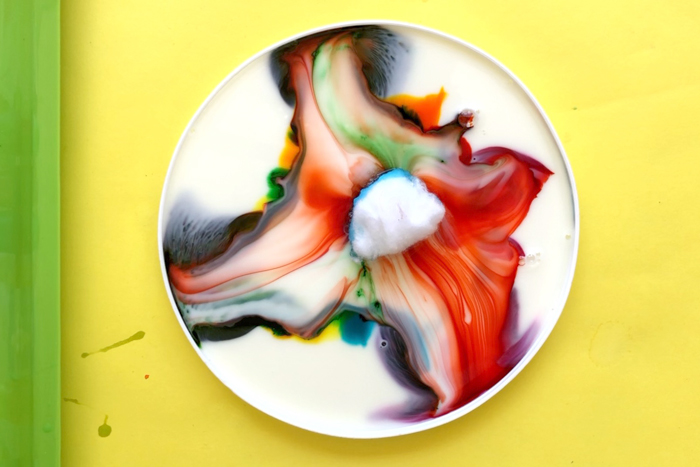
- Add milk to plate
Pour a thin layer of milk in a plate or bowl.
- Add food coloring
Add a few drops each of food coloring on the center of the plate.
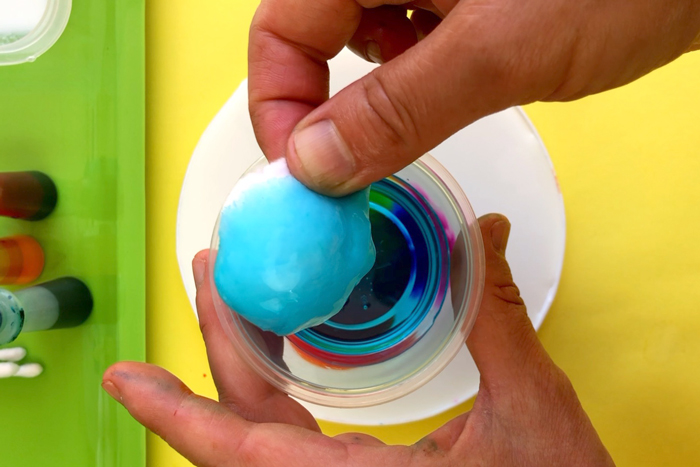
- Soak cotton ball
Soak a cotton ball in dish soap.
- Place cotton ball in milk
Carefully place the cotton ball in the center. The colors will explode out of the center!
- Let the reaction continue
Let the reaction continue until the colors begin to mix and become brown.
Tips & More
- You don’t need that much milk! I vastly overestimated how much we would need. For a class of 25 kids we used 1 1/2 gallons of milk.
- This is a great use of expired milk products. Put that small amount of whipping cream at the back of your refrigerator to use.
- Kids love the magic aspect of this project. We called the cotton swabs “magic wands.”
- Too much swishing and swirling and you’ll end up with brown muck fast. Of course kids don’t seem to care!
A word about food insecurity
We try to be respectful of the challenges children and families face including food insecurity. As an educator, I try to avoid using food in projects when possible. I make exceptions for projects that may have a lot to teach kids and where I feel we won’t be wasteful. That said, please think carefully about the population of students and families you serve before doing this project. Consider whether they would find this wasteful or offensive before proceeding. Also consider vegan families who may not want their children working with animal products; see some of the alternatives we suggest below.
Magic Milk Variations
- Try Different Milk Types We have used almond and cow’s milk for this experiment and both worked well. The higher the fat content of the milk the more pronounced the “explosions” should be. A fun experiment would be to compare the results with different types of milk: almond, cow, rice, coconut. You can also experiment with cream, whole milk, and skim milk to see if there is a difference.
- Premix the soap and milk For a variation we premixed the milk and dish soap. You won’t have the color burst effect but it does seem to keep the colors separate a little longer.

The Science Behind the Magic Milk Experiment:
The dish soap molecules are attracted to the fat molecules in the milk. As soon as you introduce the soap to the milk/coloring mixture the molecules race around trying to bond. The food coloring gets pushed around in the process and appears to burst. Eventually the molecules all bond and the reaction stops.
This is a good example of how detergents work, their molecules have two ends: one end is attracted to oils and the other to water. One end of detergent molecules attracts oils and dirt from clothes, dishes etc., and as they stick together they break the oil and dirt down into smaller, easy to remove pieces.

How to Do the Magic Milk Experiment in the Classroom
If you would like to the magic milk experiment with a class full of kids here are step-by step instructions.
Per student Materials:
- (1) Small Plate or other shallow dish (make sure these are waterproof)
- (1) Large Plate or other shallow dish
- Tray to put underneath
NOTE: You may also use a divided plate as pictured above.
Teacher’s Materials:
- Milk 1.5 gallons per class of 25 students
- Tubs to collect dishes in afterwards
Shared Materials:
- Small bowl of dish soap
- Q-tips (Cotton swabs)
- Cotton Balls
- Small bottles of liquid food coloring
Experiment #1 Procedure:
- Pass out per student materials. Ask students to place the small plate in the center of the table. It will be used for the second experiment. Ask students to place the large plate in the center of their tray.
- Explain the experiment first. Tell students they will be making colorful explosions using milk and food coloring and a “magic ingredient.” Tell students to use only a few drops of food coloring once it is available. Demonstrate how to carefully squeeze drops out of the food coloring bottles.
- Teacher(s) pour a thin layer of milk in each plate.
- Pass out the shared materials to each group of students.
- Ask students to carefully drop several drops of food coloring in the milk around their plate. Remind them not to disturb the color.
- When everyone has added color tell students to grab a “magic wand” AKA a Q-tip. Ask them to dip the wand into the magic ingredient (soap) but hold it to the side of the plate until everyone is ready. You can ask them if they know what the magic ingredient is.
- Do a countdown and on the count of 3 student should dip their q-tip into one of the drops of color. Instruct students to continue dipping the q-tip into the other drops. Listen for the oohs and aahs!
- When done the teacher should place the plates and milk in tubs to clean.
Experiment #2 Procedure:
- Ask students to place the small plate in the center of their tray.
- Teacher(s) pour a thin layer of milk in each small plate.
- Ask students to carefully drop a good squeeze of three colors of food coloring near the center of their plate. Remind them not to disturb the color.
- When everyone has added color tell students to dip a cotton ball in the soap.
- Instruct students to place the cotton ball in the center of the plate and not move it. See video below. This is an exercise in restraint!
- Watch as the color explodes out of the center of the plate/cotton ball.
- When done the teacher should place the plates and milk in tubs to clean.
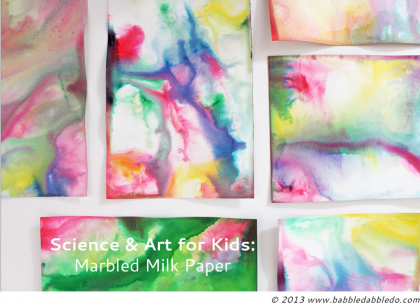
Turn the magic milk experiment into colorful paper!
Did you know you can expand on this experiment by making Marbled Milk Paper?
Go HERE for instructions:
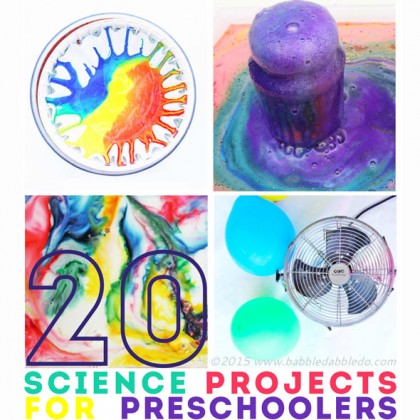
More Favorite Science Projects to Try:
So cool! I can’t wait to try this out with my little guy. 🙂
Thanks Michelle! So simple and fun! BTW your blog is lovely! I particularly love that you have fast and easy projects; I’m trying to do something similar on my blog: quick, easy, simple projects using stuff you already have on hand.
This is awesome my daughter and I are going to do this today!
Thanks for stopping in Amanda! It’s a super fun and simple project. Enjoy!
Thanks! I’m an art teacher. There’s so many meet ideas I got from your blog. Thanks!
Linda, I’m thrilled to hear it! Thanks for stopping by 🙂
what type of paper did you use for the milk painting project?
Hi Denise, I used watercolor paper 🙂
Did I miss something? I didn’t see directions for a little paper dog. I love this site. GREAT ideas Sorry if ? is dum! I can hardly wait to make the crystals. You know, Epsom salts have done ‘miracles’ ever since I knew of them! They were up front and most important in the “medicine cabinet” of my parents who had fifteen children, therefore many opportunities to use the salts for ‘injuries, localized infections and sore spots.’ Now I see they can add enormously to the decorations in my life as well as do almost magical “healing” Wish my Dad could see those! “What a Wonderful World!” Thank-you!
Thanks Virginia!
I have tried this experiment out with my children today. I was really excited about it after seeing the lovely photo’s etc, however it was a bit of a flop. Tried it with Almond milk as suggested and semi skimmed cows milk, but when we put in the washing up liquid not much really happened. We changed the washing up liquid and got much better colour spread. However when it did the colours almost pretty much disappeared and trying to get paintings from them was so wishy washy. Are food colourings in the US very different to those in the UK, or do I just need to buy better colourings? I assumed that the liquid colourings from my local supermarket would be fine. I have also tried with gel colouring (which is the only thing that most stores stock) but this wasn’t particularly good either. I really want to make some lovely backings for Mother’s day cards etc but I am drawing a blank! Any help you could give would be great.
Hi Rachel, I’m sorry to hear this! Gel food coloring will not work. Regular food coloring should work fine. You will need to make the prints right away, if you wait until the colors are mixed you will get muddy results. And make sure you are using watercolor paper. I tried the project using cardstock and regular paper and they just didn’t absorb the color well. I hope this helps and please keep me posted!
Hello there, We used paste food colouring from cake shop, used to colour roll out icing, much better than the supermarket colours, which are useless for most things now as they have changed the formulas. Mix the colour paste with a little water to make a strong coloured liquid, we use this for colouring pasta too and play dough.
Thanks for the tip!
Was looking for the science explanation (chemical reactions) to share with the students while doing this? I like teaching the science of a science based experiment.
can the whole milk be used as a substitute for almond milk ?
Absolutely!
I love it when you add the science concepts involved, both at an adult level to refresh our memories or learn new, and at a level appropriate for young children.
Exploring the properties of art materials engages children in art and science!
Thanks so much Peggy!
I have tried the milk art 3 times with my grandchildren. We were very excited to watch the action of the colors in the milk but no much happened. I used whole milk, food colors, and Dawn dish soap. But once I put the drops of soap in the colors spread a little and then nothing else happened, I have read the posts and people talk about all the movement of the colors but we didn’t get that result. Am I doing something wrong?
Once the soap and fat molecules combine the reaction does stop. We like to swirl the milk using Q-tips after and watch the colors swirl.
Messy. But I think my kids would love this activity.
They will love it!
This looks like so much, and I love how it turns out. This would be a great project to take on with my four-year-old! Thanks so much for the idea!