This post contains affiliate links.
Ever since I bought a copy of The Best of Making Things: A Hand Book of Creative Discovery, originally published in 1973, I have had my eye on this project: the Salt Pendulum. I love the combination of science, art, and kinetic fun! We added the idea of using colored salt for a more vibrant project and I have to say it was worth it. Even my always skeptical son decided to join in the fun for awhile. To make your own colored salt visit my tutorial here.

How to Make a Salt Pendulum
Materials:

- Colored Salt We used (4) 26 oz. containers worth of salt
- Funnel
- String
- Thumbtacks (optional)
- Beads (optional)
- Hot Glue
- Black paper or board
- Tape
- A doorway for hanging the pendulum
Instructions:
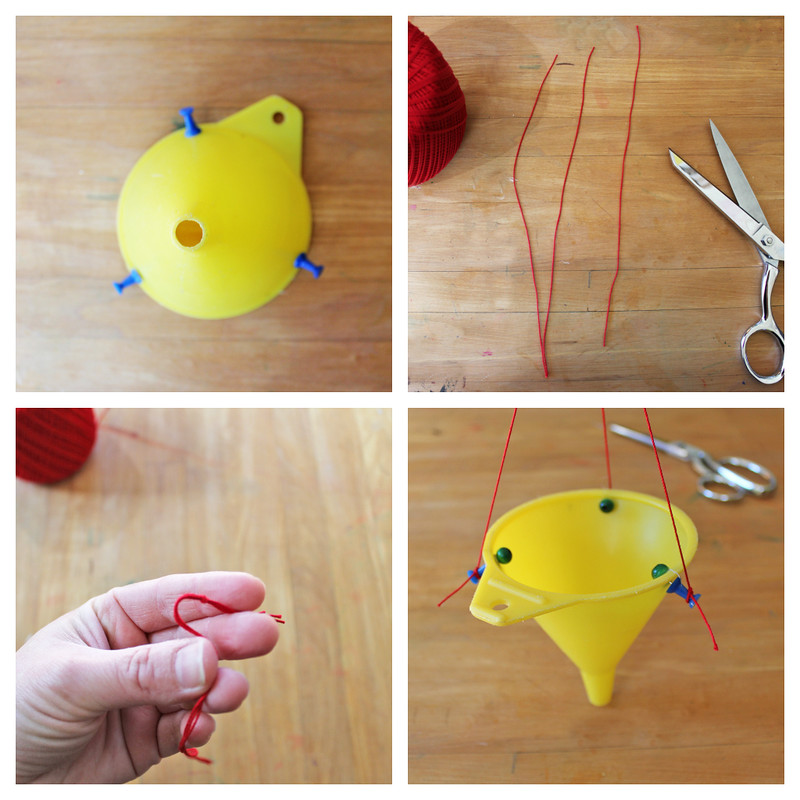
- Step One Punch three evenly spaced holes near the top of your funnel.
- Step Two If you are using thumbtacks push them through the holes and hot glue a bead onto the pointed end to protect fingers.
- Step Three Cut three equal lengths, roughly 10” to 12”, of string and knot them together at the top.
- Step Four Tie the loose ends of the strings to the thumbtacks. If you are not using thumbtacks, thread the string through the holes in the funnel, knot them securely, and add a dab of hot glue to the ends.

- Step Five Figure out where you will hang the pendulum. We hung ours outside on our porch between two hooks we have on the underside of a beam. The hooks are roughly 4 feet apart. The pendulum can easily be hung in a doorway as well. Just hang two hooks or place two nails on either side of the top of the doorframe. Because the salt is messy make sure it’s in a doorway or location you can easily clean afterwards! Once the hooks are in place tie a taut piece of string between them.
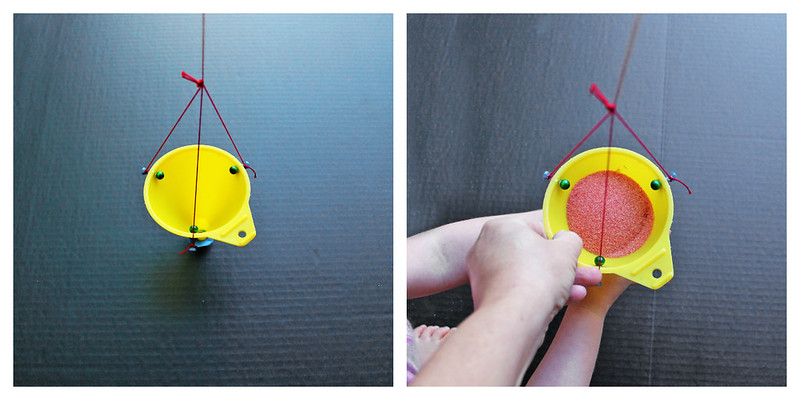
- Step Six Cut one long piece of string and tie it to the knotted strings on the pendulum. Center it on the upper cross string and tie it. Remember that the salt will weigh down the pendulum so either tape the end of the funnel shut and pre-fill the pendulum when hanging, or hang the pendulum about a foot above the floor to account for the weight of the salt.
- Step Seven Place your black board/paper underneath the pendulum
- Step Eight Tape the bottom of the funnel shut and fill it with one of the salt colors. Make sure the salt is not clumped together but nice and loose so that it easily flows out the funnel.

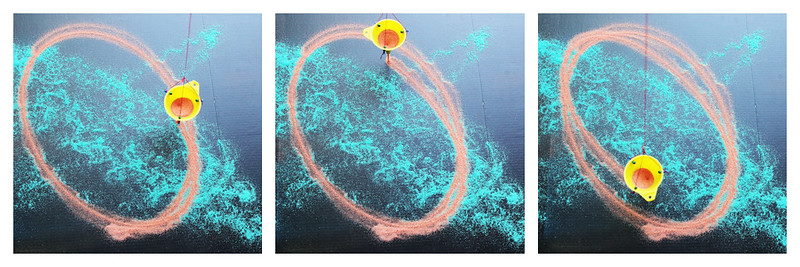
- Step Nine It’s ready! Ask your child to either untape the bottom or untape it and let them swing the pendulum gently. Off it goes!


We made several “drawings” by layering the colors of salt and changing the direction of the swing each time. When you’re ready to start fresh, empty your salt into a bowl and save it for another project. Yes, the colors will be mixed but I don’t like to waste anything!


I absolutely loved how this project turned out. It felt like we were making planetary drawings; now if I could only figure out a way to preserve them….
Enjoy!
Love this – looks great and such a brilliant way to see and talk about all sorts of different concepts.
Thank you! I love it when a project can explore different concepts in one sweet little package.
Love love love those pendulums!!!
Thank you! One of those fun little quirky projects!
I’m the Editorial Assistant for Fun Family Crafts and I wanted to let you know that we have featured your project! You can see it here:
http://funfamilycrafts.com/salt-pendulum/
If you have other kid friendly crafts, we’d love it if you would submit them. If you would like to display a featured button on your site, you can grab one from the right side bar of your post above. Thanks for a wonderful project idea!
Hi Cindy,
I’m thrilled to be included in the list of amazing crafts you have on Family Fun Crafts! Thanks so much for the features!
Ana
I remember doing this as a kid with plain sand. I can’t remember the details, but it make the oval because of the earth’s rotation (so now it’s a science project AND art!). I am thinking of trying it with poster board sprayed with tacky adhesive on the chance of preserving it. Maybe I’d follow with a coat of acrylic sealer? Then again, I might just take a picture! 🙂
Thanks for stopping by Sunny! Share a pic of your results here when you’re done! I’d love to see it!
http://en.wikipedia.org/wiki/Foucault_pendulum !
If you want to preserve it do it with a sauce bottle filled with diluted paint! You could even do the salt on top for added effects.
Sally, that is such a great idea! I love it!
it’s a great idea! you know I am thinking a layer condensed milk will work as an adhesive, it dries perfectly fine and doesn’t go bad. I am gonna try that, will let you know 😉
What a great tip! Thanks you for sharing it!
Hi,
Other than what Sunny suggested (spray adhesive and sealer), you could cover/paint a poster board with glue/mod podge and seal it with spray or contact paper. Which leads me to using just contact paper, do the drawing on it and put another contact paper on top. Obviously it can’t be to thick or it won’t work.
Hope this helps 🙂
Val
Contact paper is a wonderful suggestion!