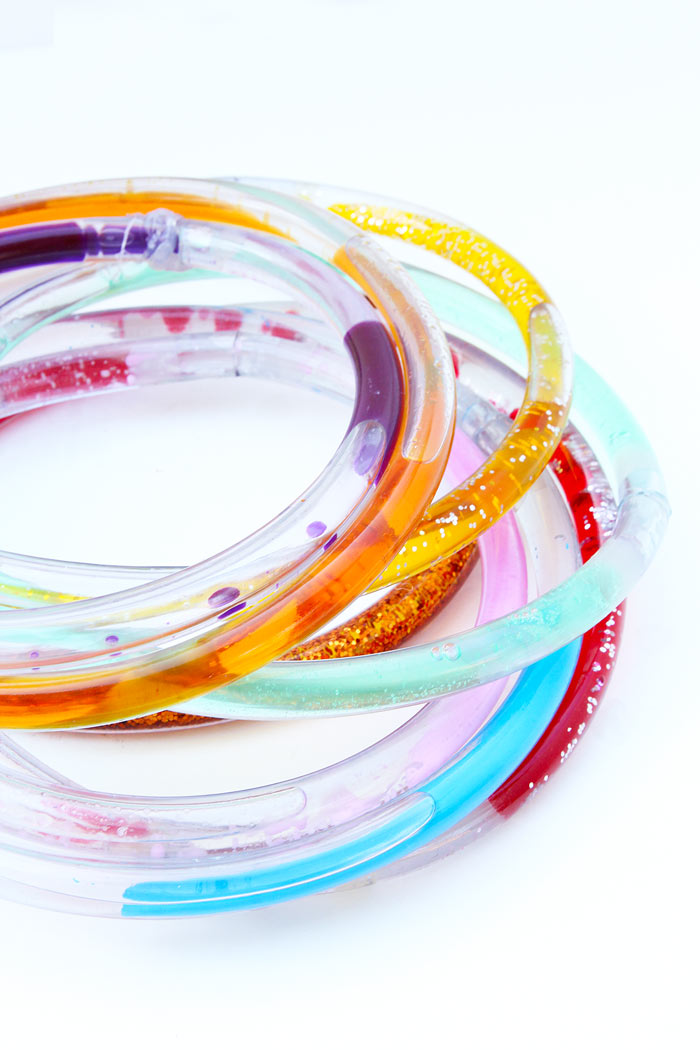
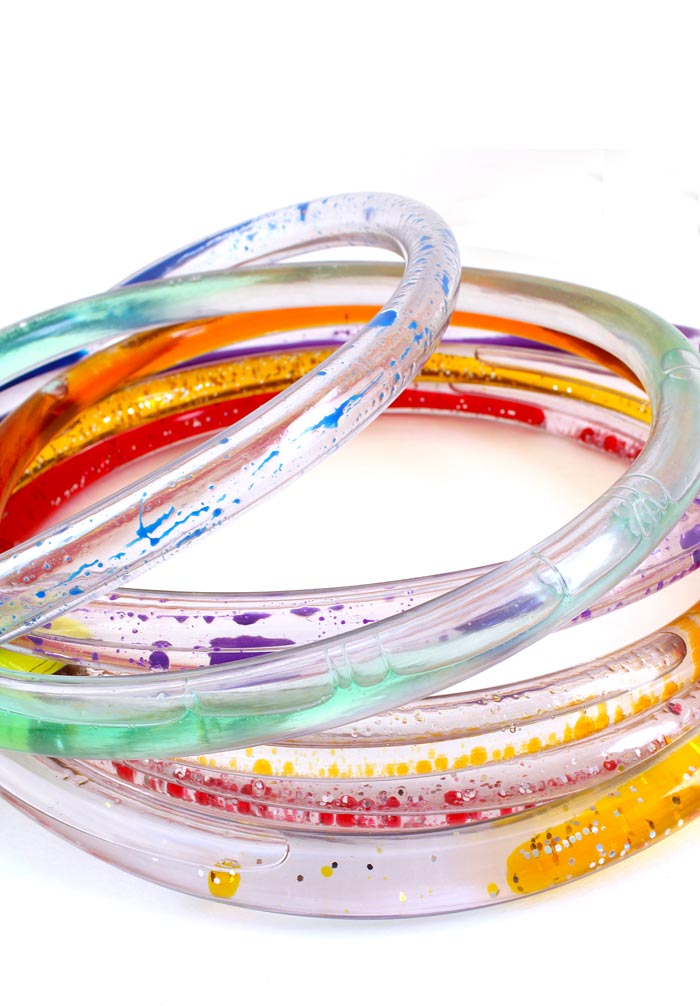
I have a soft spot for toys that teach and today’s Science Project Idea sneaks some educational concepts into a colorful, mesmerizing set of what I’d like to call Discovery Tubes.
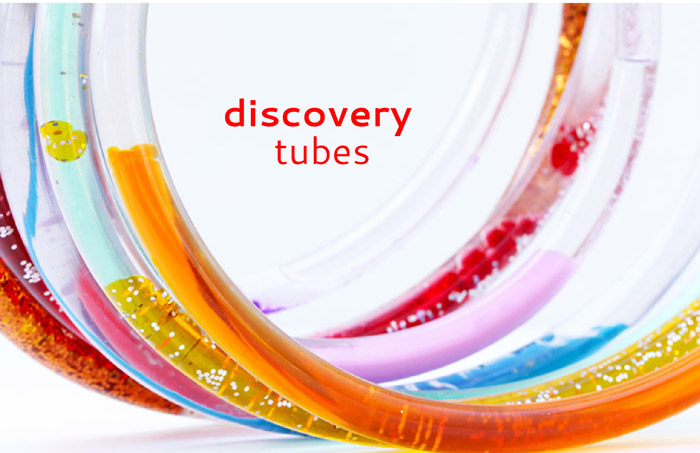
If you’ve been searching for kid’s activities in the last couple of years you certainly have seen discovery bottles. They are a fantastic idea both for sensory play and calm down activities. Essentially you fill bottles with water and assorted items and children move the bottles around to discover the items inside. We are using our Discovery Tubes to explore a few scientific concepts: viscosity, density, and polarity.
I know what you’re thinking, did she just say viscosity? You bet I did! Viscosity is a term commonly used to describe how fast a liquid moves. The higher the viscosity of a liquid, the slower it moves. Water is not very viscous while liquids like molasses and syrup are very viscous. Today we are going to put different liquids in clear vinyl tubing and see what magic unfolds….
See more science projects for preschoolers
 [clickToTweet tweet=”Make Discovery Tubes and explore three different scientific concepts in one colorful DIY toy!” quote=”Make Discovery Tubes and explore three different scientific concepts in one colorful DIY toy!”]
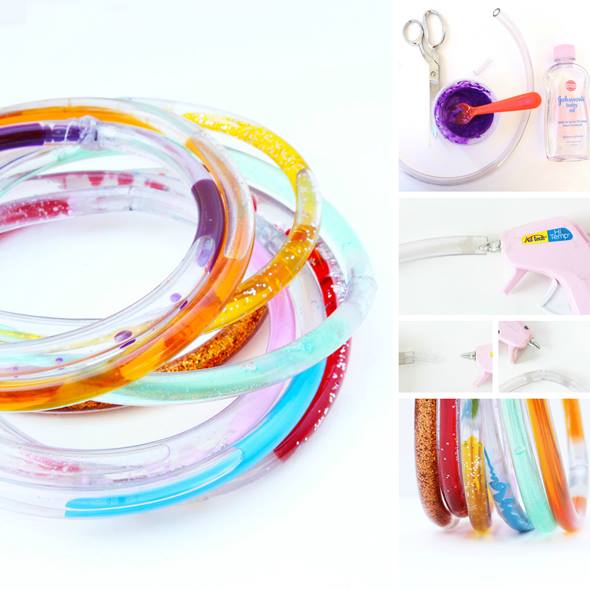
Clear vinyl tubing can be purchased here online for 75 cents/foot. You also can usually find it at your local hardware store.
This post contains affiliate links.
Science Project Idea: Discovery Tubes
Materials
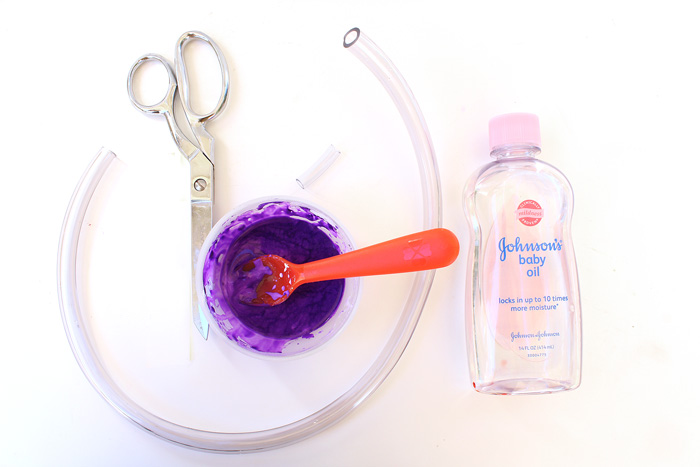
NOTE: A few readers have told me hot glue did not work for them. An alternative glue is E6000. I have not tried it but it is supposed to work with plastics and is very strong. It can be found at hardware stores or here online. Make sure to let it dry before adding the liquids to the tubes.
For the tubes:
- For the main tube: Large Clear Vinyl Tubing – we used THIS SIZE
– Cut about 22” per discovery tube
- For the plug: Thin Clear Vinyl Tubing – we used THIS SIZE.
MATCH THE OUTER DIAMETER OF THIS TUBE TO THE INNER DIAMETER OF THE LARGE TUBING– Cut about 1 ½” per discovery tube.
- Funnel (optional)
- Scissors (ADULTS ONLY)
- Hot Glue/Gun or E6000 Adhesive
To fill them:
- Baby Oil
- Corn syrup for Oobleck
- Water
- Liquid Tempera Paint
- Liquid Watercolors
- Glitter
Before you start: Have all your ingredients laid out. Once filled, the contents can easily spill out before sealing so you want to make sure your supplies are easily accessible.
If you are adding Oobleck see how to make it here: How to Make Oobleck
Instructions
Note: If using E6000 glue, add the plug to one side of the tube and fill with glue first (Step 4). E6000 needs at least 5 minutes to set.
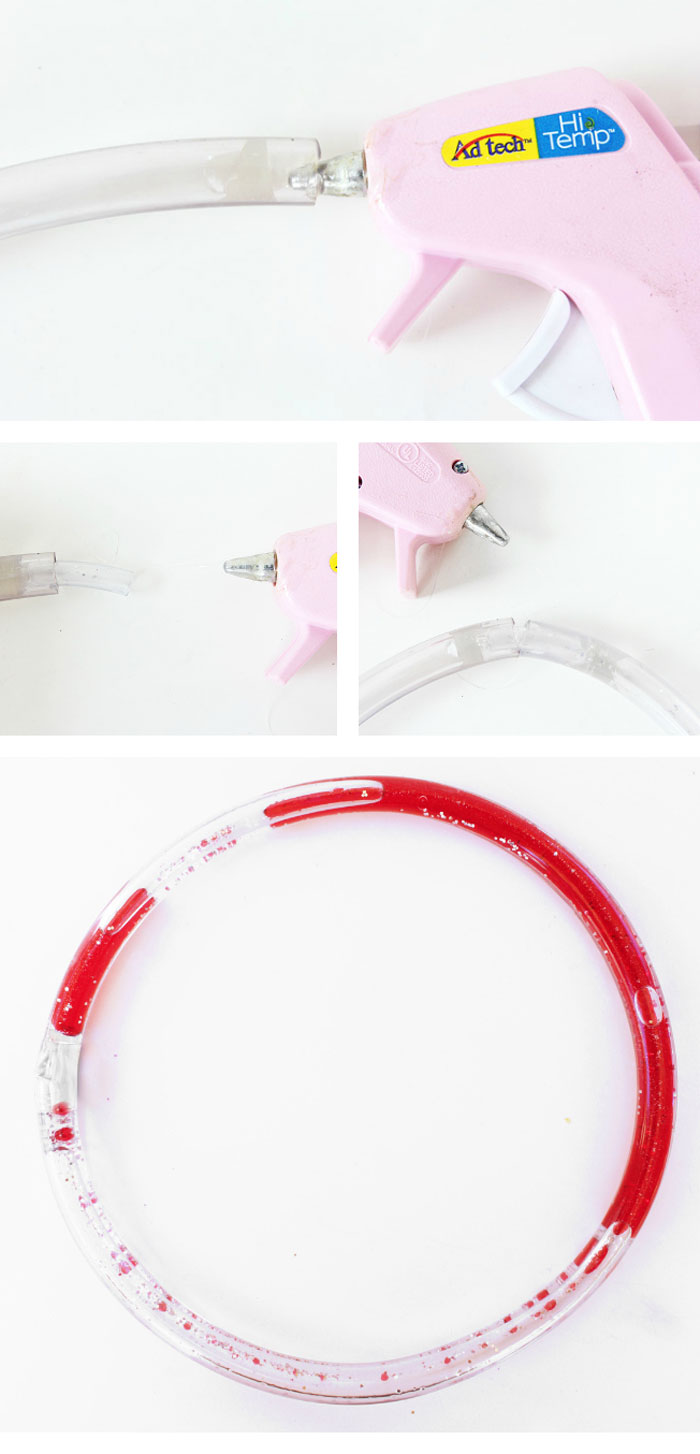
- Step One Heat up your hot glue gun. If using E6000 glue, add
- Step Two Begin filling one of the tubes. Depending on the tube you are making, you should always start with either baby oil or water to coat the inside of the tube. You can use a funnel to help channel the ingredients into the tube.
- Step Three Add your second and/or third ingredients. Be careful not to spill them on the outside of the tube. If you do spill, you can wipe the tubes off after they are sealed. Leave a small gap (about 2 inches) of air in the tube.
- Step Four Holding the open ends of the tubes up so as not to spill out the contents, squeeze hot glue into one open end of the tube. Try and fill the inside diameter of the tube. Press the ¼” diameter 1 1/2“ long section of tubing into the main tube/hot glue. Repeat this on the other open end of tubing and press together to seal. Hold while the hot glue cools.
- Step Five If desired add a little hot glue around the joint.
You’re done. Make more!
Tips:
- DO NOT SEAL THESE WITH TAPE! Before I discovered the hot glue trick I simply covered the joint with duct tape. BAD IDEA! The adhesive on tape will get moistened by the baby oil and slowly leak and make for a gooey oily mess! Stick with the hot glue.
- Even with the hot glue there is a chance that these may leak a little. I had a great success rate with the hot glue but the joints are flexible and prone to a small leak. Be sure to play with these in a place you don’t mind getting a little oily.
- If you add liquid tempera paint to your tube make sure you have coated the entire inside of the tube with baby oil first! If the inside of the tube is not coated, the paint will stick to it. Another way to prevent the tempera from sticking to the sides is to only use a small amount of paint compared to baby oil.
- We tried using multiple colors of paint and corn syrup to create a rainbow effect. Please note that if you try this the colors will end up mixing together at some point.
- If you want to remake a tube simply trim the ends off, rinse out and start over!
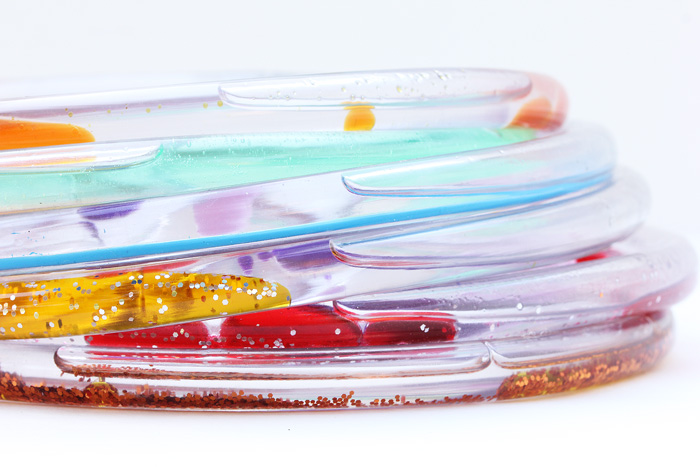
Combinations
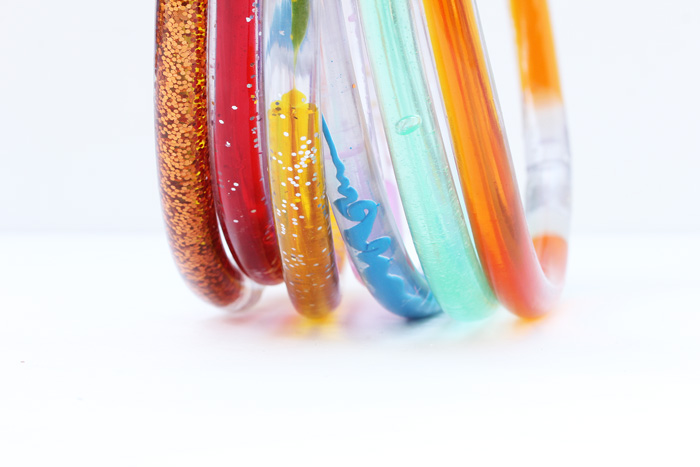
Note: To color our water, corn syrup, oobleck and rice we used these watercolors.
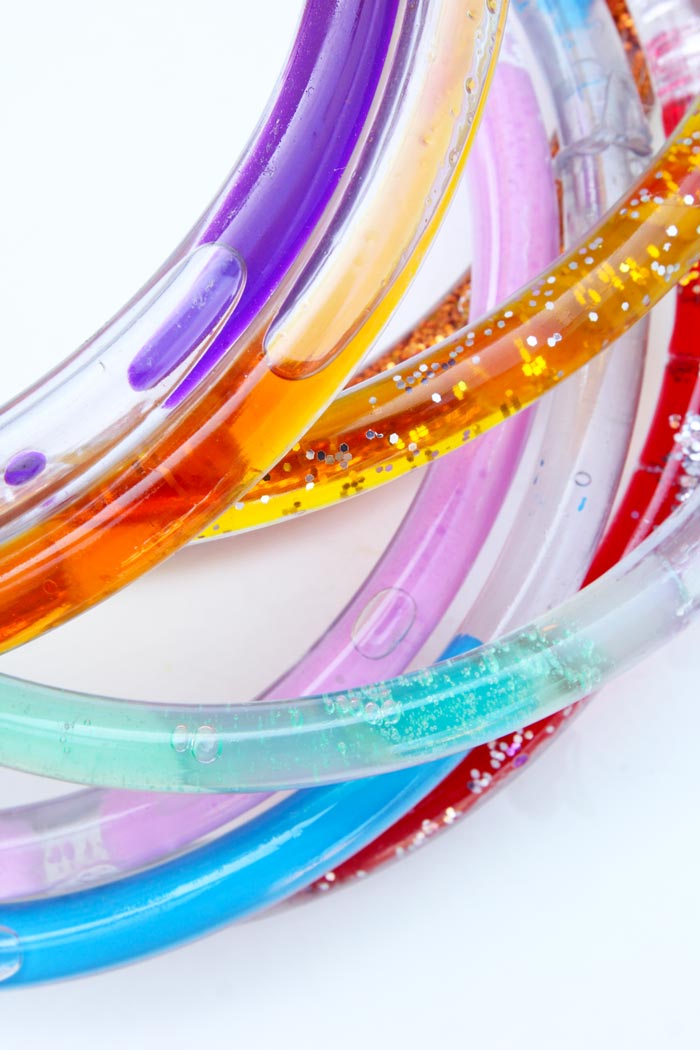
- Baby Oil + Colored Water (add glitter too)
- Baby Oil + Colored Dish soap + Clear corn syrup
- Baby Oil + Colored corn syrup + glitter
- Baby Oil + Tempera paint (add only a little paint and be sure to coat the inside of the entire tube with baby oil first!
- Baby oil + colored oobleck
- Water + Perler Beads + Dish soap
- Baby Oil + Colored Rice
There are so many variations to try, if you have any good ideas please leave comment below!
Scientific Concepts Explored:
Viscosity
As I mentioned at the beginning of this post our Discovery Tubes are a great way to illustrate the concept of viscosity to kids! Viscosity is the measure of friction in a liquid and determines how fast or slow a liquid flows. Water has a low viscosity and flows quickly while liquids like corn syrup, soap, molasses, and lava have a high viscosity and move slowly. Putting liquids of different viscosities together in a tube is a great visual display of viscosity. And did you know that beyond being a scientific term viscosity is something many artists think about? Check out this video from the Khan Academy illustrating different methods of changing the viscosity of paint.
 Polarity & Density
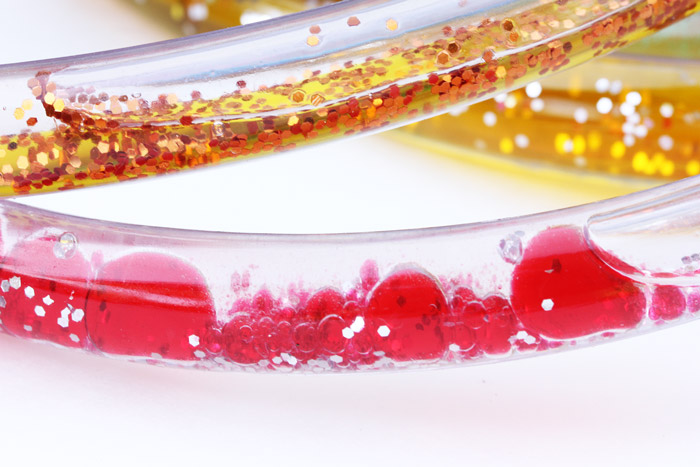
Discovery Tubes are also a great way to demonstrate two more scientific concept to kids: density and polarity. Density and polarity are the reasons that oil and water don’t mix and instead make for an incredible display of dancing bubbles in the tubes where we used baby oil and water.
Density is the measure of how heavy the particles that make up a substance are and how close the particles are together. Water and oil have different densities: the molecules of water are very densely packed making each drop heavier than each drop of oil. When you put water and oil together, the water sinks to the bottom and the oil floats on top.
Polarity is a pretty hefty concept to explain but let’s simplify it by saying that certain molecules are attracted to or repel other molecules, similar to the way magnets behave only on a microscopic level. In chemistry substances with SIMILAR AMOUNTS of polarity are attracted to each other (magnets differ in that they are attracted to opposite poles). Water molecules are polar and oil molecules are not, so the water molecules are attracted to each other and push the oil molecules out of the way to get to each other, hence oil and water don’t mix. Here is a more detailed explanation of both polarity and density in chemistry for kids.
Looks Like
Stanley William Hayter. Stanley William Hayter was an artist and printmaker who worked in Paris and New York and collaborated with many well known moderns artists to help them incorporate printmaking into their repertoire. He worked with the likes of Picasso, Mark Rothko, Wassily Kandinsky and Jackson Pollock on limited edition prints. He was also an artist in his own right, creating 400 original prints in his lifetime. Mr. Hayter is also credited with developing the art technique called viscosity printing, which is why we are talking about him here today. Before he invented this print making technique, different colors on a single print had to be laid down in separate presses. Viscosity printing exploits the different viscosities of paint and allows you to make a print with different colors in one single press. I love it when science and art come together like that!
I hope you liked toy that teaches!
Even if you don’t feel like getting into the nitty gritty of the science behind this project Discovery Tubes are just fun to watch! And I love it when science for kids is presented in a mesmerizing and colorful way.
Are you passionate about raising creative kids?
Join over 14,890 parents and educators who want connect with kids and nurture their creative process through magical, easy projects you can do TOGETHER.
Send me awesome creative project ideas!
Oh my!!!! Beautiful activity, can’t wait to try it out, but please change your explanation wherever you mention viscosity!!!!!!! Viscosity is RESISTANCE to flow, so the more viscous a fluid is, the more SLOWLY it will flow. Molasses has high viscosity while water has low viscosity. You kid’s future science teachers will thank you, firstly for being so daring and forward thinking to incorporate explorations of viscosity into their learning, and secondly for learning proper terms and using them correctly! 🙂
Mad props for the activity, thanks for sharing!
Actually I’m slightly edgy about the explanations of density and polarity, but to be fair those are REALLY difficult to explain in plain-speak, and I’ve taught these concepts to my chemistry students for years so I do appreciate how clear you’ve tried to make the explanation. Do pop me an email though if I can help clarify in any way, either on these or other science topics! I love getting my hands wet, I miss my classroom and would love to help!
Divya,
Thanks for pointing out my error! I corrected the description of viscosity, I’d love to hear if you think it’s all in order. And I’d love to hear your explanations of polarity and density, I try hard to make these concepts easy to understand especially for kids but they are pretty heavy concepts. I’ll shoot you and email and appreciate the once over!
We tried to make liquid inside , but finally not the same as vdo, how much to use baby oil? One spoon or two spoon? How do we start to mix ingrediant. Pls kindly advice
It’s hard to say an exact amount but fill the tube with baby oil leaving a few inches of air so everything can flow.
I don’t know much about viscosity, but I do know this post freaking ROCKS and I want to live in a world of discovery tubes and teletubbies. Don’t they go hand in hand? These are so cool Ana and the video is UNREAL and I love all the pics. Just awesome awesome awesome!
These are ah-mazing!!! Just showed them to our preschool teacher and I bet we will have them by this Monday 🙂
Yay! Did you guys make them?
Oh my goodness, these are fantastic!!
How beautiful! We have made a few calm down bottles/discovery bottles, but these are awesome! And, we actually have tubing downstairs… I knew there was a good reason to keep it! Going to have to give this a try!
seriously? you are incredible. the video is literally amazing!! bravo (clapping hands)!!!
WOW these are amazing Ana!!!! totally awesome!!
Thank you Kristen!
This is simply Outstanding!!! Will make awesome gifts for thrilled babies and children alike! Applause Applause!!!! Sharing!!
Thank you so much!
We made these and they are awesome! We made a small change though. We uses E6000 glue to put the smaller tubes in. It’s silicone and flexible. Works perfectly! We cleaned the oil off the inside of the end of the tube with a q tip dipped in rubbing alcohol.
THANK YOU for this suggestion Deanne! I just bought some E6000 and it worked so well! I’m going to update the post to let everyone know. I appreciate your tip!
Can I use canola oil in place of baby oil, trying to use what I have on hand..
It should work too but will have a yellow tint 🙂
Wow, excellent ideas to make with my kids! Thanks!
You’re welcome Heidy!
want to know can you make glow stick tubes thank can you do this in preschool
just want to know can you do glow sticks this is soooo awsome
Did you try that? Send a pic!
Hi,
Do I need Corn Syrup AND Corn Starch In the materials area you say corn Syrup for Ooblek but in the how to make area you say Cornstarch. In the fill area you say Corn Syrup.
We are making these today! I have everything exceptt Corn Syrup. We love your website! Its made our homeschool so FUN!!